Ever find yourself battling for counter space or struggling to keep your small kitchen organized? You’re not alone! Small kitchens are charming but can be tricky to keep tidy, which is why innovative organization ideas are so popular—they turn limited space into a functional paradise.
In this article, you’ll discover a variety of clever tips and tricks to maximize your kitchen’s potential. From space-saving storage solutions to creative layout hacks, these ideas will help you create an efficient, clutter-free environment that makes cooking and cleaning a breeze. Get ready to transform your small kitchen into a well-organized haven!
1. Use Clear Stackable Containers for Dry Goods
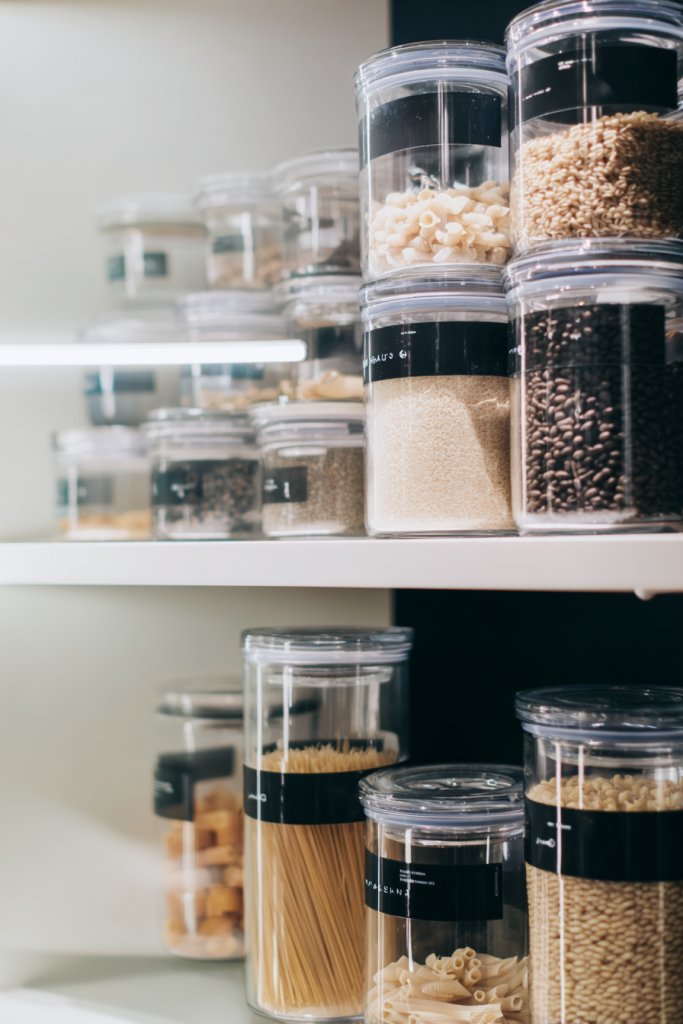
Ever open your pantry and feel like you’re staring into a sea of mismatched bags and jars? Keeping dry goods organized in small kitchens can be a real challenge, especially when everything ends up shoved in the back or buried under clutter. The dream? A tidy, easy-to-navigate storage system that makes grabbing snacks or ingredients a breeze.
Picture a row of uniform, transparent containers neatly stacked on a shelf. You see colorful cereals, grains, and nuts all in matching jars, each with a clear label or a quick glance. Their sleek shapes and consistent sizes create a visual harmony that’s calming and satisfying. It’s like turning chaos into a curated display of your favorite snacks and staples.
Choose airtight, BPA-free containers for freshness, or go for vintage glass jars for a rustic look. For small spaces, stackable or modular containers maximize vertical storage. Use color-coding or labels to categorize items, especially if you stock multiple types of pasta or grains. During holidays or seasons, swap out labels or add festive touches to keep things fresh and fun.
Start by sorting your dry goods into categories—cereals, flours, snacks, spices. Invest in clear, stackable containers with tight-sealing lids that are easy to open and close. Label each container with a waterproof label or a chalkboard sticker for easy updates. Arrange the containers on open shelves or inside cabinets where they’re visible and accessible. Regularly check and refill to keep your pantry neat and functional.
Personalize your containers with custom labels or decorative touches like colored lids or patterned tapes. Mix and match container shapes to suit your space or aesthetic, from sleek rectangles to round jars. Consider adding a lazy Susan for bulkier items or a tiered shelf for small containers. This way, every item has its place, and your kitchen feels more inviting.
Using clear, stackable containers turns your pantry into a visually appealing and highly functional space. No more digging through bags or guessing when you’re out of supplies. Plus, it’s a simple upgrade that adds a touch of organization magic—your future self will thank you every time you open the cabinet.
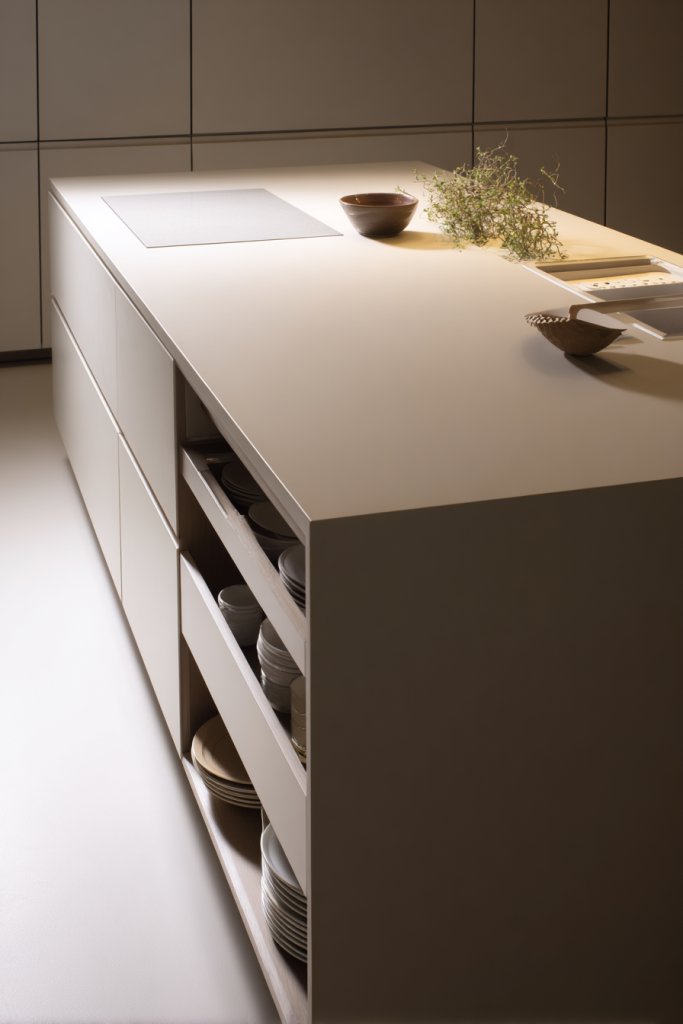
2. Incorporate Pull-Out Shelves in Lower Cabinets for Easy Access
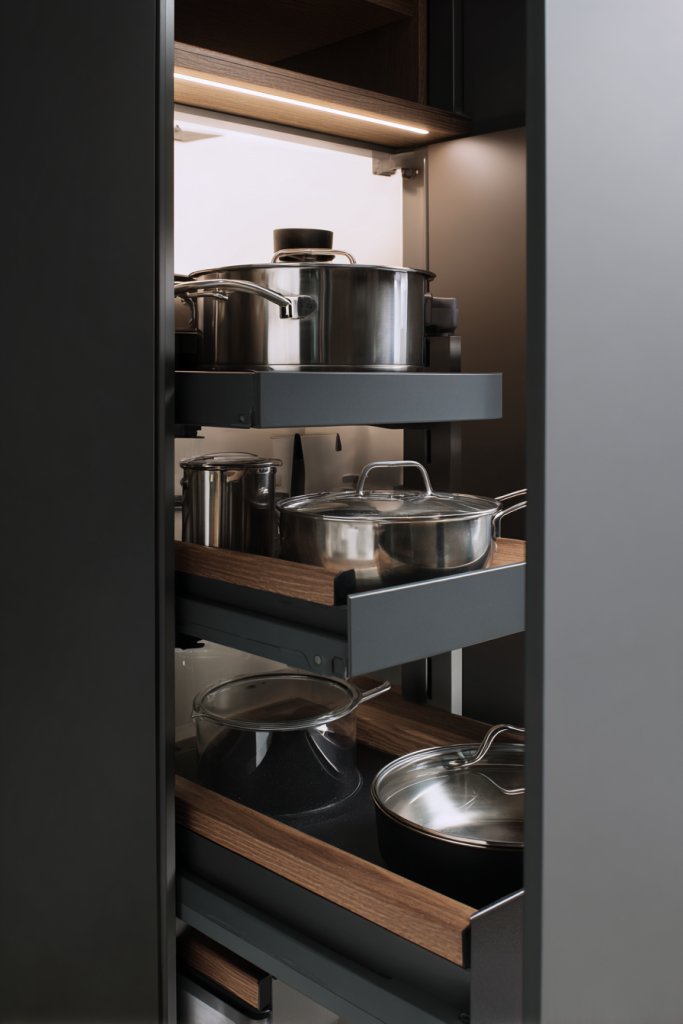
Bending, kneeling, or crawling into bottom cabinets to find that elusive saucepan can turn cooking into a workout. Small kitchens often lack proper organization, making it a struggle to access pots, pans, and small appliances quickly. Who wants to waste time rummaging when meal prep should be smooth and effortless?
Imagine opening a lower cabinet and pulling out a smooth sliding tray that reveals neatly stacked pots and lids. The tray glides effortlessly, revealing everything at your fingertips. The metal or wooden rails blend seamlessly into the cabinet, creating a sleek and functional look. It’s like having a personal assistant organizing your kitchen gear.
Opt for wire or wood shelves based on your aesthetic—wire for industrial or minimalist styles, wood for warmer, rustic vibes. Adjustable pull-out shelves allow customization for different item heights. For tiny kitchens, narrow or single-depth trays maximize space, while larger cabinets can hold double or triple-tiered systems. Consider adding soft-close mechanisms for a quiet, smooth experience.
Begin by measuring your cabinet dimensions and choosing compatible pull-out shelf hardware. Install the slides securely to ensure stability, then attach your shelves—metal, wood, or acrylic—using screws or brackets. Organize your pots, pans, and small appliances on these trays, grouping similar items together. Regularly check for smooth operation and tighten hardware as needed. Labeling or color-coding can further enhance quick identification.
Customize by adding cushioned liners or decorative trims to match your kitchen decor. Use different shelf heights to accommodate various items, from small baking tools to large stockpots. Incorporate soft-close features or add a handle for easier pull-out action. This not only makes your kitchen more functional but also adds a polished touch.
Pull-out shelves eliminate the frustration of reaching deep into cabinets. They make your kitchen safer and more efficient, especially if mobility is a concern. With just a few tools and some planning, you can turn your cluttered lower cabinets into organized storage that feels like a luxury upgrade.
3. Hang a Magnetic Knife Strip on the Wall
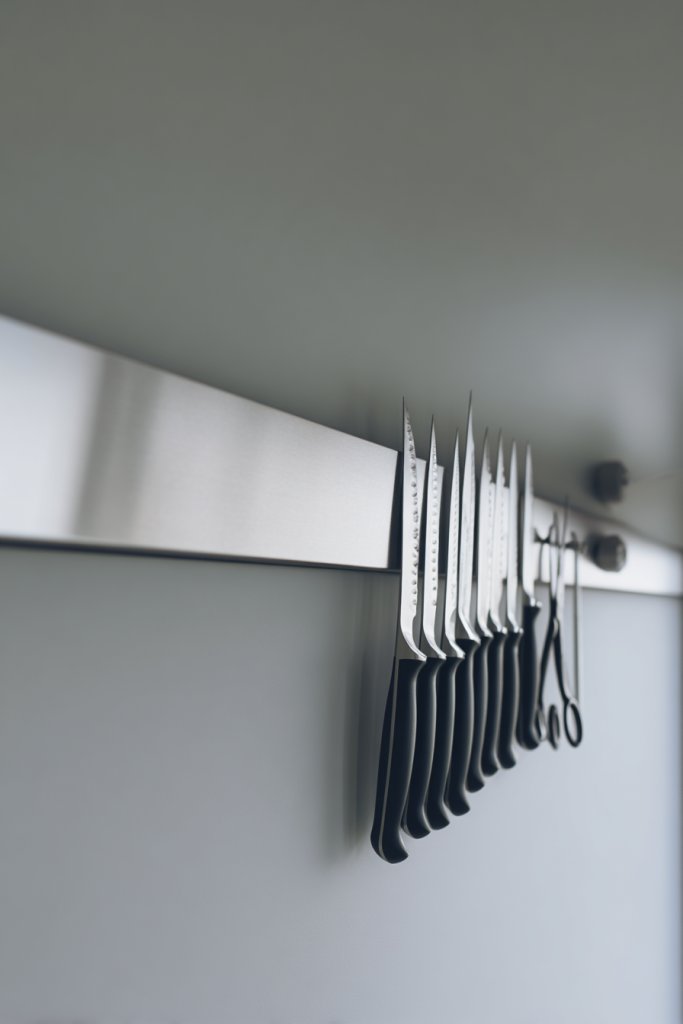
Knives cluttering up your countertop or stuffed into drawers are a safety hazard and a space hog. Small kitchens often lack dedicated storage for sharp tools, making it hard to keep blades within reach yet out of harm’s way. Who wants to dig around in a cluttered drawer to find the right knife?
Picture a sleek, stainless steel or magnetic strip mounted horizontally on your backsplash or wall. Sharp blades are securely held in place, ready to grab at a moment’s notice. The strip blends into your kitchen decor, whether modern or rustic, keeping your workspace tidy and safe. It’s a simple, stylish upgrade that transforms knife storage into an artful display.
Choose from metal, wood, or magnetic strips that match your kitchen theme. For a farmhouse look, opt for distressed wood, while a modern kitchen might favor stainless steel. Mount it at a height that’s comfortable for your use, or place it above your prep area. You can also add small hooks or clips for scissors or utensil holders, making everything easily accessible.
Measure your wall space and purchase a magnetic strip or metal bar with sufficient length. Mount the strip using screws or strong adhesive, ensuring it’s level and secure. Organize your knives by size or use, keeping the most-used blades at the front. Regularly check for magnet strength and remove dust or debris that can weaken hold. This simple step keeps your knives sharp, safe, and clutter-free.
Decorate the strip with a decorative edge or paint it to match your kitchen accents. Use labeled magnetic clips for specialized knives or tools, making organization even easier. Incorporate a small magnetic holder for metal utensils or a magnetic knife sharpener for added functionality. Personal touches turn this practical solution into a charming focal point.
This minimal effort upgrade boosts safety and efficiency in your kitchen. It clears precious counter space and keeps blades sharp and within easy reach. Plus, it’s a DIY project anyone can do—no fancy tools required. Ready to turn chaos into order with a simple magnetic strip?
4. Utilize Under-Shelf BDOOR Storage Hooks for Small Items
Are your mugs, measuring cups, and dishcloths taking up prime drawer or counter space? Small kitchens often struggle with maximizing every nook and cranny. The frustration of cluttered surfaces can turn cooking into a game of Tetris. The solution? Efficiently use every inch beneath your shelves.
Visualize a sturdy hook installed underneath an open shelf or inside a cabinet. Mugs hang neatly upside down, with measuring cups stacked or hanging from hooks, and dishcloths drape over a bar. This setup keeps essentials within arm’s reach while freeing up drawer space. The hooks are discreet but highly functional, adding a layer of organized charm.
Choose hooks that blend with your decor—metal for modern, painted wood for rustic, or silicone-coated for safety. Install them at different heights to accommodate various item sizes. Use labeled hooks for specific items or group similar items together for a cohesive look. During seasonal changes, swap out or reposition hooks for new functionality.
Measure the underside of your shelves or inside cabinets for the best hook placement. Securely attach hooks using screws or adhesives, making sure they can support the weight of mugs or cloths. Organize your small items on the hooks, grouping by function or frequency of use. Regularly check for stability and replace worn hooks as needed. It’s a quick, effective upgrade that makes a big difference.
Add decorative hooks with unique designs or colors to match your style. Use a combination of hooks and small baskets for a layered, textured look. Label hooks with chalk or adhesive tags for quick identification. Personalizing this space turns a simple hack into a custom organization station.
This under-shelf hook system transforms underutilized space into a functional, clutter-free zone. It’s a smart way to keep your essentials organized and accessible. Best of all, it’s an easy DIY project that offers instant gratification—your kitchen will thank you.
5. Create a Dedicated Spice Drawer with Organizer Inserts
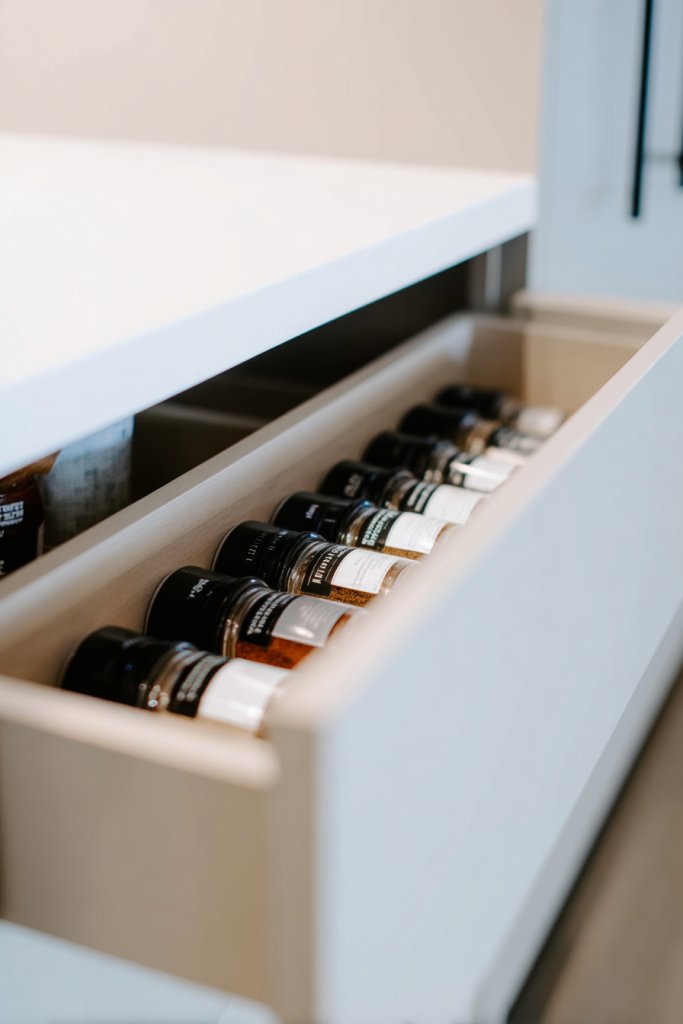
Spice jars rolling around in a drawer or stacked in a chaotic pile make cooking feel like a treasure hunt. Small kitchens often lack the space for a full spice rack, yet spices are essential for flavoring every dish. The goal? A compact, organized spice station that’s easy to navigate.
Imagine pulling out a shallow drawer and seeing all your spice jars neatly aligned in custom inserts. Each jar is visible and accessible, with labels facing up for quick identification. The inserts keep everything in place and prevent jars from tipping over. It’s like having a mini spice shop right inside your drawer, blending function with sleek design.
Choose adjustable or modular inserts to fit your drawer size and spice jar collection. For a minimalist look, opt for clear plastic or bamboo trays that match your decor. During holidays, swap labels or add seasonal spices for a fresh touch. For small kitchens, consider stacking or tiered inserts to maximize space.
Measure your drawer’s dimensions and select compatible spice insert organizers. Install the inserts securely inside the drawer to prevent shifting during use. Arrange your jars alphabetically or by frequency of use, adding labels if necessary. Regularly check for empty jars or expired spices and refresh your collection. This setup simplifies cooking prep and keeps your spices visually appealing.
Personalize your spice drawer with themed labels, colorful containers, or decorative trims. Use magnetic or clear labels for quick identification. Add small measuring spoons or scoops for convenience. Incorporate a small chalkboard or dry erase label for special blends or notes. Customization makes your spice drawer both functional and fun.
A dedicated spice drawer transforms clutter into clarity, making cooking more enjoyable. You’ll save time hunting for that elusive cumin or paprika. Plus, it’s a simple, inexpensive upgrade that elevates your entire kitchen organization game. Ready to spice things up?
6. Use Wall-Mounted Rails with Clips for Utensils and Tools
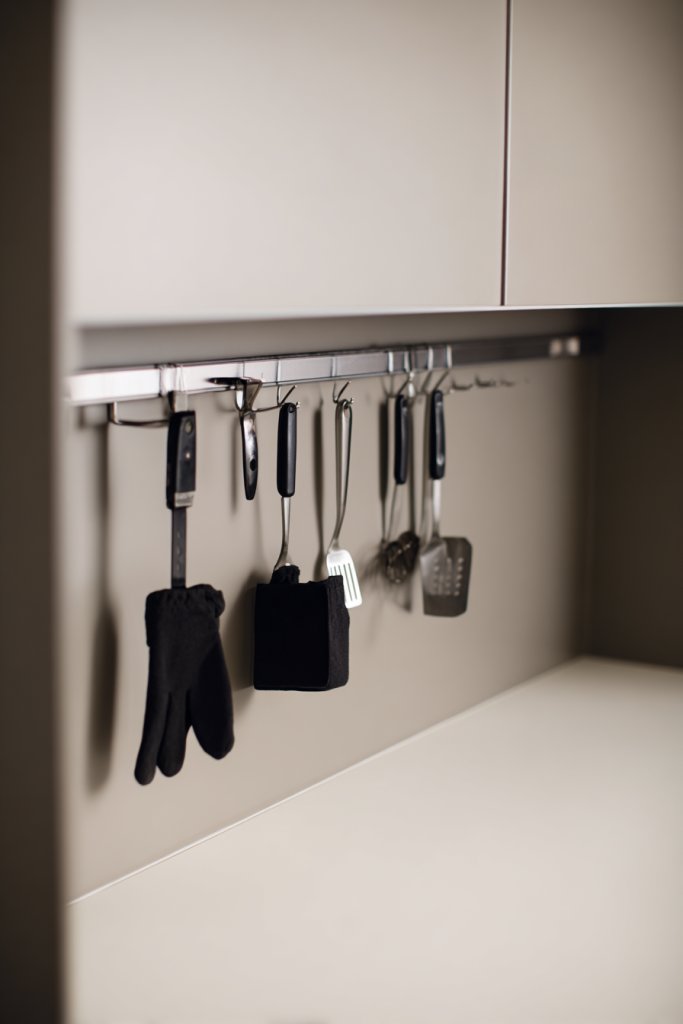
Counter space is precious, and kitchen tools often clutter your prep area, making cooking feel chaotic. Small kitchens need a smart way to keep utensils, oven mitts, and tools at hand without sacrificing valuable surface area. The trick? Wall-mounted rails that turn clutter into organized art.
Visualize a sleek metal or wooden rail mounted just above your stove or on the backsplash. Clips or hooks hang from the rail, holding spatulas, ladles, and even oven mitts in place. The tools are displayed neatly, and everything is within easy reach. The clean, minimalist look adds a modern, functional touch to your kitchen.
Select rails that match your decor—brushed metal for industrial, painted wood for rustic, or sleek stainless steel for contemporary. Use different hook sizes to accommodate various tools. For seasonal decor, swap out hooks or add decorative elements like colorful clips or labels. Mount at a height that’s ergonomic for daily use.
Measure the wall space where you want to install the rail. Mount the rail securely with screws, ensuring it can handle the weight of your tools. Organize utensils by type or frequency of use, hanging them accordingly. Regularly check for loose hooks or wear, replacing or repositioning as needed. This setup keeps tools off countertops and out of drawers, freeing up space.
Add decorative elements like painted or textured rails, or color-coded clips for different utensil types. Incorporate small hanging baskets or magnetic strips for additional storage. Label sections or hooks for family members or specific tasks. Personalizing this setup makes your kitchen more efficient and inviting.
Wall-mounted rails simplify your cooking routine and reduce clutter. They keep essential tools visible and within easy reach, speeding up meal prep. Plus, they add a sleek, organized look that’s easy to maintain—no more digging through drawers or cluttered counters.
7. Incorporate Slim Rolling Carts for Flexible Storage
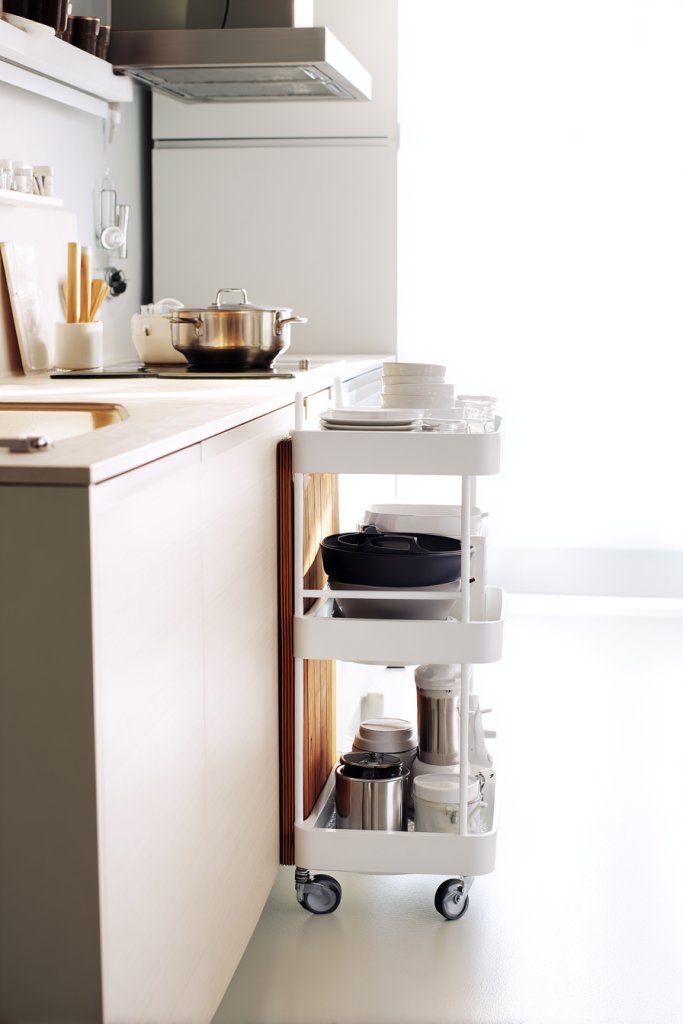
Limited space often means sacrificing storage or having to cram everything into tight corners. Small kitchens need a flexible solution that can move around and store multiple items without taking up permanent space. Enter the slim rolling cart—your new best friend in organization.
Picture a narrow, wheeled cart tucked between the fridge and counter or beside a small sink. It holds pots, pans, cleaning supplies, or snacks, and can be moved effortlessly for cleaning or rearranging. The cart’s sleek design makes it a versatile addition that blends into any decor, from modern to vintage.
Choose carts with multiple tiers, baskets, or drawers based on your needs. For a cohesive look, pick colors or finishes that match your kitchen’s aesthetic. Use them seasonally—for example, store holiday baking supplies during the off-season. For bigger kitchens, multiple carts can create a mobile storage island.
Identify the best spots for your cart—tight spaces or corners that need extra storage. Select a cart with sturdy wheels and a durable surface. Organize items by category, stacking or grouping for easy access. Regularly clean and check wheels for smooth movement. Label sections for quick retrieval, and consider locking wheels for stability.
Decorate your cart with decals, paint, or fabric liners to match your style. Use baskets or bins on the shelves to contain smaller items. Add hooks or hooks for hanging utensils or tools. Personal touches turn a simple storage cart into a stylish, functional addition.
Slim rolling carts add flexibility and extra storage without permanent fixtures. They’re perfect for seasonal storage, entertaining prep, or everyday organization. With minimal effort, you’ll create a more spacious, efficient kitchen that adapts to your needs.
8. Maximize Corner Space with Lazy Susan Turntables
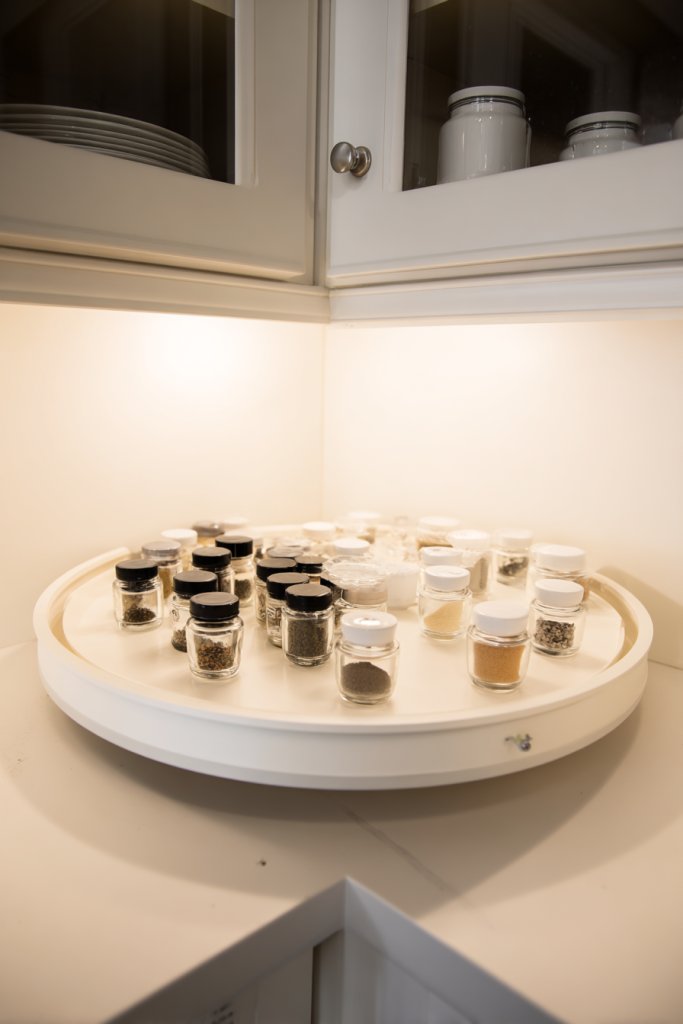
Corners in kitchens are notorious black holes—hard to reach, hard to see, and often wasted space. Small kitchens desperately need a way to make these awkward spots functional without cluttering the main counters. The answer? Lazy Susan turntables that turn corners into treasure troves.
Imagine a round, rotating shelf inside a corner cabinet filled with spices, oils, or baking supplies. With a gentle spin, everything is visible and accessible, eliminating the need to dig through clutter. The smooth turn of the Lazy Susan adds a touch of elegance and convenience, transforming a dead zone into a dynamic storage space.
Choose from wood, acrylic, or metal versions depending on your style. For a rustic look, opt for distressed wood; for a modern vibe, sleek acrylic works best. Use multiple tiers for larger items or small baskets placed on the turntable for added organization. Incorporate color or labels for quick identification.
Measure your corner cabinet’s dimensions and purchase a Lazy Susan that fits snugly inside. Install the turntable securely, ensuring it spins smoothly without wobbling. Organize your items by category—spices, baking tools, or canned goods—inside the turntable. Regularly clean the surface and check for stability. Label sections if needed for quick access.
Add decorative trims, painted finishes, or personalized labels to match your kitchen decor. Use small baskets or containers on the turntable for smaller items. Incorporate anti-slip mats for stability and noise reduction. Personal touches make corner storage both functional and stylish.
Maximizing corner space with Lazy Susan turntables makes your kitchen look organized and feels more spacious. It’s a simple upgrade that delivers big results, especially in tight spaces. Once installed, you’ll wonder why you didn’t do it sooner—welcome to smarter storage!
9. Install Magnetic or Pegboard Wall Panels for Accessories
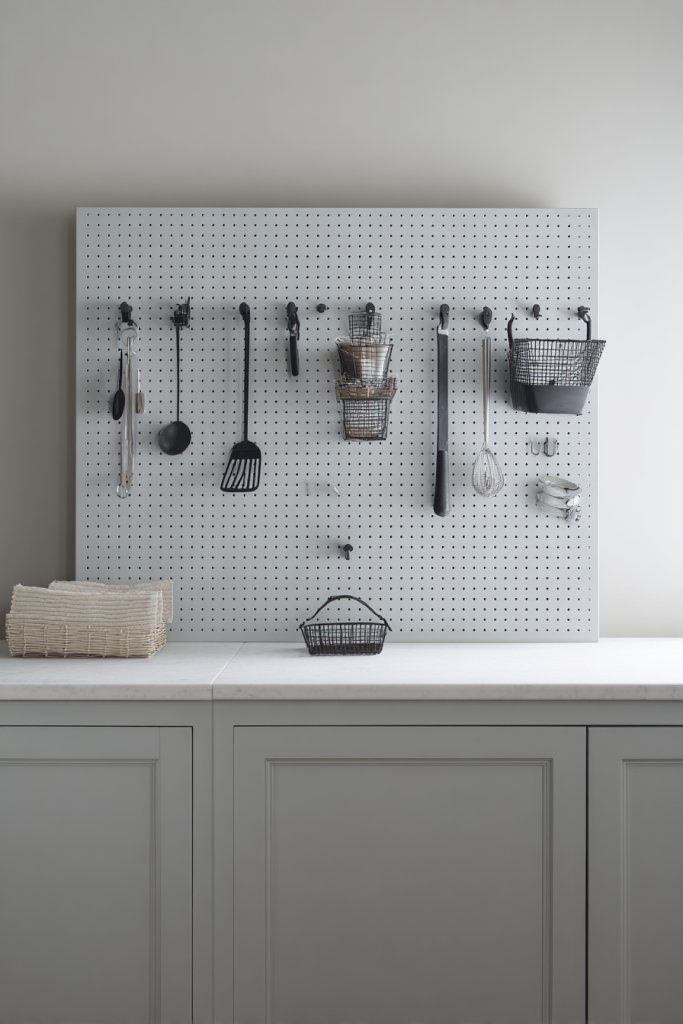
Cluttering countertops with utensils, baskets, and tools makes cooking feel chaotic and overwhelming. Small kitchens need a way to keep essentials visible, accessible, and off the work surface. The fix? Wall-mounted magnetic or pegboard panels that turn blank walls into functional storage hubs.
Visualize a sleek pegboard or magnetic panel mounted above your prep area or near your stove. Utensils hang neatly from hooks, while baskets hold small tools or spices. The arrangement looks organized yet stylish, with a variety of hooks and containers that can be customized. It’s like having a personal display wall for your kitchen essentials.
Choose between metal magnetic boards or wooden pegboards, depending on your decor. Use colorful hooks, baskets, or labels to add personality. Mount the panels at different heights for visual interest and ergonomic access. During seasons or holidays, swap out hooks or add decorative elements for a fresh look.
Locate a suitable wall space and install the panel securely with screws or strong brackets. Arrange utensils and tools by category or usage frequency. Use labeled baskets or hooks for small items like measuring spoons or bottle openers. Regularly check for loose hooks or dust buildup, and reorganize as needed. This setup keeps everything within reach and clutter-free.
Decorate with painted frames, colorful hooks, or themed accessories. Incorporate small containers or magnetic strips for knives or spice tins. Use labels or chalkboard tags for quick identification. Personal touches turn a practical wall panel into a creative, organized feature.
Wall-mounted panels turn chaos into convenience, making your kitchen more functional and attractive. They free up counter space and prevent clutter from piling up. With just a few screws, you can dramatically improve your kitchen’s efficiency and style.
10. Use Stackable Drawer Dividers for Cutlery and Small Items
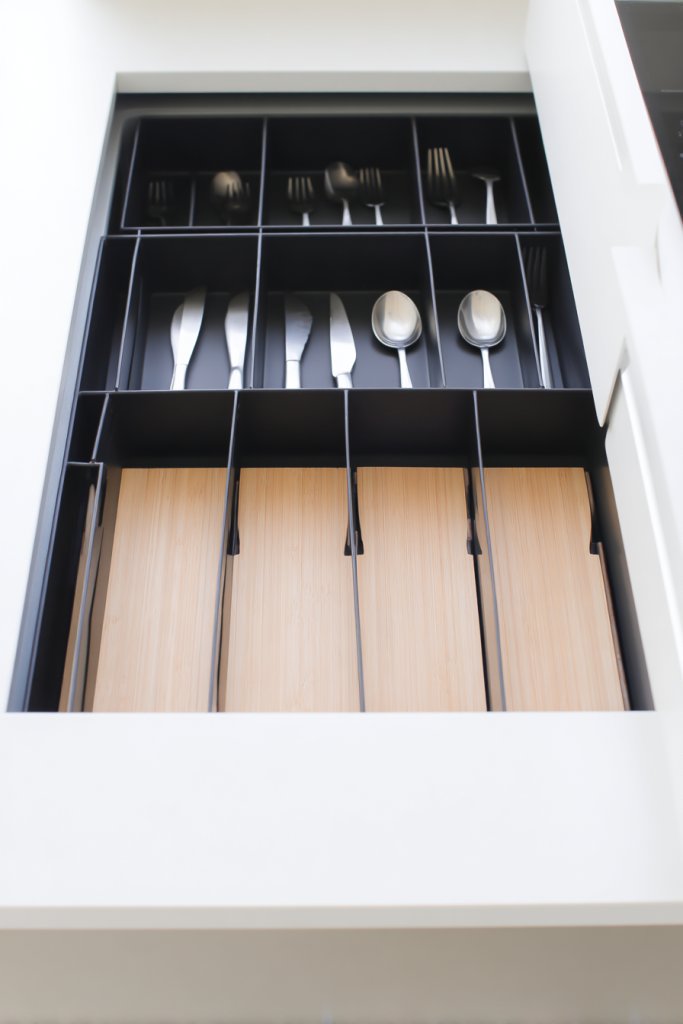
Dishes and utensils jumbled together in drawers make finding what you need a frustrating game of search and rescue. Small kitchens often lack dedicated storage, so every item needs to have its place. The solution? Adjustable stackable dividers that turn cluttered drawers into organized, neat compartments.
Imagine opening a drawer where silverware and gadgets are separated by clear, adjustable dividers. Each section holds a specific category—knives, forks, spoons, or small kitchen tools—so everything is immediately visible. The dividers can be customized to fit your drawer size and storage needs, creating a tidy, compartmentalized display.
Choose from plastic, bamboo, or metal dividers based on your decor and durability preferences. Use different colors or labels for categories, especially if you have a large collection of gadgets. During seasonal changes, reorganize items or add new compartments to suit your evolving needs.
Measure your drawer’s dimensions and purchase adjustable dividers accordingly. Install the dividers, then organize utensils, gadgets, and small tools into each section. Regularly clean and reassess the organization—don’t let clutter creep back in. Label sections if needed for quick retrieval, and replace or reposition dividers during deep cleans.
Decorate dividers with colorful tape, decals, or engraved labels. Mix materials—bamboo for a natural look, plastic for affordability—to match your style. Incorporate small trays or containers for tiny accessories. Personal touches keep your drawer both functional and fun.
Using stackable dividers makes your drawer instantly more usable and visually appealing. It’s an inexpensive, easy fix that saves time and reduces stress during busy mornings. Organized drawers boost confidence and keep your kitchen running smoothly.
11. Hang Pot Racks Above the Kitchen Island or Ceiling
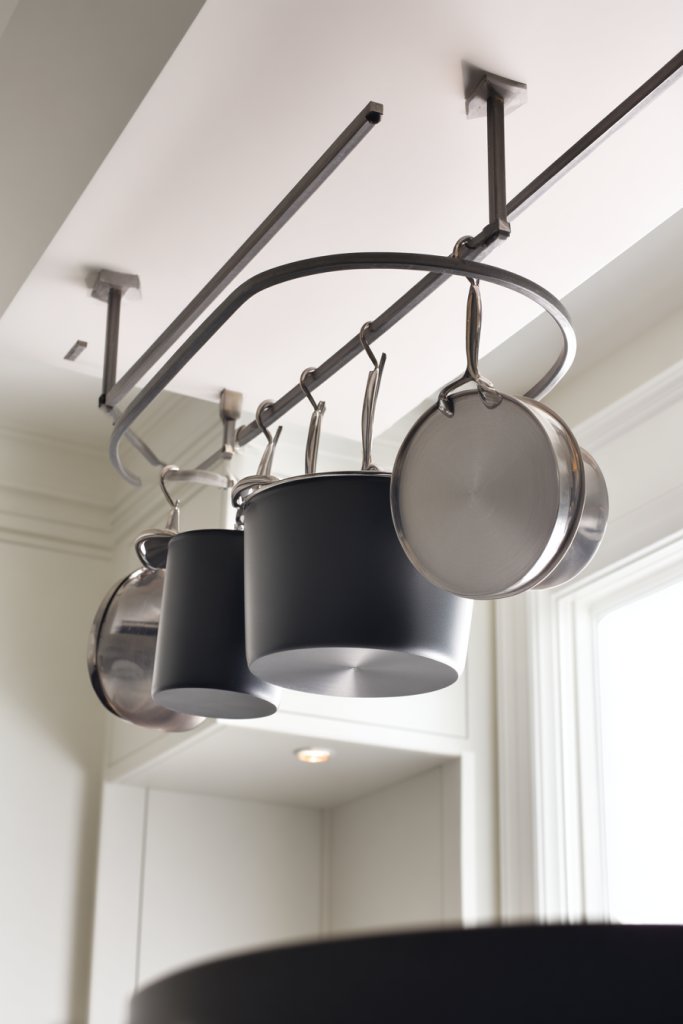
Counter and cabinet space is precious, yet pots, pans, and lids often clutter your stovetop or cabinet interiors. Small kitchens need a clever way to store big, bulky cookware without sacrificing valuable surface or cabinet space. The solution? Hanging pots and lids from ceiling-mounted racks.
Picture a sleek, metal pot rack suspended above your kitchen island or in the ceiling corner. Pots and pans hang from sturdy hooks, accessible at a moment’s notice. The rack adds an industrial or rustic charm, depending on your style, and frees up cabinet space for other essentials. It’s both practical and eye-catching.
Choose from ceiling-mounted, wall-mounted, or over-island styles based on your space. Use hooks that support different sizes and weights, and arrange cookware by function or frequency of use. For a decorative touch, select racks with intricate designs or finishes that match your decor. During holidays, swap out or add decorative accents.
Measure the height of your ceiling or island to determine the ideal hanging length. Install the rack securely with appropriate anchors and screws. Organize your cookware by size or type, hanging frequently used items at eye level. Check the stability regularly and clean the rack to prevent grease buildup. Label or color-code hooks for even better organization.
Decorate your rack with themed hooks, painted finishes, or decorative accents. Use matching or contrasting colors to highlight your cookware. Incorporate additional storage options like small baskets or utensil holders. Personal touches make your kitchen both functional and stylish.
A ceiling or wall-mounted pot rack instantly declutters your cabinets and countertops. It makes your cookware part of your decor, showcasing your collection. Installing one is straightforward, and the payoff is a more spacious, organized kitchen that’s ready for any culinary adventure.
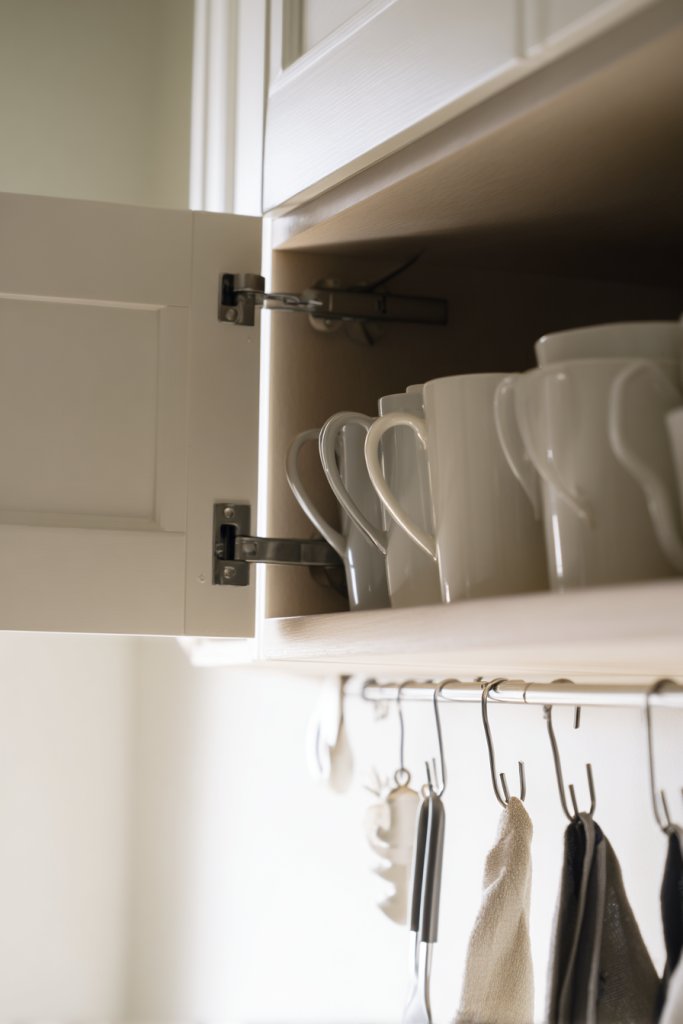
12. Incorporate Under-Cabinet Hooks for Mugs and Towels
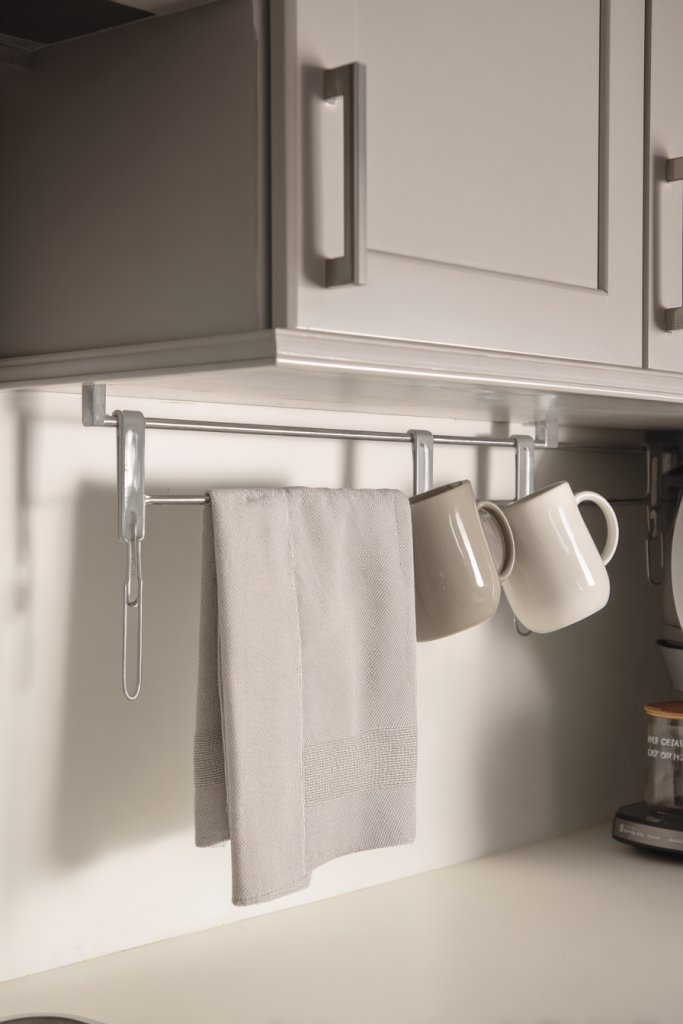
Counter space for coffee mugs and dish towels can be scarce, especially when these essentials pile up or clutter your sink area. Small kitchens need a clever way to keep these items within reach without taking up valuable surface area. The fix? Under-cabinet hooks for mugs and towels.
Visualize hooks installed beneath upper cabinets, holding coffee mugs upside down and towels neatly hanging. This frees up drawer space and keeps everyday essentials visible and accessible. The hooks are discreet but highly functional, adding a tidy, organized look to your kitchen.
Choose hooks that match your cabinet hardware or add decorative accents for personality. Use different sizes or shapes to hold mugs of various sizes, and select towel hooks that complement your decor. During seasonal changes, swap out towels or add themed mug hooks for a festive touch.
Measure the space beneath your cabinets and install hooks using screws or adhesive strips designed for kitchen use. Hang mugs by their handles or hooks, and drape towels over the bars. Regularly clean and check for wear or loose hooks. Organize mugs by size or use for quick access.
Decorate hooks with painted or decorative covers. Use color-coded hooks for different family members or purposes. Add small label tags or chalkboard stickers for quick identification. Personal touches turn this simple idea into a stylish and functional feature.
This under-cabinet hack keeps your mugs and towels tidy and accessible, reducing clutter on counters and in drawers. It’s a quick upgrade that makes daily routines smoother. Plus, it’s a DIY-friendly project with big space-saving results.
13. Add a Compact, Multi-Functional Kitchen Island with Storage
Counter space is gold in small kitchens, but a large island isn’t always an option. The challenge? Finding a piece that offers workspace, storage, and style without overwhelming the room. Enter the compact, multi-functional kitchen island—a small but mighty upgrade.
Visualize a sleek island with built-in shelves or drawers, tucked into a corner or placed centrally. It provides a surface for prep work, with storage underneath for pots, pans, or pantry items. The finish matches your decor—be it rustic wood, glossy laminate, or matte steel—adding style and function to your space.
Choose a size that fits your space, from a mobile cart to a small island with casters. Incorporate open shelves for frequently used items or concealed drawers for hidden storage. During holidays or parties, use it as a serving station or extra prep area. Personalize with decorative accents, cutting boards, or colorful containers.
Select a compact design that maximizes storage without blocking pathways. Assemble the unit following manufacturer instructions, or customize a ready-made piece with added shelves or hooks. Organize utensils, cookbooks, or small appliances within easy reach. Regularly clean and update your organization system to keep it functional.
Add decorative elements like a patterned countertop, a colorful backsplash, or unique hardware to match your style. Use baskets or bins inside shelves for small items. Incorporate a fold-down extension or removable tray for extra prep space when needed. Personal touches make it uniquely yours.
A multi-functional island enhances your kitchen’s utility while adding a stylish focal point. It’s a versatile solution that adapts to your needs and space, making cooking and entertaining more enjoyable. With minimal effort, you turn a small corner into a central hub of activity.
14. Mount a Fold-Down Table or Counter Extension for Extra Workspace
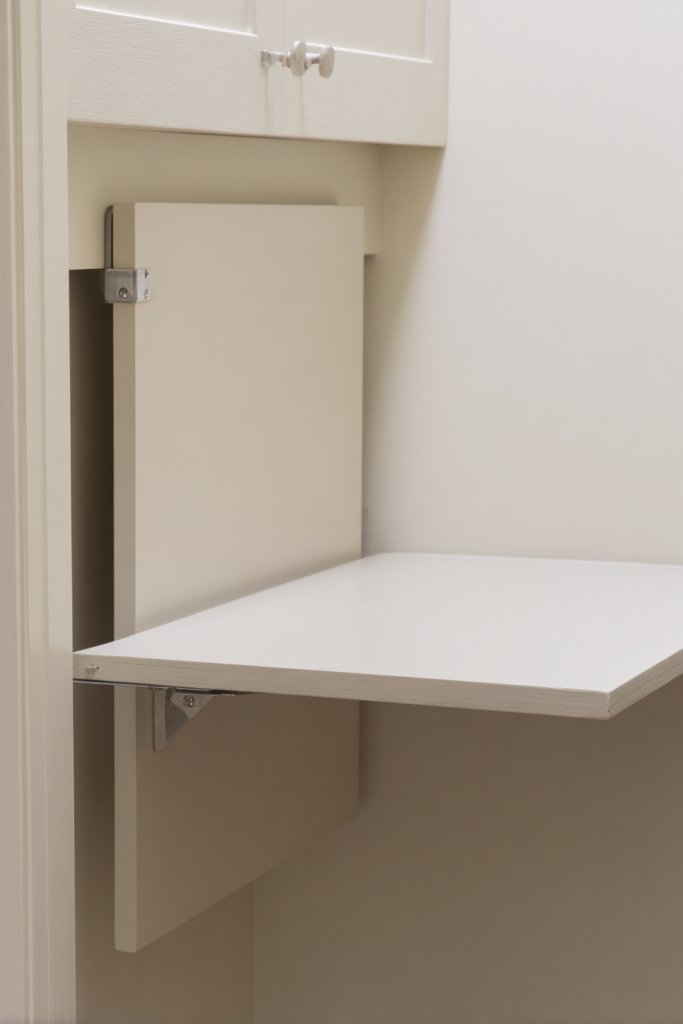
Counter space can disappear when you need it most, turning meal prep into a cramped, stressful ordeal. Small kitchens need a way to add temporary work surfaces without permanently sacrificing space. The solution? a fold-down table or counter extension that tucks away when not in use.
Imagine a sleek, wall-mounted fold-down table that swings down when you need extra space. It’s perfect for quick meals, prep work, or a place for kids to do homework. When folded up, it blends seamlessly into the wall, maintaining a clean, uncluttered look. It’s like having a secret extension that appears only when needed.
Choose a fold-down table with a finish that matches your cabinets or wall color for a seamless look. Use a sturdy hinge and lock mechanism for safety. During different seasons or occasions, customize the surface with a decorative tablecloth or placemats. Consider adding storage underneath or nearby for utensils and condiments.
Install the fold-down hinge securely into stud or wall anchors, ensuring it can support weight. Attach the table surface with screws, and test for stability. When not in use, lift and secure the table in the closed position. Use it for quick meals or extra prep space, and regularly check for wear or loose screws.
Paint or decorate the surface with a peel-and-stick wallpaper or decals for a personalized touch. Add small hooks or magnetic strips nearby for utensils or tools. Use decorative hardware or brackets for a vintage or modern look. Personal touches make it both functional and charming.
A fold-down table is a game-changer for small kitchens, providing flexible space on demand. It keeps your room open and airy while offering extra surface when needed. Easy to install and use, it’s a smart upgrade that adapts to your lifestyle.
15. Use Hidden Drawer Inserts for Small Appliance Cords and Accessories
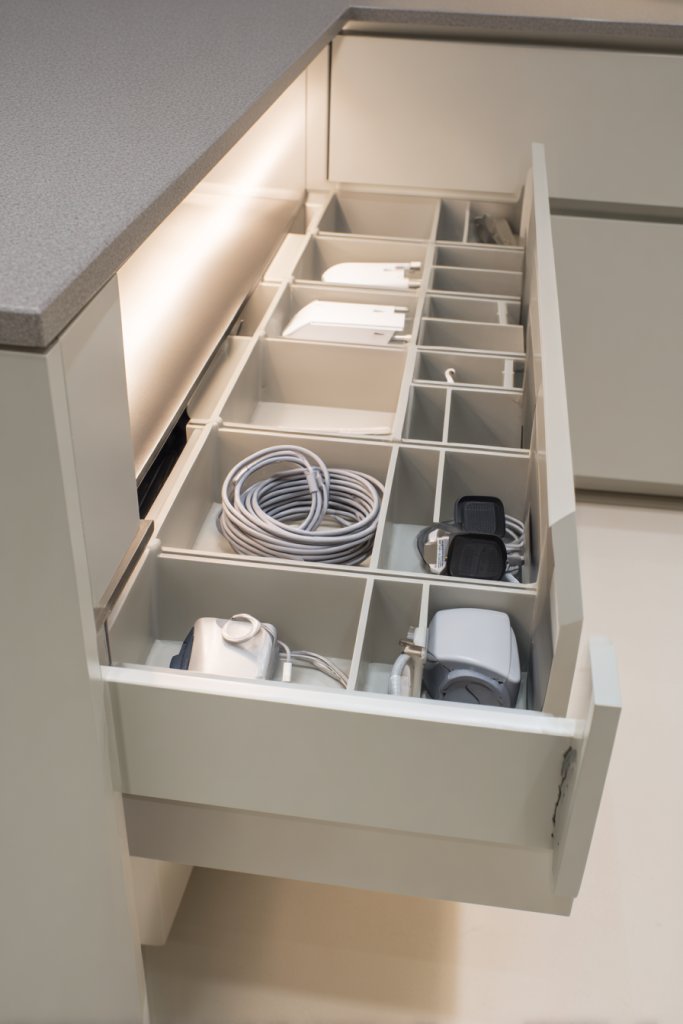
Cords, chargers, and small appliance accessories clutter your drawers or countertops, making it hard to find what you need when you need it. Small kitchens benefit from hidden organization solutions that keep these items out of sight but within reach. The secret? dedicated drawer inserts designed for cords and accessories.
Imagine a sleek drawer with compartments or nested trays that keep chargers, cords, and appliance accessories separated and tangle-free. Each item has its own space, with labels or color-coding if desired. The result? A tidy, organized drawer that looks as good as it functions, reducing frustration and mess.
Choose from foam inserts, adjustable trays, or custom-cut compartments to fit your specific needs. Use cable clips or Velcro straps to keep cords neat and prevent tangling. During different seasons or projects, reorganize or add new sections for new gadgets. This approach is adaptable and cost-effective.
Measure your drawer’s dimensions and select or customize inserts accordingly. Install the inserts securely, then organize cords and accessories by device or function. Use labels or color-coding for quick identification. Regularly review and tidy the space, discarding unused cords or outdated accessories. This keeps your workspace clutter-free and efficient.
Decorate with stylish labels, color-coded clips, or decorative tape for a personalized touch. Incorporate small containers for batteries or tiny parts. Use transparent trays or inserts for easy visibility. Personal touches make organization simple and enjoyable.
Organizing cords and small accessories behind the scenes saves time and reduces clutter. It keeps your countertops clean and makes your appliances more accessible. With a little DIY effort, you turn chaos into calm, making your kitchen more functional and less stressful.
16. Hang Baskets or Wire Mesh Containers for Fresh Produce
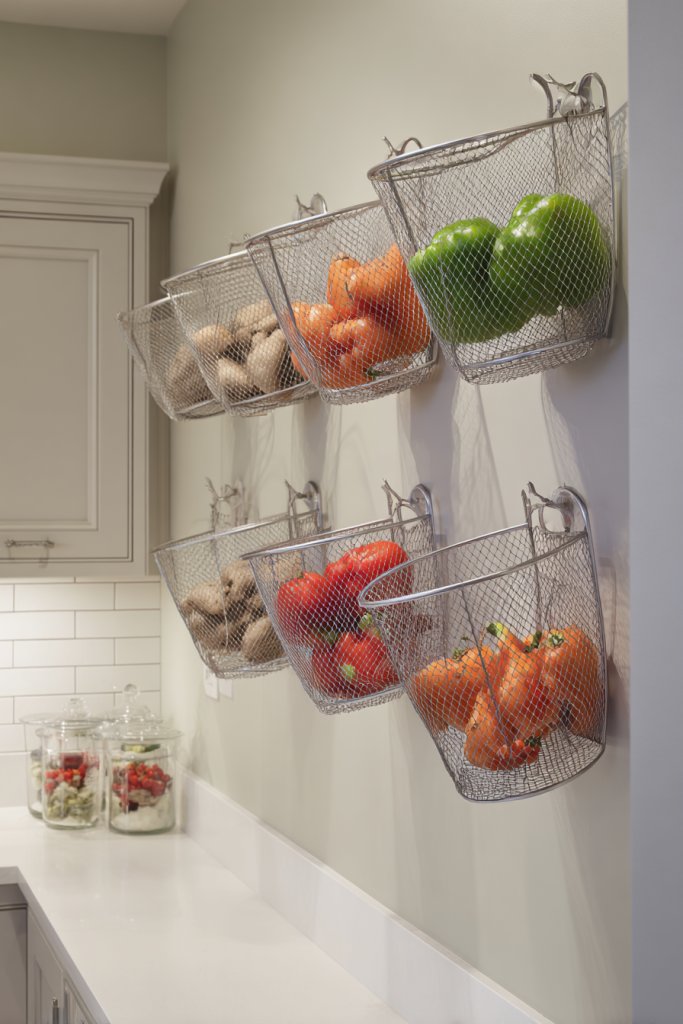
Fruits and vegetables often sit in crisper drawers or on cluttered counters, sometimes forgotten or bruised. Small kitchens need a way to keep produce visible, ventilated, and easy to access. The answer? hanging baskets or wire mesh containers mounted inside cabinet doors or on walls.
Visualize a set of open wire baskets hung inside a cabinet door, filled with bright apples, carrots, or herbs. The open design allows air circulation, keeping produce fresh longer. The colorful fruits pop against the metallic or wooden backdrop, adding a natural, inviting touch to your kitchen.
Select baskets made of wire, rattan, or plastic coated for durability and style. Mount them in different sizes for various produce types, or group them for a colorful display. During different seasons, swap out items or rearrange baskets for a fresh look. Use labels or tags for easy identification and organization.
Attach baskets securely to cabinet doors or wall studs using hooks, screws, or brackets. Organize produce by type or ripeness, and check regularly for spoilage. Keep baskets clean and dry, and reposition as needed for optimal airflow. This method keeps your produce visible and accessible, reducing waste.
Decorate baskets with paint, fabric liners, or decorative trims. Use chalkboard labels for changing produce types or freshness notes. Incorporate small hooks or clips for herbs or garlic. Personal touches create a vibrant, functional display that adds life to your kitchen.
Hanging produce storage makes healthy eating more approachable and organized. It reduces clutter and waste, encouraging better habits. This simple, stylish solution boosts your kitchen’s efficiency and aesthetic appeal—who knew produce could be so pretty?
17. Install a Narrow, Vertical Storage Tower for Baking Sheets and Cutting Boards
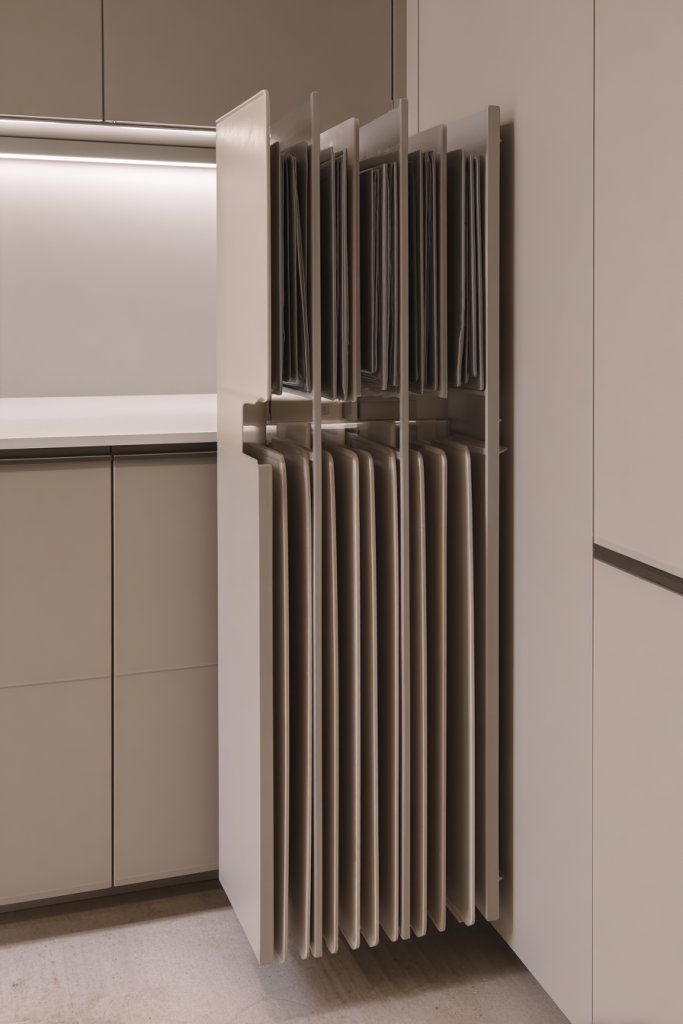
Baking sheets, trays, and cutting boards tend to pile up or get lost in the back of cabinets. Small kitchens need a space-efficient way to store these flat items without stacking or leaning them against the wall. The solution? a narrow, vertical storage tower that keeps everything upright and accessible.
Picture a slim, cabinet-mounted or standalone vertical rack filled with baking sheets, trays, and cutting boards standing neatly upright. The dividers keep everything separated, preventing warping or scratching. When you need a specific item, it slides out easily, making organization look effortless and sleek.
Choose from wood, metal, or plastic racks, depending on your decor. Adjustable or modular dividers allow customization for different item sizes. Use labels or color coding to identify different types—baking sheets versus cutting boards. During holidays, switch out trays for seasonal or decorative options.
Measure your cabinet or space to select the right rack size. Install securely with screws or brackets, ensuring stability. Organize your baking sheets and boards by size or use, and place frequently used items at the front. Regularly clean and maintain the rack for smooth access and longevity. Reorganize as your collection grows.
Decorate the rack with paint, decals, or labels for a personal touch. Incorporate silicone or felt pads to prevent slipping or scratching. Add small hooks for utensils or spatulas. Personal touches create a functional, stylish storage solution tailored to your needs.
A vertical storage tower saves space and keeps your flat items organized and easy to find. It eliminates clutter and warping, making your kitchen more efficient. With minimal effort, you improve your organization game and enjoy a cleaner, more functional space.
18. Create a Vertical Herb Garden on a Windowsill or Wall Shelf
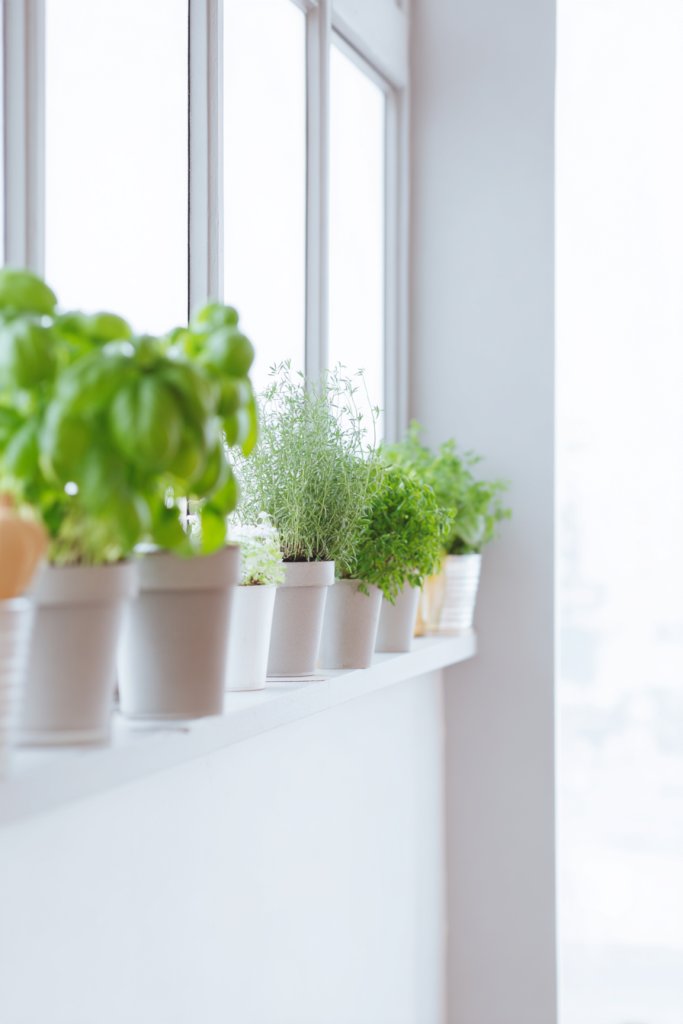
Fresh herbs elevate any dish, but small kitchens often lack space for dedicated herb gardens. Buying fresh herbs regularly can also be costly and wasteful. The solution? Growing a vertical herb garden that takes up minimal space but provides endless freshness.
Imagine small pots filled with fragrant basil, thyme, and parsley sitting on a sunny windowsill or mounted wall shelf. The herbs flourish in small, colorful containers, adding a lush, green touch to your kitchen. The setup is simple yet vibrant, making your kitchen feel lively and inviting.
Use pots in different sizes, colors, or materials to match your decor. Vertical wall-mounted planters or tiered shelves work well in tight spaces. During different seasons, swap out herbs or add new varieties for variety. Incorporate decorative stones, labels, or small stakes for a personalized touch.
Choose a sunny spot with good drainage and stability. Select containers with drainage holes and fill them with quality potting soil. Plant your herbs, water regularly, and ensure they get enough sunlight. Attach shelves or wall mounts securely, and organize pots for easy care and harvesting. Regular pruning encourages healthy growth.
Decorate pots with paint, labels, or fabric wraps. Add small stakes with fun messages or use decorative stones for a polished look. Incorporate a watering system or self-watering pots for convenience. Personal touches turn your herb garden into a charming, functional feature.
A vertical herb garden provides fresh flavors at your fingertips and adds a green vibe to your kitchen. It’s a compact, sustainable solution that boosts your culinary creativity. Once started, you’ll love the freshness and the sense of accomplishment it brings.
19. Use Decorative Baskets and Bins for Frequently Used Items
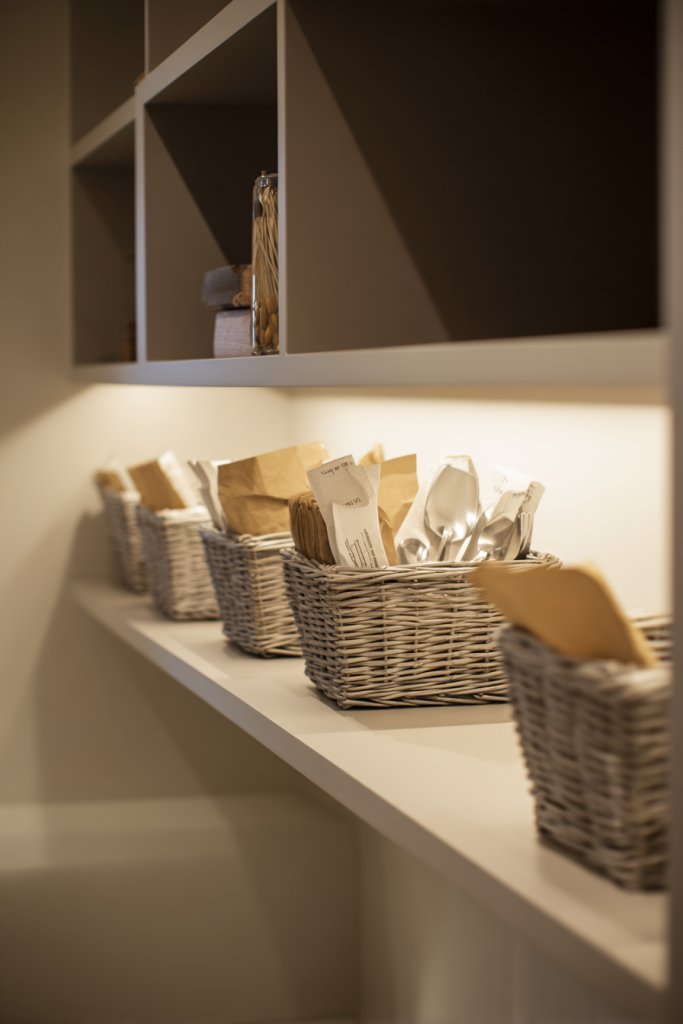
Cluttered countertops and open shelves make your kitchen look chaotic and uninviting. Small kitchens need a way to organize frequently used items like utensils, napkins, or snacks while keeping the space stylish. The secret? decorative baskets and bins that combine function with aesthetic appeal.
Visualize a set of woven or painted baskets arranged on open shelves or countertops. Inside, you find neatly folded dish towels, snack packs, or cooking utensils, all easy to access. The baskets add texture and warmth, elevating your kitchen decor while hiding clutter behind beautiful facades.
Choose baskets in natural materials like wicker or rattan for a rustic look, or sleek metal or fabric bins for modern aesthetics. Use different sizes for varied items, and label baskets for quick identification. During holidays, swap seasonal decor or add themed accents for a festive vibe.
Arrange baskets on open shelves, under counters, or on top of cabinets. Fill them with your most-used items, such as coffee supplies, utensils, or baking tools. Regularly tidy and rotate items to keep everything fresh and accessible. Labels or tags help everyone in the household know where things go.
Decorate baskets with paint, ribbons, or fabric linings to match your style. Incorporate small decorative items like vintage spoons or themed tags for a personalized touch. Use stacking or tiered arrangements to maximize space and visual interest. Personal touches make organization both functional and charming.
Decorative baskets turn clutter into curated display pieces, making your kitchen look tidy and inviting. They simplify everyday routines and add a cozy, personalized vibe. With just a little effort, you create a more organized, stylish space that feels like home.
Conclusion
With a mix of smart storage solutions, space-efficient layouts, and creative hacks, these small kitchen organization ideas can truly make a difference. Don’t hesitate to try out different strategies and see what works best for your space and lifestyle. Remember, a well-organized kitchen not only looks great but also makes your daily routines more enjoyable. Take action today and turn your small kitchen into a perfectly organized culinary retreat!