Ever found yourself wishing for a stylish yet efficient kitchen space that doesn’t take up too much room? Mini kitchen ideas for small spaces have surged in popularity because they prove that you don’t need a large area to create a functional and beautiful cooking zone.
In this article, you’ll discover a variety of clever and inspiring ideas to maximize your small kitchen. From smart storage solutions to space-saving appliances, these tips will help you transform any tiny kitchen into a practical and charming culinary haven that suits your lifestyle perfectly.
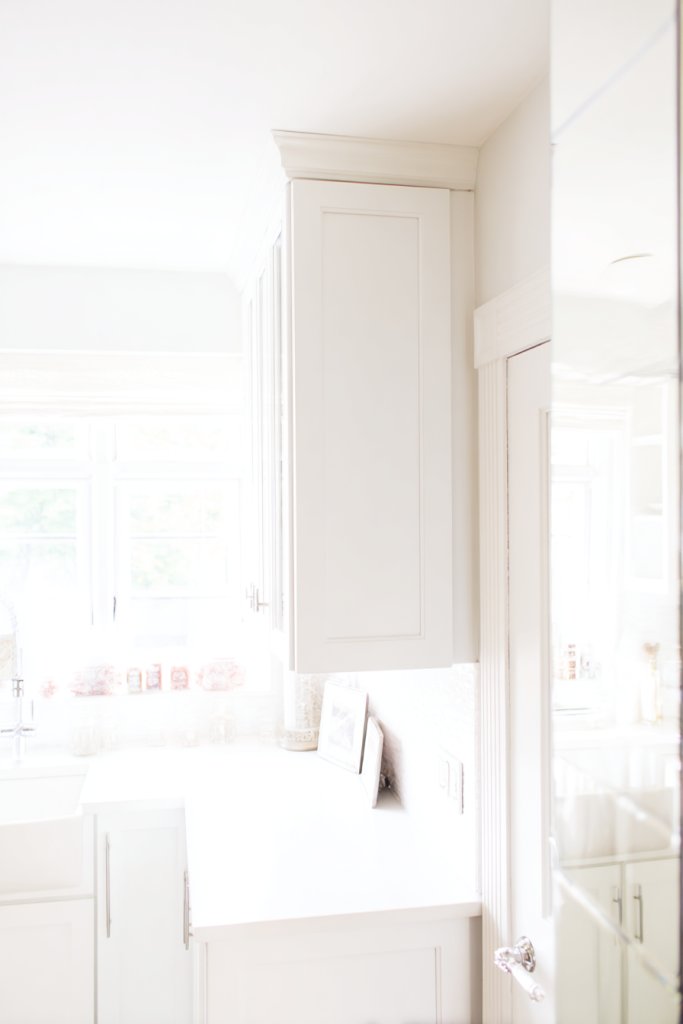
1. Use Vertical Shelving to Maximize Storage Space
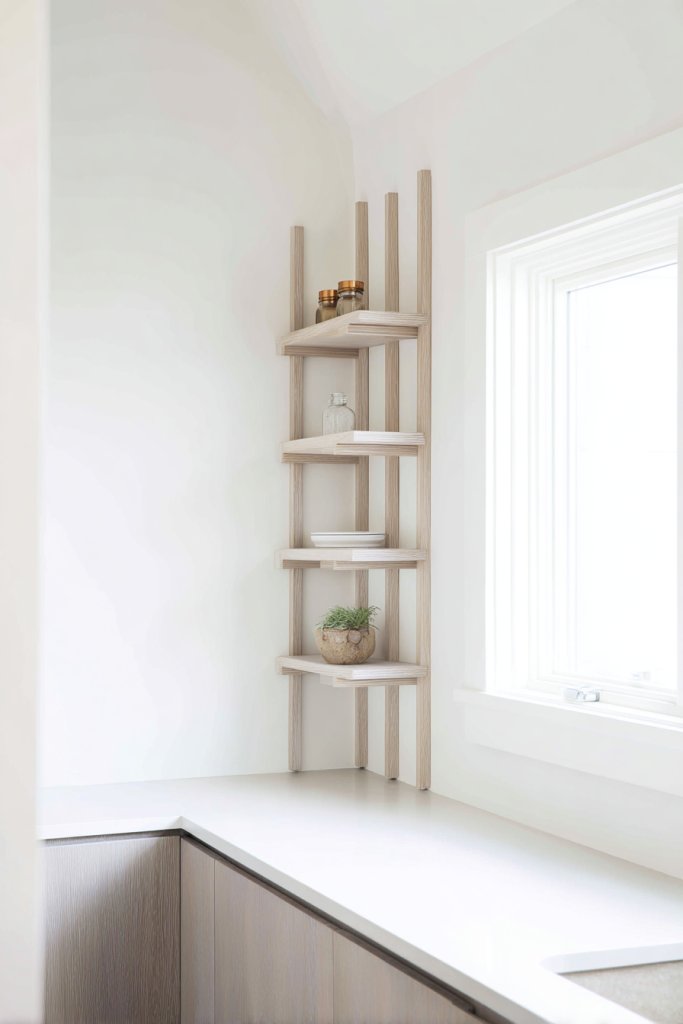
Living in a small kitchen often feels like a constant battle to keep things organized. Countertops get cluttered quickly, and it seems like there’s just no space left for anything. Ever wished you could find a way to store more without sacrificing style or accessibility? Vertical shelving might just be the game-changer you need to make your kitchen feel more spacious.
Imagine a wall lined with open wooden or metal shelves reaching from countertop to ceiling. Spices, jars, and cookware are neatly arranged, adding a layered look that’s both functional and decorative. The textures of reclaimed wood or industrial metal contrast beautifully against a painted wall, creating a dynamic visual appeal. This setup transforms an empty wall into a practical focal point, making everything easy to reach.
You can customize vertical shelves according to your style—sleek glass and metal for modern kitchens or rustic wood for farmhouse vibes. Adjustable shelves help accommodate taller items, while floating designs keep things minimal. In small spaces, stacking multiple narrow shelves avoids crowding, and adding baskets or bins can hide clutter. Seasonal accessories like fabric liners or colorful containers can refresh the look periodically.
Start by measuring the wall space and selecting sturdy, wall-mounted brackets or floating shelf systems. Choose materials that match your decor—wood for warmth, metal for industrial chic, or even plastic for budget-friendly options. Secure the brackets into wall studs for stability, then install the shelves at a height that’s comfortable for your use. Arrange your items thoughtfully, grouping similar objects together for a tidy appearance. Regularly dust and rotate items to keep the shelves looking fresh.
Add decorative touches such as colorful spice jars, vintage canisters, or handcrafted ceramic dishes to make the shelving uniquely yours. Incorporate small LED puck lights underneath for subtle illumination, especially over frequently used areas. Use decorative hooks underneath for hanging utensils or small tools, making everything both accessible and stylish. Personalize with labels or tags to keep things organized long-term.
Vertical shelving turns unused wall space into a powerhouse of storage. It’s a simple, versatile solution that can be tailored to any style or budget. Once installed, you’ll wonder how you ever managed without it. Ready to make your small kitchen feel larger and more organized? It’s time to embrace vertical storage and enjoy a clutter-free cooking experience.
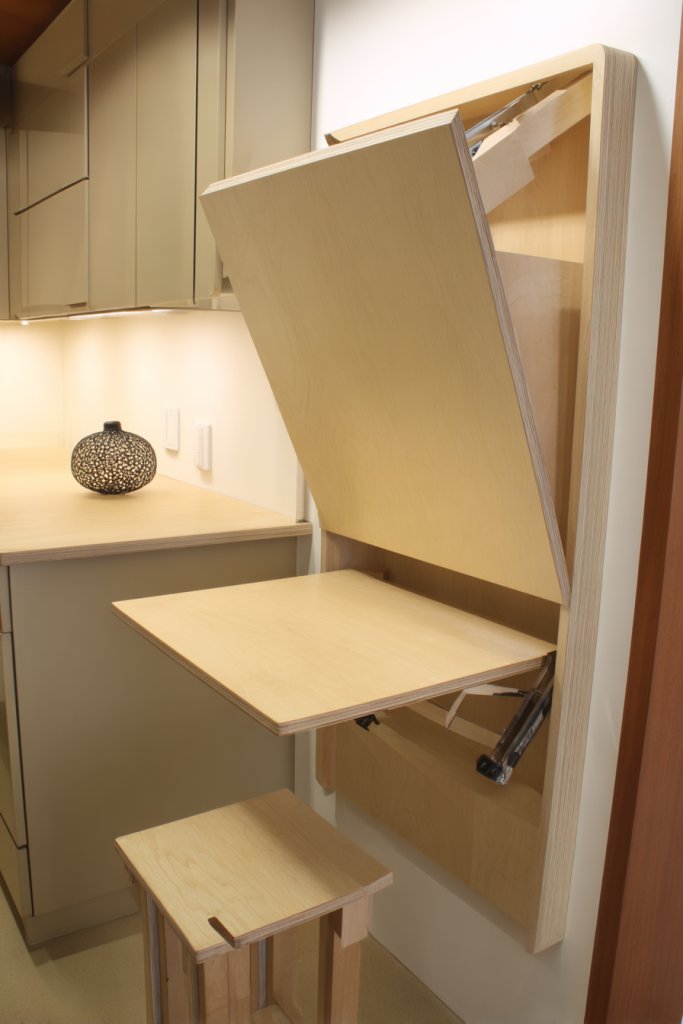
2. Incorporate Fold-Down Countertops for Flexible Workspace
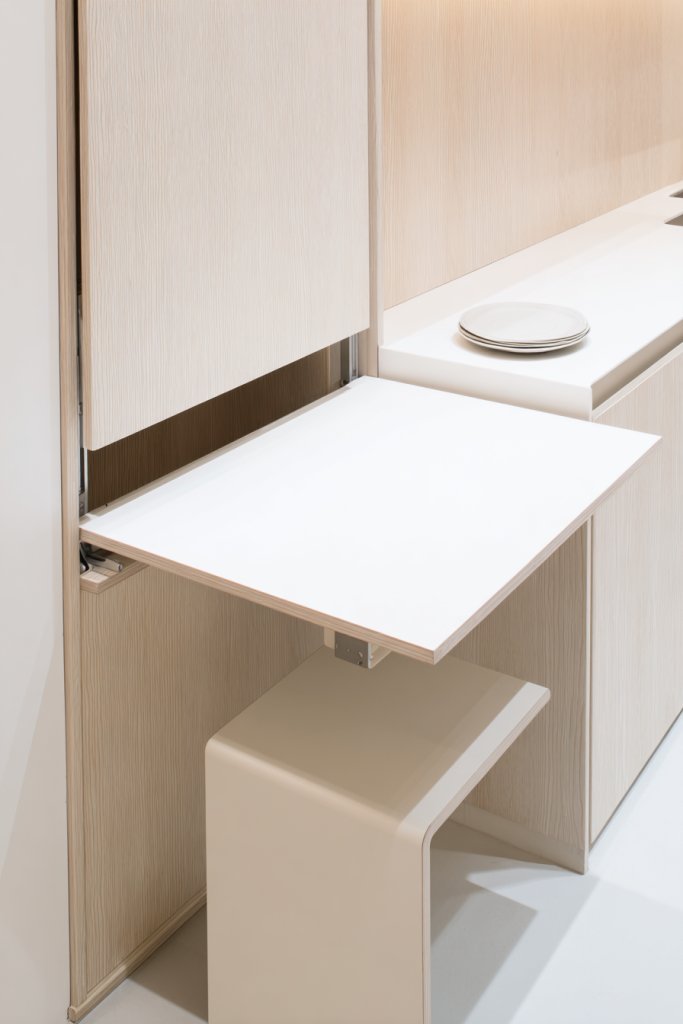
Small kitchens often suffer from a lack of prep space, making cooking feel more like a chore than a joy. When countertops are limited, every meal prep session turns into a game of Tetris. Wouldn’t it be amazing to have extra space when you need it and tuck it away when you don’t? Fold-down countertops offer a clever, space-saving solution.
Picture a compact kitchen wall with a sleek fold-down panel that doubles as a prep surface. When folded up, it’s flush with the wall, blending seamlessly with cabinetry or backsplash. When needed, simply unfold it to reveal a sturdy surface, perfect for chopping vegetables or assembling sandwiches. The edges are smooth, with hidden hinges or brackets that keep the look clean and modern. It’s like having a secret workspace just waiting to be used.
Choose materials that complement your decor—stainless steel for a contemporary feel, butcher block for warmth, or laminate for budget-friendly durability. You can also opt for a fold-down table that extends into a small dining area for one or two people. Seasonal modifications include changing the finish or adding decorative accents like a colorful edge trim. For very tight spaces, consider a fold-out shelf that doubles as a serving station or bar.
Begin by selecting a wall with enough clearance and strength for the fold-down mechanism. Use heavy-duty brackets or hinges rated for the expected weight. Attach the panel securely into wall studs, ensuring it’s level and sturdy. Seal the edges with weatherproof paint or varnish to prevent moisture damage. When in use, unfold the surface and stabilize it with support legs if necessary. Keep tools and hardware nearby for quick installation or adjustments.
Personalize your fold-down workspace with a splash of color on the edges or a decorative backsplash panel. Add small hooks or magnetic strips on the underside for hanging utensils or keys. To make it more versatile, incorporate a fold-out extension or a secondary flap that can serve as extra prep space or a mini buffet. Use non-slip mats or cutting mats to protect the surface and add a pop of personality.
Fold-down countertops provide a flexible, space-efficient way to expand your kitchen’s functionality without sacrificing style. They’re perfect for small spaces that need occasional extra prep area. Once installed, you’ll wonder how you ever managed without it. It’s a clever upgrade that makes your kitchen more adaptable and efficient—what’s not to love?
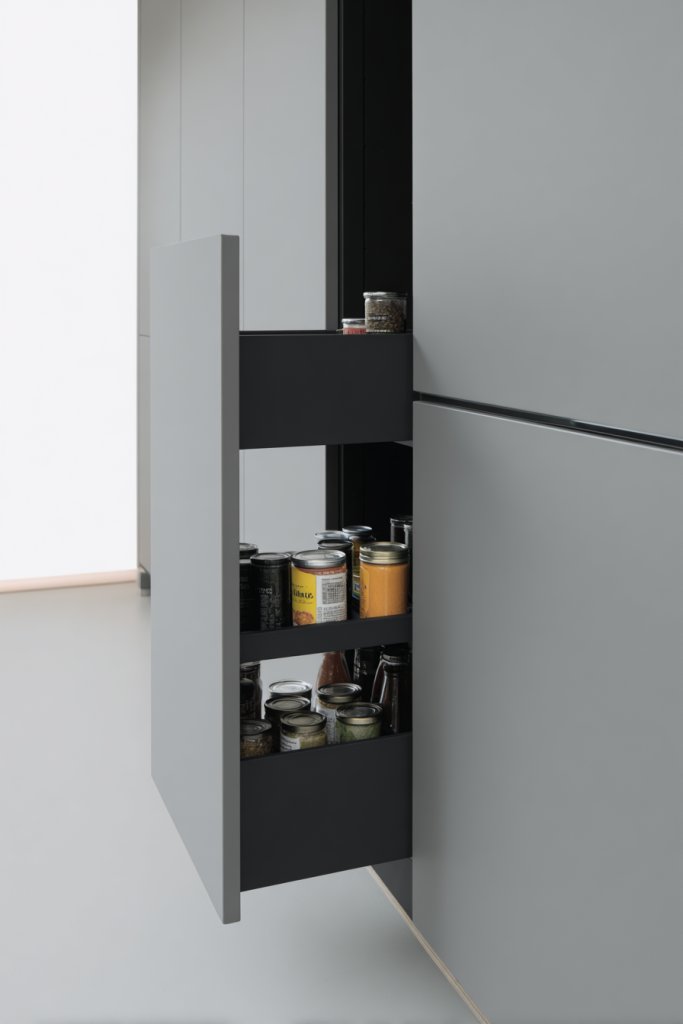
3. Opt for Slim, Pull-Out Pantry Cabinets
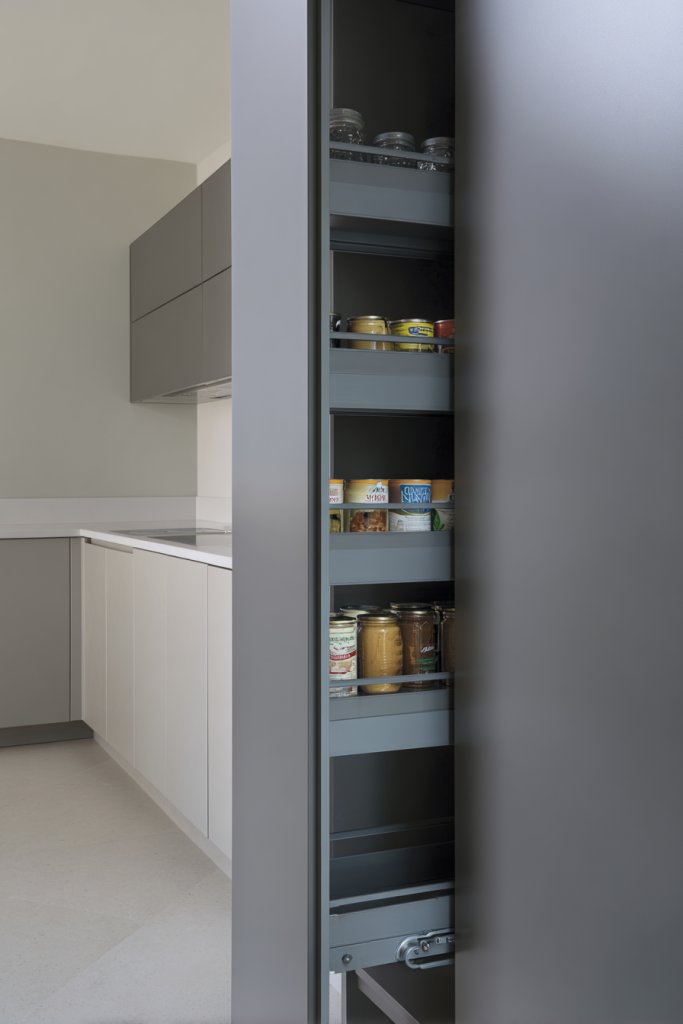
Tight spaces often leave you fighting for pantry real estate, and clutter can quickly take over. Traditional cabinets just don’t cut it anymore when you’re desperate for organized, accessible storage. Ever wished for a way to keep dry goods and snacks neat without sacrificing precious space? Slim, pull-out pantry cabinets are the perfect solution.
Envision a narrow, vertical cabinet slipping seamlessly into an unused corner or between appliances. When you pull the handle, a series of shelves glides out smoothly, revealing a full view of your stored items. The sleek profile hides clutter and keeps everything within arm’s reach, making it easy to find what you need. The minimalistic design blends into any decor style, from modern to rustic.
Choose from various finishes—matte, glossy, or textured—for a look that matches your kitchen. Adjustable shelves accommodate different-sized packages, while soft-close mechanisms prevent slamming. For even more efficiency, add baskets or tiered trays inside for small items. In small apartments, consider installing multiple narrow units for a cohesive storage system.
Start by measuring available space and selecting a slim cabinet design that fits your needs. Focus on high-quality sliding hardware to ensure smooth operation. Install into wall studs or secure into existing cabinetry with appropriate brackets. Organize your dry goods with labeled bins or jars for quick access. Regularly clean and rotate items to maintain order and freshness.
Add labels or color-coded containers inside for easy identification. Incorporate a small spice rack on the door or attach a magnetic strip to hold metal utensils. For a personal touch, select a finish or hardware style that complements your overall kitchen scheme. Use stackable containers or tiered shelves inside to maximize vertical space.
Slim pull-out pantries make storage smarter and more stylish, especially in tiny kitchens. They turn underused gaps into highly functional storage zones. Once installed, you’ll love how much easier meal prep and organization become. It’s a small upgrade with a big impact—your cluttered chaos finally tamed.
4. Install Magnetic Strips for Knife and Metal Tool Storage
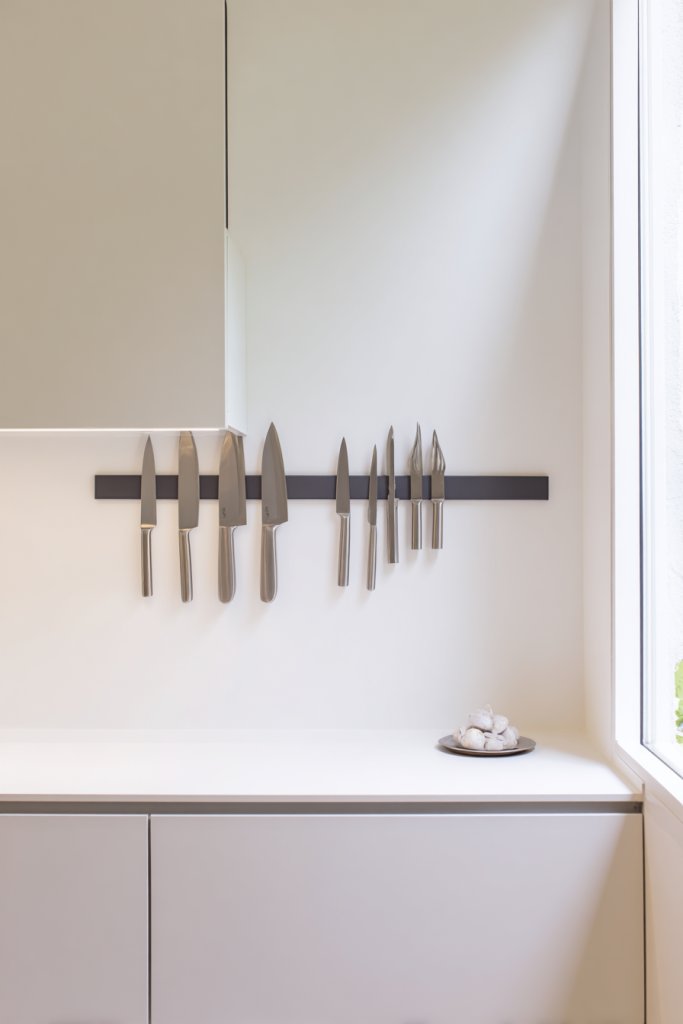
Ever feel like your kitchen drawers are overflowing with utensils and metal tools? Finding a specific knife or spatula can turn into a frustrating scavenger hunt. Wouldn’t it be nice to keep these essentials at eye level and within arm’s reach? Magnetic strips are a simple, stylish fix that declutters your drawers and keeps your tools organized.
Imagine a sleek metal or wood strip mounted on a backsplash or wall, holding knives securely without the bulky knife block. The magnets are hidden behind the blades, showcasing a clean, modern look. Nearby, smaller metal tools like scissors or bottle openers hang neatly, giving your workspace a professional vibe. The strip itself can be a statement piece, especially if you choose a material or finish that complements your decor.
Magnetic strips come in various lengths and materials—stainless steel for industrial style, painted wood for softer aesthetics. Mount them at a height that’s comfortable for daily use, and consider adding additional strips for different zones. For a more creative look, use decorative brackets or mounting hardware that matches your hardware or fixtures. Combine with small containers or hooks for extra storage options.
Select a sturdy magnetic strip that can hold the weight of your heaviest tools. Measure and mark the placement on your wall or backsplash, ensuring it’s level and accessible. Use appropriate anchors or screws for your wall type—drywall, tile, or wood. Attach the strip securely, then organize your tools by frequency of use or size. Regularly check the magnets’ strength and clean the surface for optimal grip.
Personalize with engraved or painted labels directly on the strip or nearby markers. Mix materials—combine wood and metal for contrast or add decorative elements like painted patterns. Use the space underneath for small hooks or clips to hang utensils or potholders, making everything ready at a glance. Rotate tools seasonally or for special occasions to keep it fresh.
Magnetic strips elevate your kitchen’s functionality with minimal effort. They make your tools more accessible and keep your counters tidy. Once you experience the convenience, you’ll wonder why you didn’t do it sooner. It’s a small upgrade that delivers big on style and practicality—embrace the simplicity!
5. Use Over-the-Door Hooks and Racks for Extra Storage
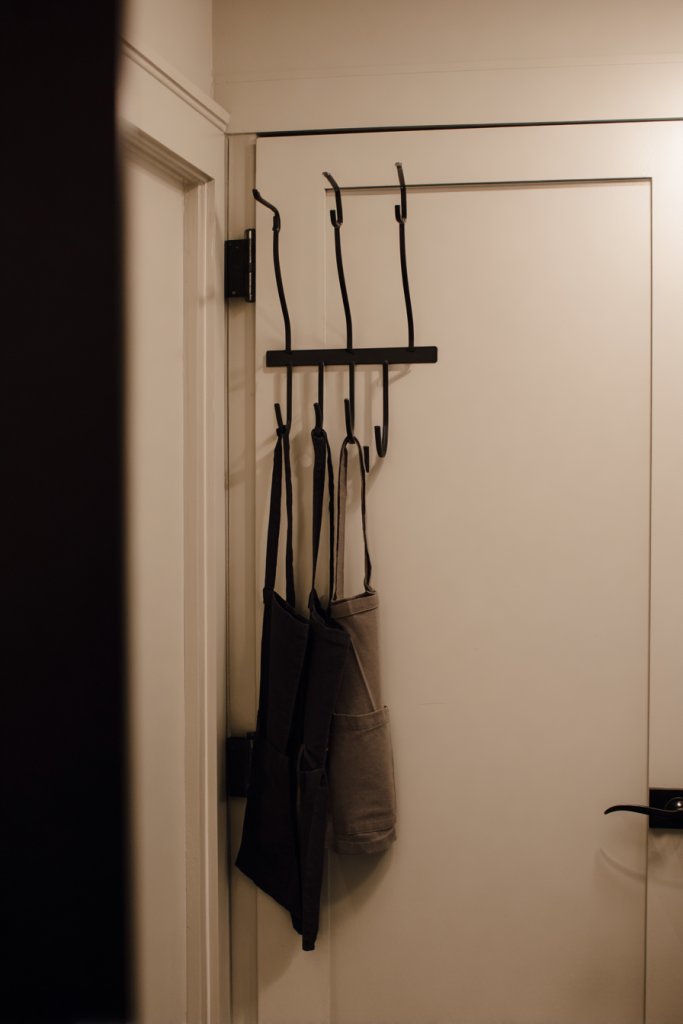
Cluttered countertops and jam-packed cabinets make small kitchens feel suffocating. Sometimes, valuable space is hiding behind doors just waiting to be utilized. Wouldn’t it be clever to turn those hidden areas into organized storage zones? Over-the-door hooks and racks are the perfect hack to add extra hanging space without permanent installation.
Visualize a cabinet or pantry door with a set of hooks holding dish towels, utensils, or small accessories. The racks can be built-in or attach easily with adhesive strips or screws, depending on your preference. They turn dull door surfaces into functional display areas. For a cohesive look, choose hooks that match your hardware or finish, creating a seamless style. The result is a clutter-free countertop and an organized interior.
Over-the-door racks come in wire, fabric, or plastic options—choose based on weight capacity and aesthetics. Use hooks to hang lightweight items, or install sturdier racks for heavier pots or cleaning supplies. For laundry or utility closets, they’re ideal for hanging mops, brooms, or aprons. In seasonal setups, swap items easily and keep things fresh.
Select the right size and style for your doors. For surface-mounted hooks, clean the door surface thoroughly before attaching with adhesive or screws. For more stability, opt for screw-in hooks that latch onto the door frame or hinges. Distribute hooks evenly to prevent door warping or damage. Organize items by frequency of use to keep everything accessible. Regularly check and tighten hooks for safety.
Add decorative touches such as painted or patterned hooks that match your kitchen decor. Use labeled containers or small baskets on racks for extra organization. Incorporate seasonal hooks for holiday-themed items or specialty tools. For a more stylish look, opt for vintage or handcrafted hooks that add personality.
Over-the-door hooks are a quick, inexpensive way to maximize space and reduce clutter. They’re versatile enough to suit any kitchen style or size. Once you see how much extra storage they provide, you’ll wonder why you didn’t try it sooner. Small changes like these can make a big difference in daily kitchen life and mood.
6. Choose Compact, Stackable Appliances

Counter space in small kitchens is precious real estate, often occupied by bulky appliances that leave little room for anything else. Ever felt frustrated by the limited area for your microwave, coffee maker, or toaster? Opting for compact, stackable appliances can free up valuable counter real estate while keeping your essentials within reach.
Imagine a sleek, tall unit that stacks a microwave on top of a coffee maker or a toaster oven. The design is minimal, with clean lines and a neutral finish that blends into your cabinets. The vertical arrangement creates a sense of order, and a small footprint leaves plenty of space for prepping or placing other items. The appliances sit snugly together, creating a tidy, modern look.
Select appliances with matching finishes—stainless steel, matte black, or pastel hues—to create a cohesive look. Use stacking modules designed specifically for kitchen appliances, or DIY with risers and stacking trays. For seasonal decor, swap out small appliances with more decorative ones or storage containers. Consider multi-function devices that combine features to reduce the number of appliances needed.
Measure your available counter space and select appliances with dimensions that fit comfortably while allowing for clearance and ventilation. Look for models with stacking capability and anti-slip feet or stabilizers. Place appliances on heat-resistant mats or pads to protect surfaces. Keep cords organized with clips or wraps, and ensure outlets are accessible.
Coordinate appliance colors or styles with your kitchen theme—bright, retro, or sleek modern. Add small decorative elements like stylish mugs or canisters on top of the stacked units. Use labels or decals for a personalized touch, especially if you switch out appliances seasonally. Keep the setup clean and clutter-free for maximum visual impact.
Stackable appliances are a smart way to maximize small kitchen efficiency without sacrificing style. They help you keep countertops clear and organized, making cooking more enjoyable. Once you adopt this approach, you’ll wonder how you ever managed with such limited space. It’s a small change that delivers big convenience and a cleaner look.
7. Create Hidden Storage Inside Kitchen Islands or Carts
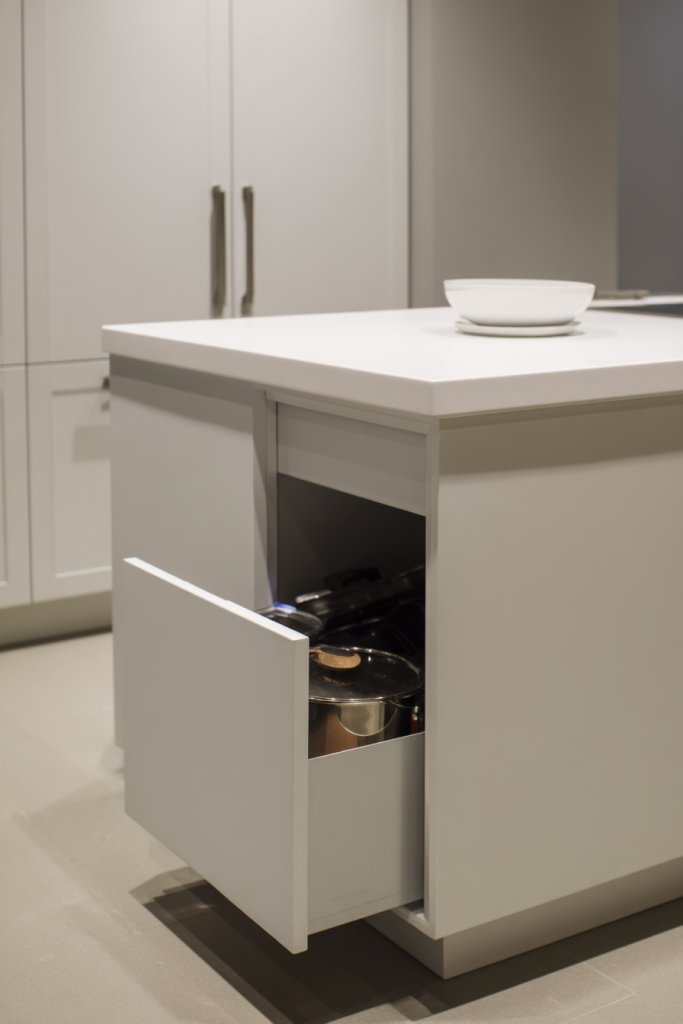
Small kitchens often lack dedicated storage for utensils, pots, pans, and accessories, leading to cluttered counters and cabinets. Finding a way to add extra storage without crowding the space can feel impossible. Hidden storage inside movable islands or carts offers a discreet, functional solution that keeps your kitchen tidy.
Picture a compact rolling cart with a butcher block top and built-in drawers or shelves hidden beneath. When you open the drawers, you find neatly organized utensils, or perhaps a pull-out trash bin tucked away inside. The cart can be moved effortlessly around the kitchen, providing both prep space and storage when needed. The sleek finish and compact size make it a versatile addition to any style.
Choose carts with a variety of finishes—metal, wood, or painted surfaces—to match your decor. Opt for models with adjustable shelves, removable trays, or fold-away features to customize storage. In small spaces, consider multi-level carts that maximize vertical storage. For seasonal use, swap out accessories or add decorative touches to match your mood.
Select a cart that fits your available space and storage needs. Assemble it according to manufacturer instructions, ensuring wheels lock securely for stability. Use baskets, dividers, or labeled containers inside drawers or shelves to keep items organized. Position the cart near frequently used areas for convenience, and clean it regularly for hygiene. Consider adding a towel bar or hooks for extra hanging space.
Decorate the cart with a colorful tablecloth or decorative decals. Use woven baskets or fabric bins to add texture and color while keeping things neat. Attach small hooks or clips on the sides for hanging utensils or towels. Personalize with labels or chalkboard surfaces to identify contents easily. Seasonal accessories like fairy lights or decorative knobs can add charm.
Creating hidden storage inside movable carts makes your kitchen more functional and organized. It provides extra space without permanently altering your layout. Once you see how much you can store, you’ll appreciate the cleverness of this solution. Small, movable, and versatile—these carts are a must-have for optimizing tiny kitchens.
8. Incorporate Clear, Stackable Storage Containers for Pantry Organization
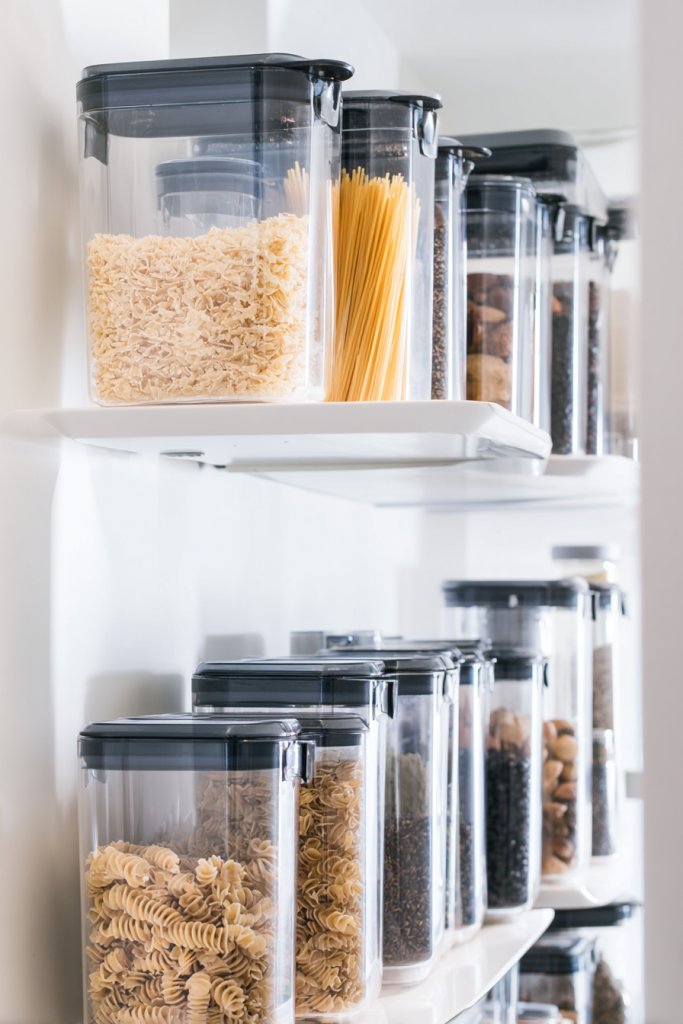
Pantry chaos is a common small kitchen headache—half-empty boxes, unlabeled jars, and a constant hunt for ingredients. When space is tight, keeping everything visible and accessible can seem like an impossible task. Clear, stackable containers are the perfect way to turn clutter into order and make your pantry pop.
Visualize uniform containers made of glass or high-quality plastic, neatly stacked in rows on shelves or inside cabinets. The transparency lets you see exactly what’s inside, so no more digging through opaque bags or cans. Labels or color-coded lids can add extra organization and style. The consistency of the containers creates a clean, streamlined look that’s pleasing to the eye.
Choose containers in different sizes to accommodate everything from spices to pasta. Stackable designs maximize vertical space, and modular sets can be customized to your needs. For added aesthetic appeal, match container colors to your kitchen theme or add decorative labels. Use silicone seals or locking lids for freshness and spill-proof storage.
Start by decluttering and grouping similar items together. Measure shelf heights to select appropriately sized containers. Transfer dry goods into the containers, then label each for quick identification. Stack containers to optimize vertical space and keep frequently used items at eye level. Regularly check for expired items and wipe down containers to maintain cleanliness. Rotate stock periodically for freshness.
Personalize containers with handwritten or printed labels, using fun fonts or color schemes. Incorporate small decorative tags or stickers for a playful touch. Use matching baskets or trays for grouping related items and creating zones. For seasonal or special ingredients, add themed labels or decorative elements to make storage more engaging.
Clear, stackable storage containers transform your pantry into a neat, accessible space. They save time during meal prep and reduce waste by keeping ingredients fresh longer. Once you see how organized everything becomes, you’ll wonder why you didn’t do it sooner. A tidy pantry is the foundation of an efficient, stress-free kitchen environment.
9. Install Under-Cabinet Lighting to Brighten and Expand the Space
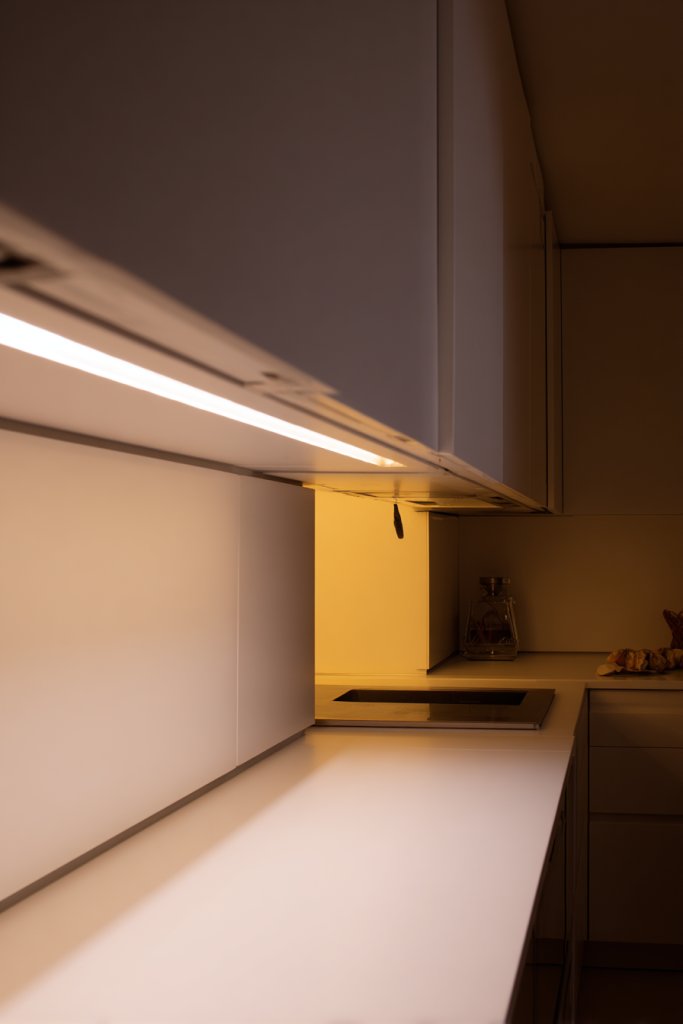
Dim lighting can make a small kitchen feel even more cramped and uninviting. Shadows cast by cabinets obscure prep areas and create a gloomy atmosphere. Wouldn’t it be fantastic to instantly brighten your workspace and make the room feel larger? Under-cabinet lighting is the easy, affordable solution to brighten every corner.
Imagine a sleek strip of LED lights installed beneath your upper cabinets, casting a warm or cool glow over your countertops. The light emphasizes the textures of your work surface and adds depth to the room. When illuminated, the kitchen looks inviting and more spacious, almost like a professional setup. The soft glow creates a cozy ambiance, perfect for evening cooking or entertaining.
Choose from warm white, cool white, or color-changing LEDs to match your mood or decor. Flexible strip lights can be cut to fit any length and installed with adhesive backing for easy mounting. For a more decorative look, add dimmer switches or diffusers. Consider pairing with task lighting over specific zones or accent lights for a layered effect.
Measure the length of your cabinets and select LED strips accordingly. Clean the underside of cabinets thoroughly before applying the strips to ensure adhesion. Connect to a power source, either plugging into an outlet or wiring directly if you’re comfortable with electrical work. Use connectors or extension cords for complex layouts. Test the lighting before final installation to avoid surprises.
Create a customized lighting scheme with remote controls, dimmers, or color options. Use the lighting to highlight decorative elements or to set a specific mood. Incorporate sensor-activated lights for hands-free operation during cooking. For added style, hide wiring behind crown molding or trim for a seamless look.
Under-cabinet lighting is a small upgrade that makes a big impact, transforming your kitchen into a brighter, more functional space. It enhances visibility, making cooking safer and more enjoyable. Once installed, you’ll wonder how you ever managed without it. Brighten your kitchen and feel more confident in your cooking space.
10. Use Corner Shelves or Lazy Susans to Maximize Corner Cabinets
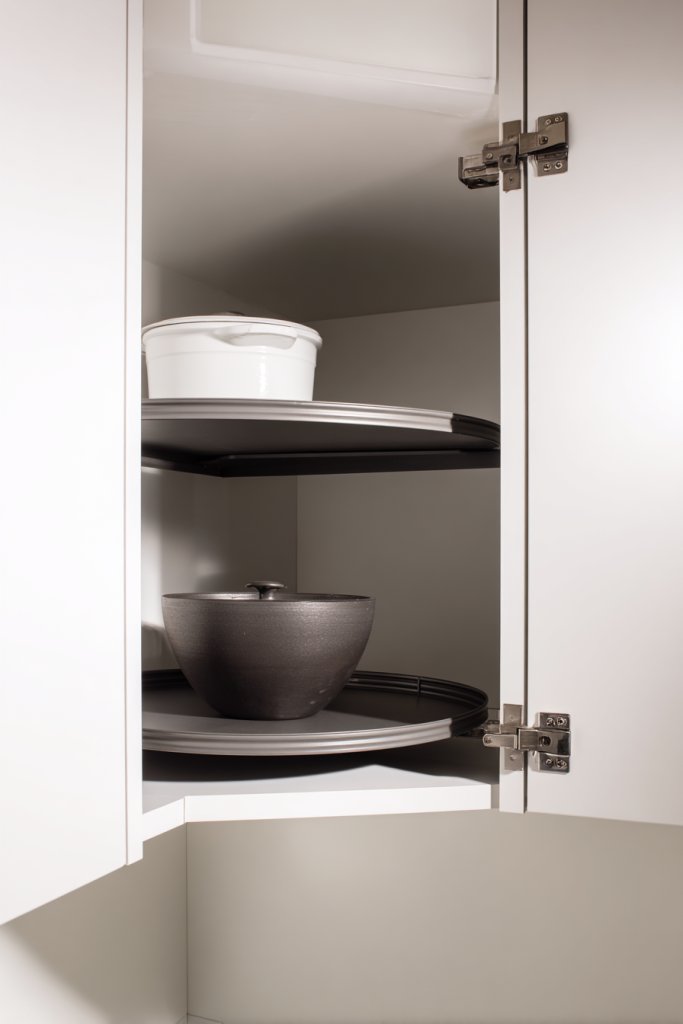
Corner cabinets are notorious for being wasted space—hard to reach and often cluttered. Yet, they’re perfect for storing bulky or seldom-used items if you have the right setup. Want to make those awkward corners work for you instead of fighting with them? Corner shelves and Lazy Susans turn underused space into organized gold.
Visualize a rotating Lazy Susan inside a corner cabinet, filled with spices, oils, or canned goods. The turntable makes everything accessible with a simple spin, eliminating the need to dig through clutter. Alternatively, tiered corner shelves stack items vertically, maximizing space while keeping everything visible. The design is sleek and functional, fitting seamlessly into your existing cabinetry.
Choose from various materials—wood, plastic, or metal—to match your style. For small corners, opt for slim, tiered shelves; for larger spaces, go for full-sized rotating trays. Use baskets or containers inside to group related items. Add decorative elements like painted accents or labels for a personalized touch. These solutions are adaptable for pantry or base cabinets.
Measure the interior dimensions of your corner cabinet carefully. Install a Lazy Susan hardware kit that fits within your cabinet, following the manufacturer’s instructions. For tiered shelves, secure them to the sides or base of the cabinet, ensuring stability. Organize items by size and frequency of use, placing the most-used at the front. Regularly clean and adjust to keep the system functioning smoothly.
Decorate the shelves with colorful liners or labels to differentiate zones. Attach small hooks or clips inside the doors for hanging utensils or small tools. Use decorative jars or containers on the shelves for a cohesive look. Incorporate seasonal or themed touches for added personality. Keep the rotation routine simple to maintain order.
Corner solutions like Lazy Susans and tiered shelves make neglected spaces highly functional. They reduce clutter and save time during meal prep. Once you see how much storage space you regain, you’ll be motivated to optimize every corner. These small changes lead to a more organized and efficient kitchen environment.
11. Implement Multi-Functional Furniture Pieces
Small kitchens often struggle to provide both dining and prep areas without feeling cramped. You want furniture that serves multiple purposes—saving space and adding style. Multi-functional pieces are the secret weapon for maximizing every inch while keeping your decor cohesive. Who says you can’t have it all in a tiny space?
Picture a compact table with foldable leaves that tuck away when not in use, or a bench that doubles as storage for tableware or linens. These pieces blend seamlessly into your kitchen, offering a place to eat, work, or prep. The surfaces are smooth and durable, with hidden compartments or drawers that keep clutter out of sight. The design is clean and modern, fitting into any aesthetic.
Choose from fold-away tables, extendable surfaces, or stools with storage compartments. Materials like wood, metal, or composite can match your style—rustic, modern, or eclectic. For seasonal updates, switch out tablecloths or add decorative cushions to stools. Select designs that are lightweight for easy movement or sturdy for daily use.
Measure your space carefully to select multi-purpose furniture that fits comfortably. Assemble according to instructions, ensuring stability and safety. Use the hidden compartments for storing rarely used items or seasonal accessories. Position the furniture for easy access and good traffic flow. Regularly clean and maintain the mechanisms for longevity.
Add decorative elements like colorful placemats, cushions, or table runners to match your decor. Use labels or decals on storage compartments for quick identification. Incorporate small trays or baskets inside drawers for organization. Personal touches like a vintage chair or a custom-painted tabletop can elevate the whole look.
Multi-functional furniture transforms your small kitchen into a versatile space without sacrificing style. It’s a smart investment that adapts to your needs over time. Once you see how it simplifies daily routines, you’ll wonder why you didn’t do it sooner. Small, clever upgrades make a big difference in your living experience.
12. Incorporate Pull-Out Pantries or Shelves for Hard-to-Reach Areas
Reaching into deep cabinets or squeezing into tight spaces for ingredients is a daily frustration. Cluttered, inaccessible corners waste valuable space and slow down your cooking. Want a smarter way to access everything without the hassle? Pull-out pantries and shelves make those tricky spots easily usable.
Visualize a narrow cabinet with a sliding shelf or a full-height pull-out pantry that glides smoothly when needed. It reveals a full view of stored items, from canned goods to baking supplies. The mechanism is sleek, often with soft-close features, keeping everything quiet and gentle. It transforms a concealed space into an accessible, organized mini-closet.
Choose from various configurations—single pull-out shelves, multi-tiered units, or modular systems. Materials range from durable metal to wood finishes, matching your overall decor. Install in tight corners or between appliances for maximum efficiency. Use labeled baskets or containers inside for even better organization. Seasonal swaps can keep the setup feeling fresh.
Measure the depth and width of the space carefully before selecting your pull-out system. Securely install the slides into the cabinet sides, anchoring into wall studs or solid framing. Organize your items with labels or stacking bins for quick retrieval. Regularly check for smooth operation and clean the tracks for longevity. Consider upgrading hardware if the mechanism feels loose or sticky.
Personalize with color-coded containers or custom labels. Add small hooks or clips inside the doors for hanging utensils or small tools. Use decorative paper or liners inside the shelves to add visual interest. For a unique touch, incorporate a chalkboard label system to track inventory or meal plans.
Pull-out shelves turn hard-to-reach spaces into highly functional storage zones. They make your kitchen more efficient and less cluttered. Once you experience the ease of access, you’ll appreciate how much smarter your space becomes. It’s a simple upgrade with impressive results—go for it!
13. Use Open-Frame or Minimalist Cabinet Doors to Create a Spacious Look
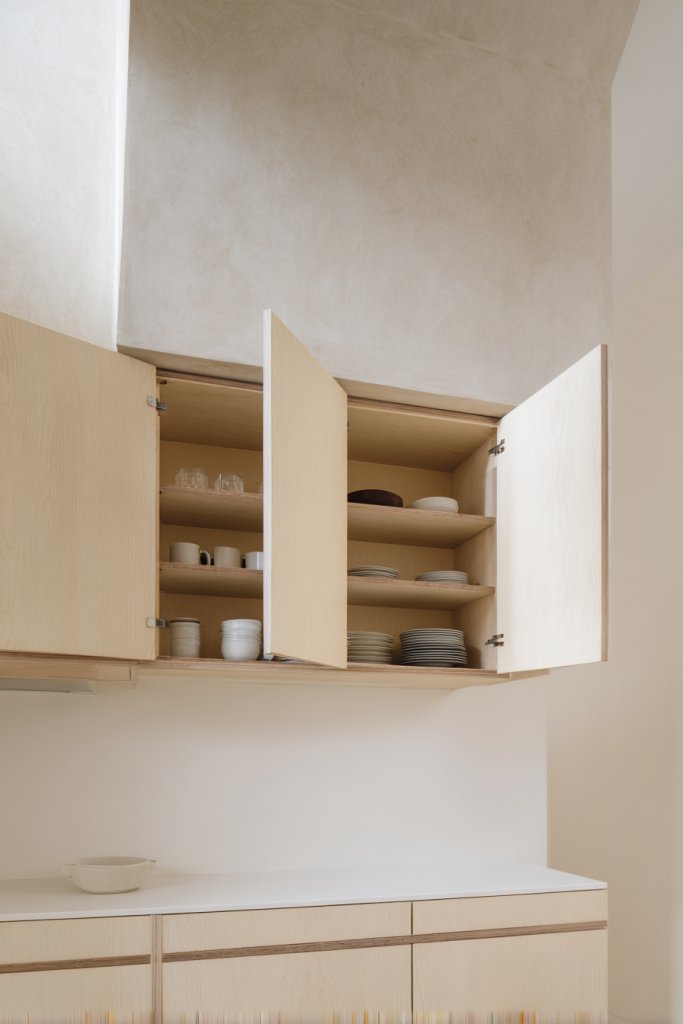
Closed cabinets can make a small kitchen feel cramped and cluttered. Heavy, solid doors add visual weight, making the space seem smaller than it is. Want a brighter, airier ambiance? Open-frame or minimalist cabinet doors give your kitchen a sense of openness and modern flair.
Picture glass-fronted cabinets or open shelving with sleek, simple frames. The transparent panels showcase your dishware or neatly arranged storage containers, adding a decorative element. The open design allows light to flow freely, making the space feel larger and less confined. Combining different open and closed elements creates visual interest and balance.
Choose from materials like clear glass, frosted glass, or open wood frames—each creates a different vibe. Incorporate minimalist hardware or no hardware at all for a seamless look. Mix open shelves with closed cabinets to hide clutter, and consider adding decorative trim or molding for a finished appearance. Seasonal or theme-based accessories can change the look easily.
Replace or retrofit existing cabinet doors with glass or open-frame panels. Use mounting hardware that supports the weight and style of your choice. Organize inside with attractive containers or stacking trays to keep things tidy. Balance the open sections with closed cabinetry to prevent visual overload. Regularly clean glass or open surfaces for a sparkling, fresh appearance.
Decorate open shelves with styled dishware, colorful bowls, or decorative jars—just avoid clutter. Add LED strip lighting inside or underneath for a warm glow. Use decorative brackets or trim to enhance the frames. Personal touches like vintage signs or small sculptures can add character without crowding the space.
Open or minimalist cabinetry creates a spacious, modern feel that’s perfect for small kitchens. It invites natural light and emphasizes a clean, organized aesthetic. Once you try it, you’ll see how it visually expands your space and elevates your decor. A simple switch in cabinet style can make a huge difference—go for it!
14. Hang Pot Racks or Ceiling-mounted Cookware Storage
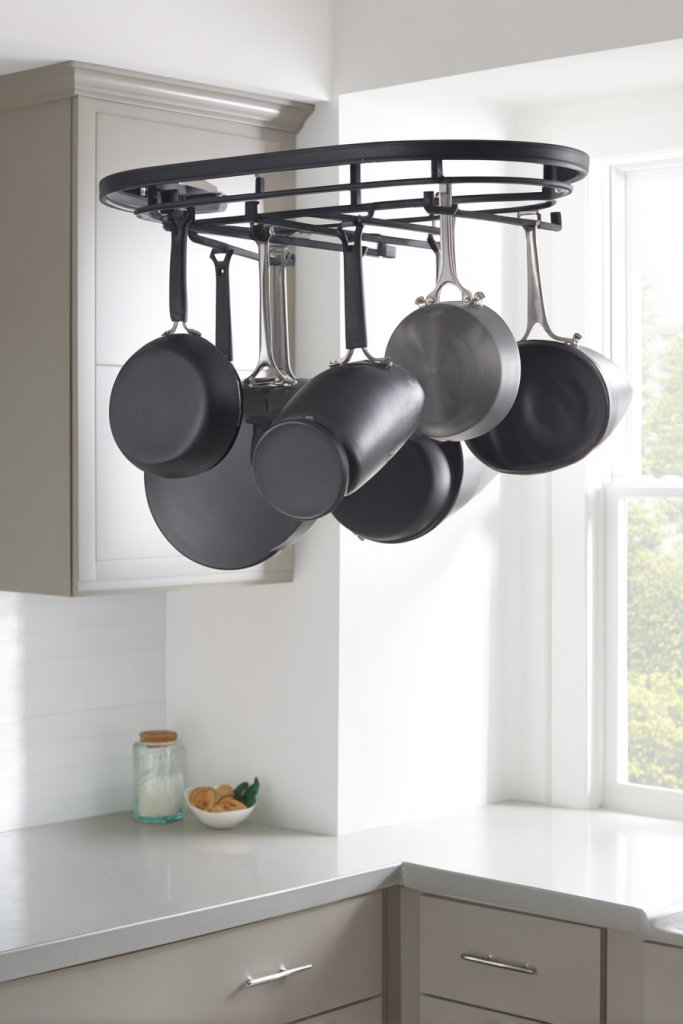
Counter and cabinet space is precious, yet pots, pans, and utensils often dominate the countertops or clutter cabinet interiors. It’s frustrating trying to find what you need quickly. Wouldn’t it be great to free up space and keep your cookware on display? Ceiling-mounted racks or wall-mounted pot hangers tidy up your kitchen and add a professional touch.
Imagine a sturdy metal or wood rack suspended from the ceiling, holding a variety of pots, pans, and utensils. The hooks are adjustable, allowing you to organize by size or function. The open display creates an industrial or rustic vibe that’s both functional and stylish. The space beneath remains clear for prep work, and your cookware becomes part of the decor.
Choose from ceiling-mounted racks, wall-mounted rails, or combination setups depending on your space. Use matching hooks or decorative elements that complement your kitchen style. Consider adding small shelves or utensil holders to maximize vertical use. For seasonal or special events, swap out cookware or add decorative accents like colorful grips or handles.
Install ceiling mounts into ceiling joists, ensuring they’re rated for the weight of your cookware. For wall racks, secure into studs or anchors, making sure they’re level. Arrange your pots and pans by size or frequency of use for efficiency. Regularly check the hardware and clean the rack to prevent grease buildup. Keep the hooks adjustable for future reorganization.
Decorate the hooks with colorful ribbons or silicone grips for a playful touch. Use matching or contrasting colors to coordinate with your kitchen palette. Incorporate small baskets or containers for utensils and lids. Personalize with vintage or handcrafted hardware for a unique, curated look.
Ceiling-mounted cookware storage keeps your kitchen organized and visually appealing. It’s a practical upgrade that also adds a trendy, professional aesthetic. Once you see how much space you gain, you’ll wonder why you didn’t do it sooner. It’s a simple change with a big impact on your cooking environment.
15. Apply Peel-and-Stick Backsplash for Style and Ease of Maintenance
A small kitchen often feels dull or uninspired, especially with plain walls or outdated tiles. A backsplash not only protects your walls but also adds personality and style. But traditional tile installation can be messy, time-consuming, and expensive. Enter peel-and-stick backsplash tiles—easy to install, affordable, and stylish.
Picture a wall lined with decorative peel-and-stick tiles in geometric patterns, metallic finishes, or colorful mosaics. They instantly transform the look of your space, reflecting your personality. The tiles have a textured surface that mimics real ceramic or stone, giving your kitchen a custom feel. When lit, they catch the light and add depth, making your small kitchen feel more lively.
Choose from a wide array of designs—modern, vintage, or eclectic—to suit your style. Mix different patterns or colors for a patchwork effect. Use trim or molding to frame the edges for a clean finish. Seasonal or thematic designs can switch up your decor easily, keeping your kitchen feeling fresh and engaging.
Clean and dry the wall thoroughly before applying. Measure and cut tiles to fit around outlets or corners. Peel off backing paper and carefully press each tile into place, starting from the center and working outward. Use a smoothing tool to eliminate air bubbles. For difficult areas, trim tiles with scissors or a utility knife. Seal edges with caulk if needed for a seamless look.
Customize with decals, small decorative stickers, or metallic accents to add sparkle. Incorporate LED strip lighting above or below the backsplash for extra brightness. Use contrasting grout or color schemes to highlight patterns. Personal touches like initials or custom motifs can make your backsplash truly unique.
Peel-and-stick tiles are a fantastic way to refresh your kitchen’s look quickly and without a big budget. They’re forgiving for DIYers and easy to replace or update. Once installed, your kitchen will feel brighter and more inviting. It’s a small upgrade that makes a big style statement—go ahead, transform your space!
16. Use Compact, Pull-Out Trash and Recycling Bins
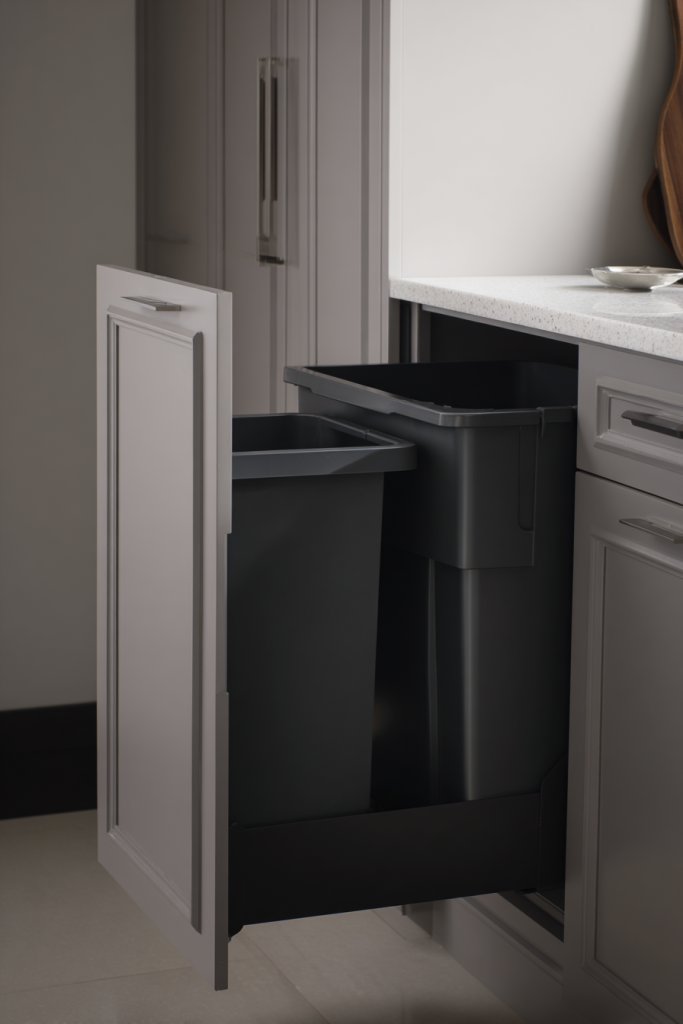
Trash bins are usually an eyesore, taking up precious space and creating clutter in small kitchens. When hidden in cabinets, they’re often inconvenient to access and clean. Wouldn’t it be great to have a discreet, space-efficient waste solution that keeps your kitchen tidy? Pull-out trash and recycling bins are the answer.
Imagine a sleek cabinet with a slide-out drawer that holds your waste and recycling containers. When needed, simply pull the handle, and the bins roll out smoothly for easy disposal. The design keeps unsightly bins hidden from view, maintaining a clean, streamlined aesthetic. The system blends seamlessly into your cabinetry, making waste management practically invisible.
Choose from single or dual-compartment systems, depending on your waste needs. Select containers with matching finishes or colors to coordinate with your kitchen decor. For added convenience, opt for models with lids, odor filters, or foot pedals. Custom sizes fit into standard or custom cabinetry, maximizing every inch.
Measure the interior space of your cabinet to select compatible bins. Install the slide-out hardware securely into the cabinet base or sides, ensuring it can handle the weight. Place the bins inside, and attach any lids or odor control features. Keep the system clean and check for smooth operation regularly. Swap out bags as needed and wash bins to prevent odors.
Label the bins for recycling or compost for added clarity. Use decorative or color-coded liners for quick identification. Add small accessories like brush holders or scent sachets nearby to keep the area fresh. For a personal touch, choose hardware finishes that match your cabinet handles or fixtures.
Pull-out trash and recycling solutions keep your small kitchen looking pristine while making waste disposal effortless. They hide clutter and improve hygiene, making everyday cleanup easier. Once you adopt this system, you’ll wonder how you ever managed without it. It’s a simple upgrade that pays off in cleanliness and convenience.
17. Create a Magnetic Spice Rack on the Fridge or Wall
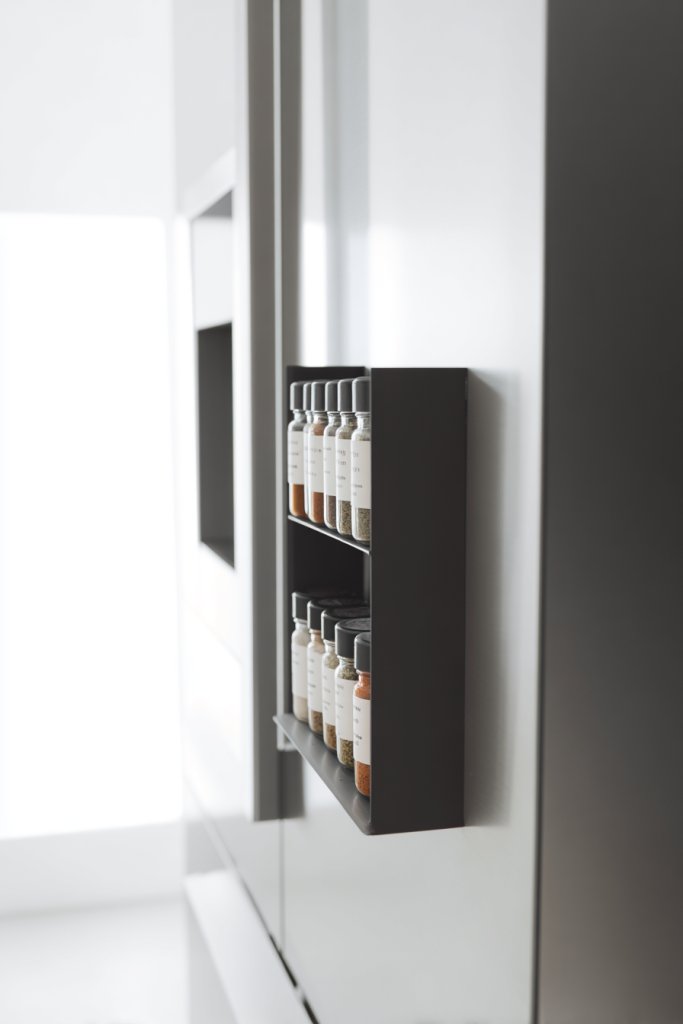
Spice jars scattered across countertops or hidden in cabinets make cooking more complicated and less stylish. Finding the right spice quickly can feel like a scavenger hunt. Want a smart, space-saving way to keep your spices organized and accessible? A magnetic spice rack is the perfect solution to declutter your kitchen surfaces.
Picture a magnetic strip or small metal containers attached to your fridge or wall, holding colorful spice jars in a neat row. The clear labels make it easy to identify each spice at a glance, speeding up meal prep. The sleek, minimalist setup adds a modern touch to your kitchen, making it look organized and intentional. It’s a visual centerpiece that’s both functional and attractive.
Choose magnetic strips that match your kitchen hardware or paint color for a seamless look. Use small, labeled metal tins or glass jars with magnetic lids for a more decorative appearance. Place the rack at eye level or near your cooking station for convenience. You can also add small hooks for measuring spoons or utensils to maximize the space.
Secure the magnetic strip or containers to a clean, dry surface using strong adhesive or screws. Arrange your spices by frequency of use or color palette for visual harmony. Keep the jars tightly sealed and wipe the surface regularly to prevent spills. Consider combining with a small chalkboard label or tag for seasonal or special spices. Regularly review and rotate spices for freshness.
Decorate the jars with custom labels, stickers, or hand-painted accents for a personal touch. Incorporate matching storage containers or a spice drawer for overflow or bulk items. Use a decorative tray underneath for catching spills or for easy relocation. Add a small plant or decorative element nearby to create a balanced look—minus the green stuff, of course. 🙂
A magnetic spice rack keeps your seasonings tidy, accessible, and adds a sleek, modern flair to your kitchen. It simplifies cooking and makes your space look polished. Once you try it, you’ll wonder how you ever managed without this smart, space-efficient setup. It’s a small change with a big impact—start organizing today!
18. Opt for Light-Colored Cabinets and Walls to Enhance Brightness
If your small kitchen feels like a dark cave, you’re not alone. Limited natural light and cramped spaces can make even the most charming kitchen look dull and tiny. Brightening up the space instantly boosts its size and livability. Who doesn’t want a kitchen that feels airy, fresh, and welcoming?
Picture cabinets painted in soft creams or pastel tones reflecting light, bouncing it around the room. Walls in matte or satin finishes with a hint of sheen make surfaces pop without overwhelming. Imagine a space illuminated by natural sunlight, complemented by reflective surfaces that amplify the glow. Even the smallest kitchen can feel expansive when filled with light and brightness.
For a cozy winter vibe, use warm whites and subtle beiges, adding textured textiles for softness. In summer, go for crisp whites and cool blues to evoke freshness. If you prefer a modern look, combine light-colored cabinets with glossy finishes and minimalist hardware. For rustic or farmhouse styles, distressed paint with matte finishes pairs beautifully with light color palettes.
Choose paint shades with high reflectance values to maximize brightness. Use semi-gloss or satin finishes for walls and cabinets—these reflect more light. Avoid dark countertops and opt for light-colored materials like quartz or laminated surfaces. Incorporate large, unadorned windows or skylights if possible to flood the space with natural light. Keep window treatments minimal or sheer to allow maximum daylight entry.
Add textured textiles in light shades such as soft cream throws or linen curtains. Incorporate decorative elements like glossy backsplash tiles or metallic accents to reflect light further. Use open shelving painted in light hues to display colorful dishware or glassware, adding visual interest without darkening the space. Keep clutter to a minimum for a clean, bright appearance.
Bright kitchens feel more inviting and spacious, encouraging you to cook and entertain with ease. When your space is filled with light, it naturally lifts your mood and sparks creativity. Embracing light colors can be a game-changer, making even tiny kitchens feel expansive and fresh. Once you experience the difference, you’ll never want to go back to dark or dull spaces.
19. Install a Pull-Out Cutting Board for Hidden Prep Space
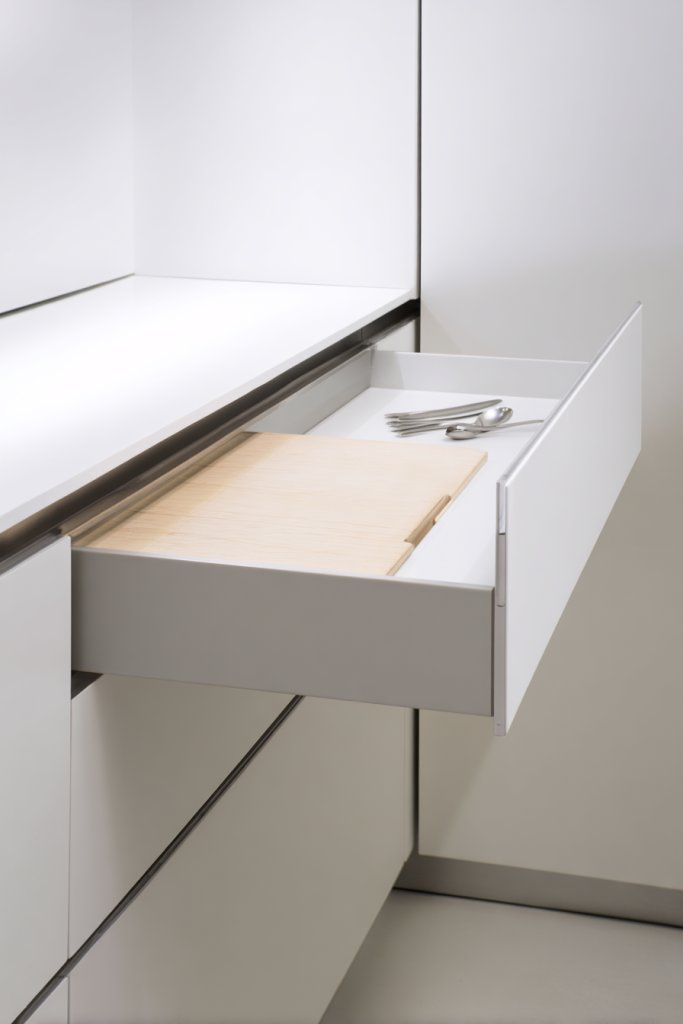
Limited counter space can turn meal prep into a frustrating puzzle. If your kitchen’s surface is constantly cluttered, it’s hard to get into a rhythm. A pull-out cutting board offers a clever solution—extra prep space that hides away when not in use. Who wouldn’t love an instant, extra work surface with a simple slide?
Imagine smoothly pulling out a sleek wooden or composite board from inside a cabinet, revealing a sturdy surface ready for chopping. It seamlessly fits into your cabinetry, almost invisible when tucked away. The mechanism is smooth, and the finish complements the surrounding cabinetry. When retracted, it’s just a neat, integrated feature that doesn’t intrude on your clean countertops.
Choose materials that match your aesthetic, from rustic butcher block to sleek, modern composites. For small or contemporary kitchens, opt for minimalist designs with hidden drawer handles. In vintage-inspired spaces, distressed wood or decorative hardware adds charm. Seasonal or themed finishes, like colorful edges or painted accents, can personalize this feature further.
Start by assessing the available cabinet space suitable for a pull-out board. Select high-quality slides rated for heavy use, ensuring smooth operation over years. Measure the dimensions carefully to fit the board snugly but allow easy sliding. Install the slides inside the cabinet and attach the board securely, making sure it glides effortlessly. Consider sealing the edges to prevent water or debris buildup.
Add a groove for holding utensils or a built-in juice groove for easy cleanup. Customize the surface with a food-safe finish or decorative paint. Attach a small magnetic strip or hooks nearby for knives or utensils, creating a dedicated prep zone. If space allows, incorporate a fold-down extension for even more workspace.
A pull-out cutting board transforms a tiny kitchen into a functional culinary workspace. It’s a perfect example of smart, space-saving design that boosts your confidence in meal prep. Once installed, it’s a game-changer for efficiency and organization. Your kitchen will feel more versatile and less cramped, inspiring you to cook more often.
20. Use Over-the-Range Microwave and Vent Hood Combo
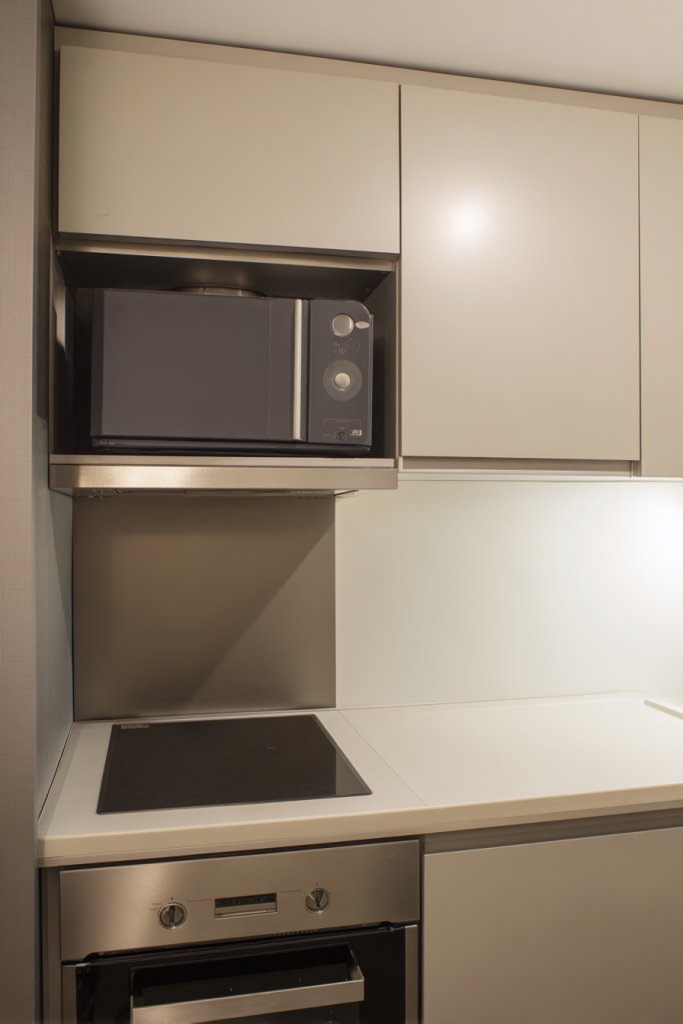
Counter space is gold in a small kitchen, yet microwaves and range hoods often hog that precious real estate. Combining these two essentials into a single unit frees up countertop space and creates a sleek look. It’s a smart move for anyone tired of cluttered surfaces and cramped work zones.
Visualize a compact, integrated unit mounted above your stove, with a streamlined design that blends into your cabinetry. The microwave sits flush, while the vent component extends seamlessly from the same housing. The entire setup looks modern and minimal, with clean lines and a uniform finish. It creates a tidy, organized appearance that makes your kitchen feel more open.
Choose models with sleek digital controls and stainless steel finishes for a contemporary vibe. For a warmer, cottage style, look for units with matte black or painted wood accents. Some units feature smart functions like sensor cooking or voice controls, adding a high-tech touch. The size of the unit can be customized based on your stove width and kitchen layout.
Measure your existing space carefully to select the right size. Ensure your cabinetry can support the weight of a combined unit, or reinforce as needed. Install the mounting bracket securely into wall studs, following manufacturer instructions. Connect the electrical wiring and test the functions before finalizing the installation. Regularly clean the filters and check for proper operation to maintain efficiency.
Opt for units with digital display panels and customizable lighting to match your kitchen’s style. Use decorative trims or panels to integrate the unit seamlessly with your cabinetry. Add small, magnetic spice racks or utensil holders nearby for convenience. Consider coordinating the unit’s finish with other hardware for a cohesive look.
This combo setup simplifies your cooking space, making it more functional and stylish. It’s a modern upgrade that impresses guests and boosts your kitchen confidence. With less clutter and a streamlined appearance, you’ll enjoy cooking more and cleaning less. Embrace this space-saving tech for a cleaner, more efficient kitchen.
21. Incorporate Narrow Rolling Carts for Flexible Storage
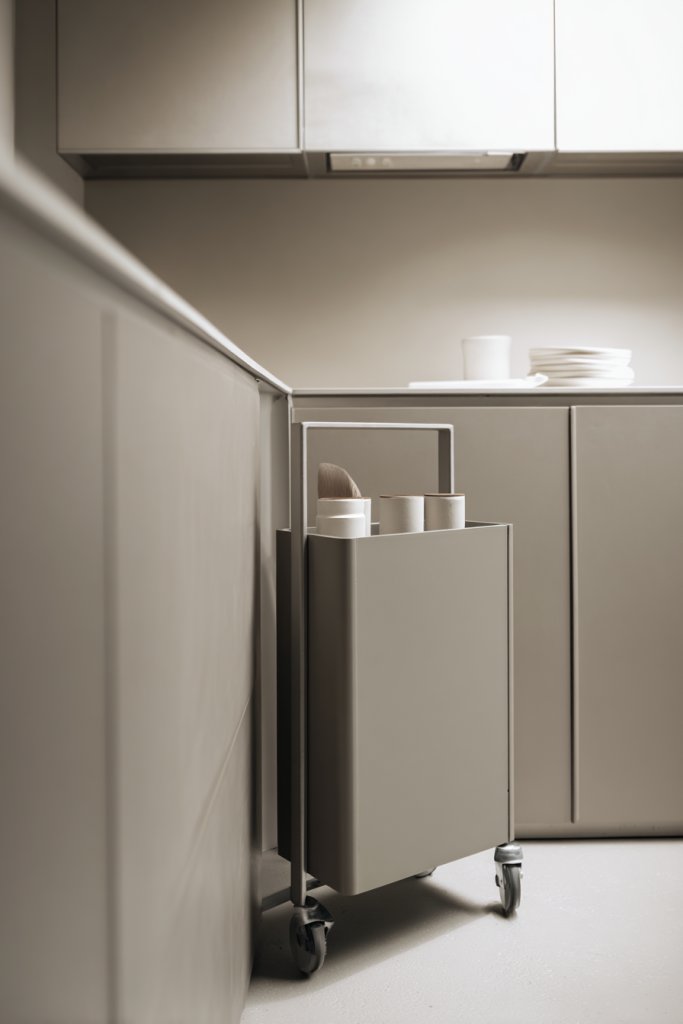
Small kitchens often lack flexible storage options, making it hard to keep everything organized while maintaining accessibility. Narrow rolling carts are the perfect solution—they slide into tight spaces and can be moved when needed. They add versatility without sacrificing style or space. Who doesn’t want extra storage on the go?
Picture a slim cart with multiple tiers, filled with spices, utensils, or small cookware. It rolls smoothly on casters, easily sliding in and out of narrow gaps between appliances or cabinets. When not in use, it tucks away discreetly, almost invisible. Its clean, minimalist design complements various decor styles, from modern to rustic.
Choose carts with colorful frames for a playful touch or sleek metals for a contemporary look. Add baskets or fabric bins to organize smaller items. Use them as mobile prep stations or snack stations during gatherings. For seasonal flexibility, opt for removable trays or adjustable shelves that adapt to your needs.
Identify underutilized spaces where a slim cart fits snugly. Select a cart with durable wheels that lock for stability. Assemble following the manufacturer’s instructions, ensuring the wheels move smoothly. Load with items you frequently use, like oils, utensils, or small appliances. Regularly clean and check the wheels for smooth operation.
Decorate the cart with colorful contact paper or paint for a personalized look. Attach labels or tags for quick item identification. Use it as a dedicated coffee or tea station, changing its contents seasonally. You can also add handles or decorative accents to match your kitchen’s style.
Narrow rolling carts bring a level of flexibility and organization that transforms tiny spaces into highly functional zones. They make daily routines easier and add a fun, dynamic element to your kitchen. Once you experience the convenience, you’ll wonder how you ever managed without them.
22. Hang Utensils and Small Tools on a Wall-Mounted Pegboard
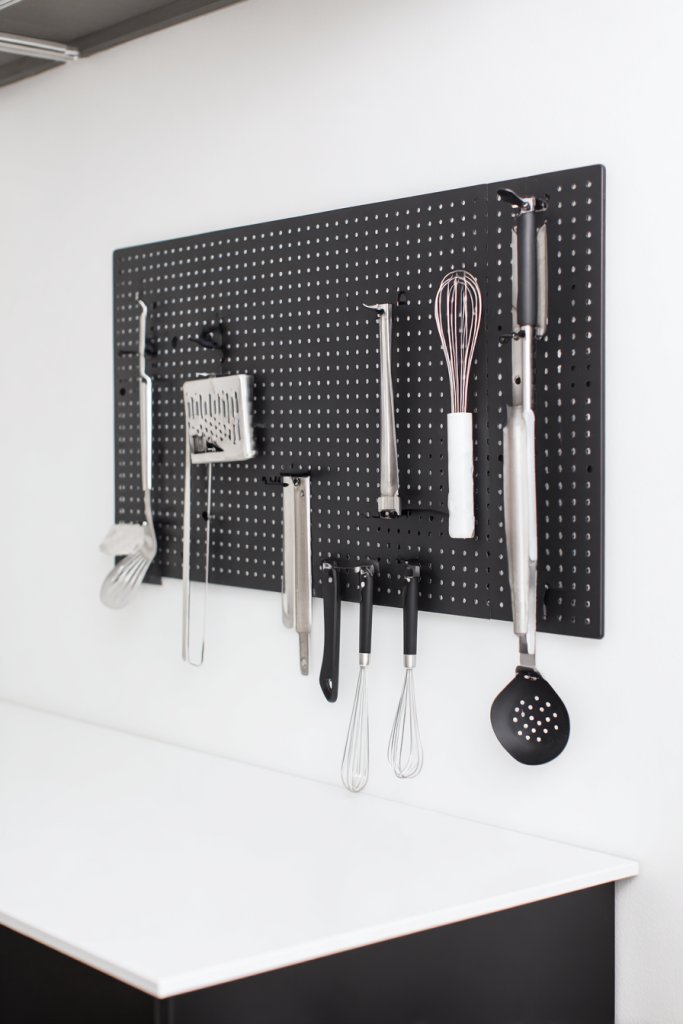
Counter clutter from utensils and small tools can make a tiny kitchen feel chaotic. Digging through drawers for that one spatula or whisk wastes time and creates mess. Wall-mounted pegboards offer a simple, stylish way to organize everything visibly and within arm’s reach. Who wouldn’t want their tools displayed like a chef’s dream?
Imagine a sleek metal or wooden pegboard mounted above your workspace, with hooks holding spatulas, whisks, and tongs. Colorful silicone grips or decorative hooks add personality and contrast. The arrangement keeps tools accessible, while the open grid design adds an industrial or modern touch to the space. It’s a functional art piece that declutters countertops.
Choose a pegboard with a frame that matches your cabinetry or a bold color to make it pop. Customize with small baskets or containers for spices or small gadgets. Use different hook sizes for varied tools, and organize by frequency of use. For a softer look, incorporate cork strips or painted wood accents that blend with your decor.
Select a durable pegboard with appropriate weight capacity. Mount it securely into wall studs, ensuring it’s level. Arrange hooks and accessories based on your tool sizes and accessibility needs. Keep frequently used items at eye level for convenience. Regularly tidy and rearrange to keep it functional and attractive. Consider adding labels for quick identification.
Decorate with themed hooks or painted frames to match your kitchen style. Integrate a small chalkboard or memo clip for reminders. Use colorful or patterned hooks to add visual interest. You can even add a small shelf or two for decorative or functional items like measuring spoons or small jars.
A pegboard turns a cluttered wall into an organized, attractive feature. It encourages better tool management and quick access, reducing frustration. Seeing your tools neatly displayed boosts confidence and inspires you to keep your kitchen tidy. It’s a simple upgrade with impressive results.
23. Install a Compact, Fold-Out Table for Dining or Food Prep
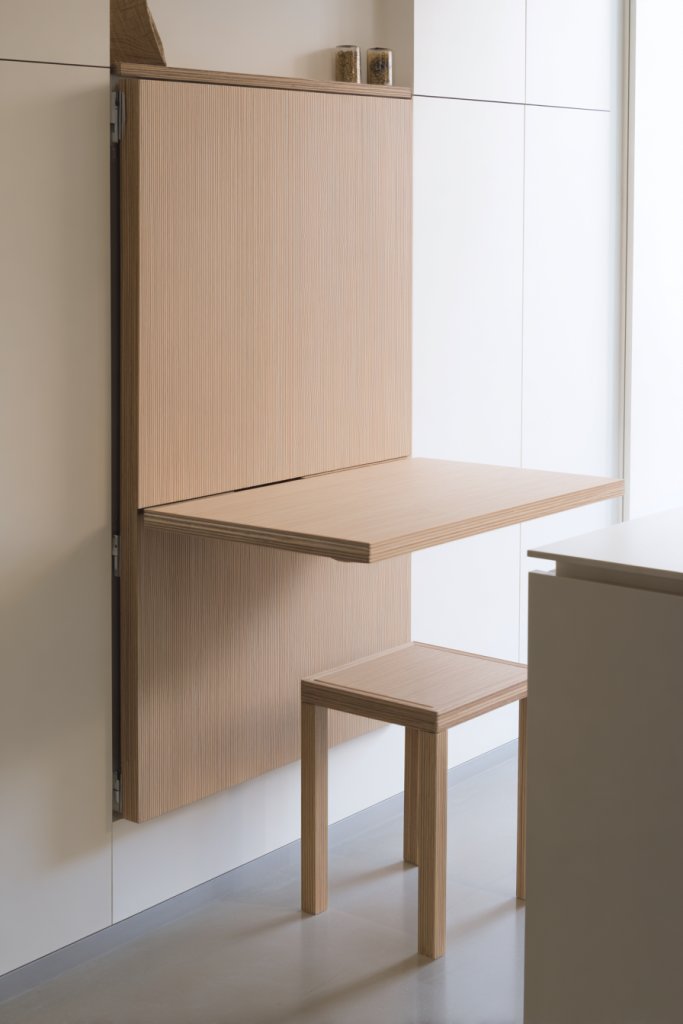
Limited space often means sacrificing dining or extra prep area, leaving you juggling with tiny counters or uncomfortable setups. A fold-out table provides a quick solution—expandable space that stows away when not needed. Who doesn’t want a versatile surface that adapts to their needs?
Visualize a sleek wall-mounted table that folds flat against the wall, with a simple latch to pull down. When in use, it provides enough room for a couple of people to eat or prep food comfortably. The surface is smooth, with a finish that matches your cabinetry. When folded up, it’s barely noticeable, maintaining your room’s clean lines.
Choose materials like wood, laminate, or even acrylic for a modern look. For rustic charm, opt for distressed wood with decorative brackets. In minimalist kitchens, use hidden hinges and a seamless finish for a sleek appearance. You can also customize the size to fit your space, from small side tables to larger dining surfaces.
Select a sturdy wall bracket designed for your chosen table size. Measure the space carefully, ensuring clearance when folded and unfolded. Attach the bracket to wall studs using appropriate anchors. Install the fold-out surface securely, and test for stability. Add a latch or magnet to keep it flush against the wall when folded. Keep the surface clean and sealed for durability.
Add decorative edge trims or paint the fold-out surface to match your decor. Use cushions or fabric covers for comfy seating nearby. Incorporate small storage hooks or baskets underneath for utensils or napkins. Personal touches make the setup more inviting and functional.
A fold-out table maximizes space without sacrificing function, turning tiny kitchens into multi-use areas. It encourages you to host friends or enjoy quick meals comfortably. Once installed, it becomes a favorite feature that boosts your confidence in small-space living and entertaining.
24. Keep Surfaces Clear with Hidden Storage Solutions
Cluttered countertops make any kitchen feel cramped and stressful, especially in small spaces. Hidden storage solutions help keep surfaces tidy while still providing quick access to essentials. Who doesn’t love a kitchen that looks spacious and organized at a glance? The secret is clever concealment.
Imagine sleek cabinets with built-in compartments or drawers that store everyday items out of sight. The countertops are clear, with only a few carefully curated accessories on display. When you open a hidden drawer or lift a countertop panel, everything you need is right there, neatly tucked away. The overall look is minimalist, clean, and spacious.
Use push-to-open cabinets or drawers with soft-close mechanisms for a seamless appearance. Incorporate pull-out trays or hidden compartments for small appliances or utensils. For a more decorative touch, opt for cabinetry with integrated handles or finger pulls. Adapt the size and placement based on your daily routines and available space.
Identify high-traffic areas where hidden storage makes sense. Choose cabinetry with internal organizers or custom inserts for maximum efficiency. Install with proper hardware, ensuring smooth operation and durability. Use labels or color coding inside compartments for quick identification. Regularly declutter to maintain the neat appearance and functionality.
Add decorative trims or paint to match your decor, making the hidden compartments part of the aesthetic. Use soft-close hinges to prevent slamming and preserve furniture longevity. Incorporate small lighting strips inside drawers or cabinets for better visibility. Personal touches like customized dividers or themed labels enhance usability.
Hidden storage solutions turn chaos into calm, making your kitchen more enjoyable and less stressful. They show that smart design can maximize every inch, boosting your confidence in DIY upgrades. A clutter-free surface invites you to cook, entertain, and relax with ease, transforming your small kitchen into a stylish haven.
Conclusion
With the diverse range of mini kitchen ideas shared, you’re now equipped to make the most of your small space. Implement these creative solutions to enhance functionality and style in your kitchen, making every inch count. Embrace these ideas and turn your compact kitchen into a space that inspires your culinary adventures—your perfect small kitchen awaits!