Step into the timeless charm of Mid-Century Modern kitchens, where sleek designs meet functional brilliance to create spaces that are both stylish and inviting. This design style’s popularity continues to surge because of its clean lines, warm wood tones, and a perfect blend of retro and contemporary elements that never go out of style.
In this article, you’ll uncover a diverse range of ideas to elevate your kitchen—whether you’re into bold color accents, minimalist cabinetry, or iconic furniture pieces. Get ready to explore creative ways to bring classic Mid-Century Modern vibes into your home and make your kitchen a true expression of timeless elegance.
1. Incorporate Sleek, Flat-Front Cabinets in Warm Walnut or Teak Finishes
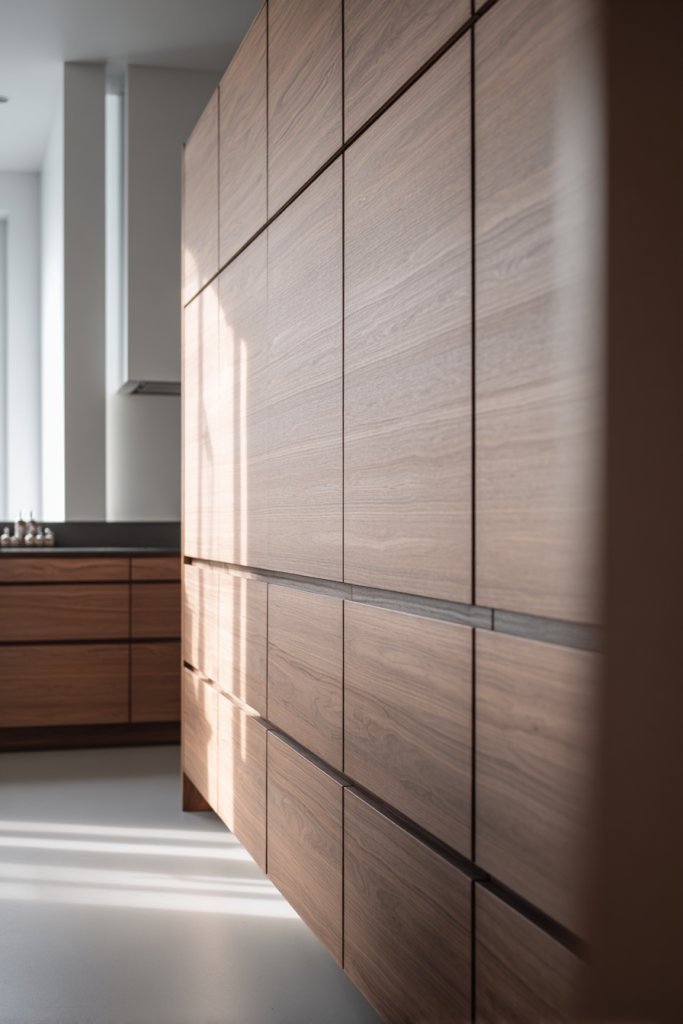
Ever feel like your kitchen’s looking a bit tired or outdated, but you’re not ready for a full remodel? Sleek, flat-front cabinets in warm wood tones are like a breath of fresh air—simple, stylish, and timeless. They solve the problem of cluttered, overly ornate cabinetry that distracts from the overall vibe. Plus, they make your space feel more spacious and modern without much effort.
Imagine smooth, handleless cabinets with a rich walnut or teak finish, reflecting warm sunlight and adding natural elegance. The flat fronts create a seamless look, while the subtle grain adds texture. The clean lines draw your eye across the room, making even small kitchens appear larger. It’s the perfect canvas for colorful accents or minimalist decor.
You can choose lighter or darker shades depending on your style—pale oak for Scandinavian chic or deep walnut for a cozy vibe. In open-concept spaces, these cabinets blend well with modern, rustic, or even eclectic decor. If space is tight, opt for floor-to-ceiling panels to maximize storage without clutter. Seasonal touches like a soft cream throw or textured towels can refresh the look.
Start by selecting high-quality veneer or solid wood panels with a matte or semi-gloss finish. Install handleless mechanisms like push-to-open or integrated grooves for the smooth front effect. Consider custom cabinetry to ensure perfect alignment and minimal gaps. Use durable, moisture-resistant materials to handle kitchen wear and tear. For a DIY project, precise measuring and a steady hand are a must—otherwise, hire a professional for a flawless finish.
Personalize with subtle hardware, like black or brass accents, if you prefer a slightly more detailed look. Add decorative trims or colored glass panels for a modern twist. Use open shelving nearby to display favorite dishware or decorative storage boxes. Incorporate soft-close mechanisms for a quieter, more refined experience. A touch of natural wood oil or wax can enhance the grain’s richness over time.
Sleek, flat-front cabinets are a classic that never goes out of style. They can elevate your kitchen’s overall aesthetic and boost your confidence in DIY upgrades. With their timeless appeal, they’re an investment that pays off visually and practically, blending seamlessly with current decor trends. Ready to give your kitchen a sleek, modern facelift?
2. Install Iconic Geometric Tile Backsplashes in Bold Colors
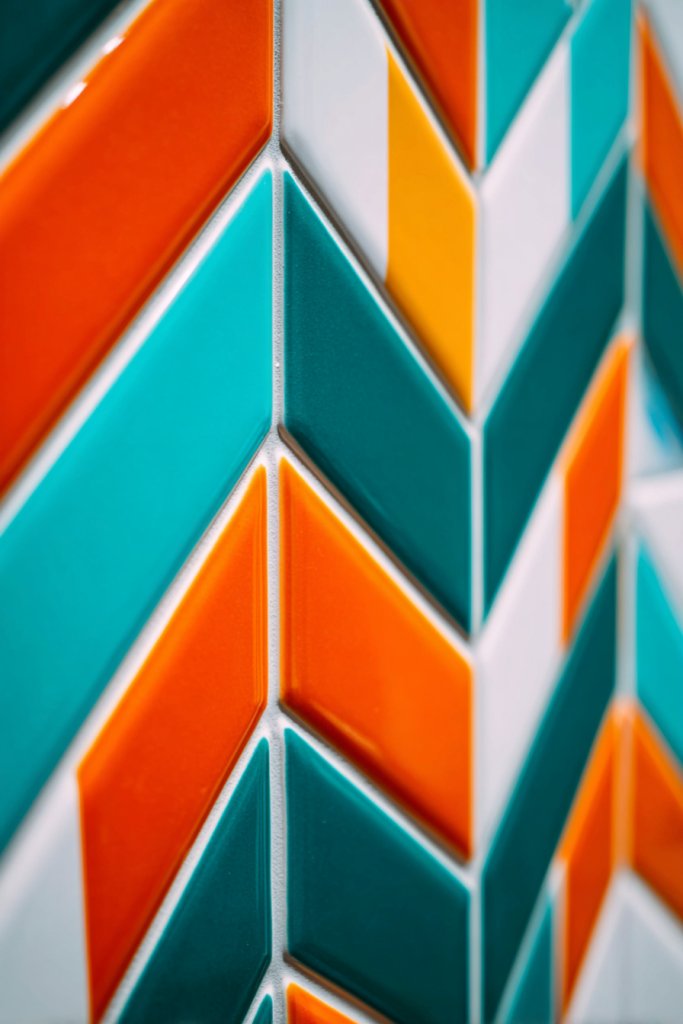
Tired of boring, plain backsplashes that fade into the background? Geometric tile patterns in bold colors transform a mundane wall into a focal point. They add personality without overwhelming the space, making your kitchen feel vibrant and lively. Plus, they’re a fun way to express your style and break the monotony.
Picture a backsplash with chevron or herringbone patterns in vivid turquoise, burnt orange, or deep navy. The tiles catch the light differently at every angle, creating a dynamic visual effect. The sharp angles and contrasting colors inject energy into the room, making even simple food prep feel more inspiring. The textured surface adds depth, giving the wall an almost sculptural feel.
Mix and match colors to suit different seasons or moods—bright yellows and reds for summer, muted pastels for spring. Use small mosaic tiles for intricate patterns or large geometric slabs for bold statements. This approach works well in both small kitchens and large open plans. Consider pairing with minimalist cabinetry to let the tiles truly shine.
Choose durable, heat-resistant ceramic or porcelain tiles with matte or gloss finishes. Use a geometric stencil or pattern guide to achieve precise layout. Prepare the wall surface thoroughly—smooth, clean, and dry—to ensure tiles adhere properly. Use high-quality grout in contrasting or matching colors for added visual impact. Professional installation ensures sharp lines and even spacing, but competent DIYers can manage with patience.
Incorporate metallic or textured tiles for added interest. Frame the patterned section with a slim border for a polished look. Complement with matching accessories like colorful utensils or cookware. Adding subtle lighting above the backsplash can highlight the pattern and color, creating a cozy glow.
Bold geometric tiles are a statement that can make your kitchen unforgettable. They show off your personality and add a layer of sophistication. With a little planning, you can achieve a high-end look that’s both fun and functional. Are you ready to turn that boring wall into a masterpiece?
3. Choose Retro-Inspired Pendant Lighting with Minimalist Metal Finishes
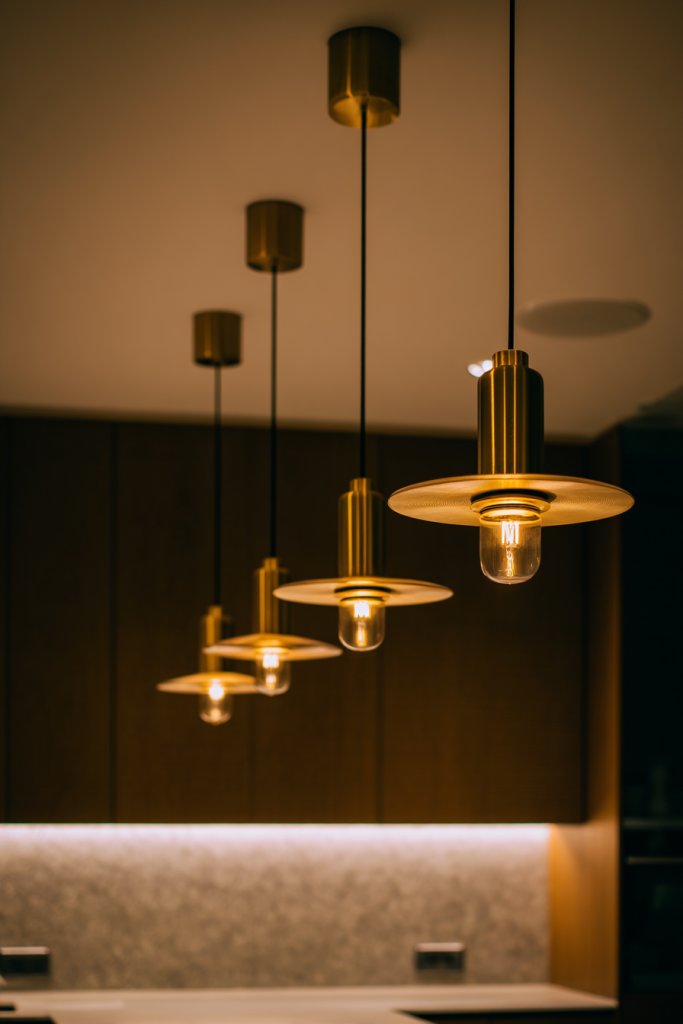
Ever notice how lighting can make or break a kitchen’s vibe? Retro-inspired pendant lights with sleek metal finishes bring a nostalgic yet modern touch. They add character and warmth, making your space feel both cozy and stylish. Plus, they’re a simple upgrade that can totally change the room’s atmosphere.
Imagine a cluster of matte black or brushed brass pendants hanging over an island or breakfast bar. The minimalist shapes—think globe, cone, or cylinder—contrast beautifully against flat-front cabinets and smooth countertops. The warm glow they cast enhances natural textures and creates inviting focal points. The metallic sheen plays with light, adding depth and sophistication.
Pick finishes that match your overall palette—brass for warmth, black for contrast, nickel for neutrality. Vary the heights for visual interest or cluster in groups for a dramatic effect. In smaller kitchens, a single statement pendant suffices, while larger spaces can handle multiple fixtures. These lights blend well with various styles, from mid-century to industrial.
Select fixtures with durable, high-quality metal and easy-to-clean surfaces. Measure carefully to hang at the right height—usually 24-30 inches above counters or islands. Install with sturdy hooks or mounting brackets, ensuring safety and stability. Use dimmable bulbs to adjust ambiance easily. If wiring is tricky, hiring an electrician is a smart move for safety and precision.
Add decorative elements like colored glass or textured metal shades for a custom look. Swap out bulbs regularly for different effects—warm white for cozy dinners or daylight for a lively vibe. Incorporate dimming switches for flexibility. You can also hang a vintage-inspired fixture in the corner for a quirky touch.
Retro pendant lighting is a subtle way to add personality and style to your kitchen. It proves that small details can have a big impact. With the right choice, you’ll feel confident in your space’s aesthetic and enjoy every meal under perfect lighting. Ready to make your kitchen glow?
4. Opt for Open Shelving with Streamlined, Modular Units
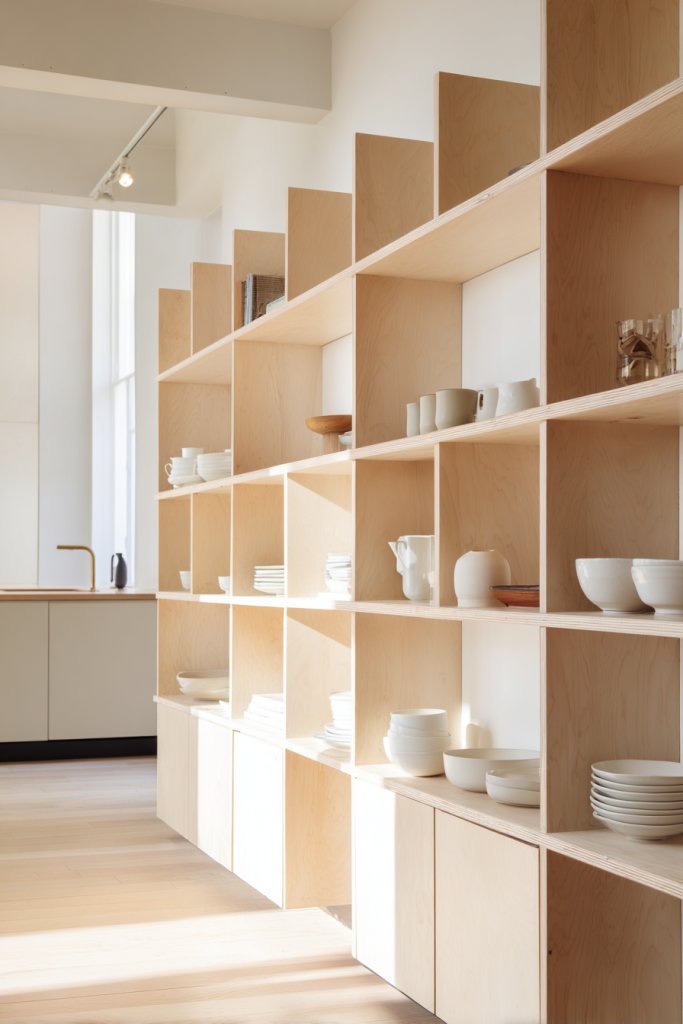
Cluttered countertops? No problem. Open shelving with streamlined, modular units offers a practical yet stylish way to keep essentials at your fingertips. They give your kitchen an airy, spacious feel while showcasing your favorite dishes or glassware. Plus, they’re perfect for adding a personal touch without feeling overwhelmed.
Picture floating shelves in matte black or natural wood, arranged in asymmetrical or symmetrical patterns. They hold a curated selection of colorful bowls, sleek storage jars, or decorative containers—nothing too cluttered. The open design allows light to flow freely, highlighting textures and colors. The minimalist brackets or hidden supports keep the focus on what’s displayed.
Use open shelving for everyday items or display special pieces during holidays or events. Vary the heights and lengths for visual interest, or cluster smaller shelves for a layered effect. In small kitchens, vertical shelving maximizes space without sacrificing style. In larger spaces, mix open shelves with closed cabinets for balance.
Start with sturdy, moisture-resistant materials like solid wood, plywood, or metal brackets. Mount the supports securely into wall studs for safety. Arrange items by function or color for a cohesive look. Incorporate decorative elements like textured pots or patterned dishware to add personality. Regularly tidy and rotate items to keep the shelves looking fresh.
Add under-shelf lighting for a functional glow and visual drama. Use decorative labels or tags on jars for a vintage feel. Incorporate small sculptural pieces or unique containers to break up uniformity. Change the arrangement periodically for a new look, especially if you love experimenting with decor.
Open shelving makes your kitchen feel welcoming and lived-in, not sterile. It shows off your personality and makes everyday routines more enjoyable. With thoughtful styling, you’ll create a space that’s both functional and inspiring. Ready to elevate your kitchen with sleek open shelves?
5. Use Mid-Century Style Bar Stools with Wooden Legs and Leather or Cushioned Seats
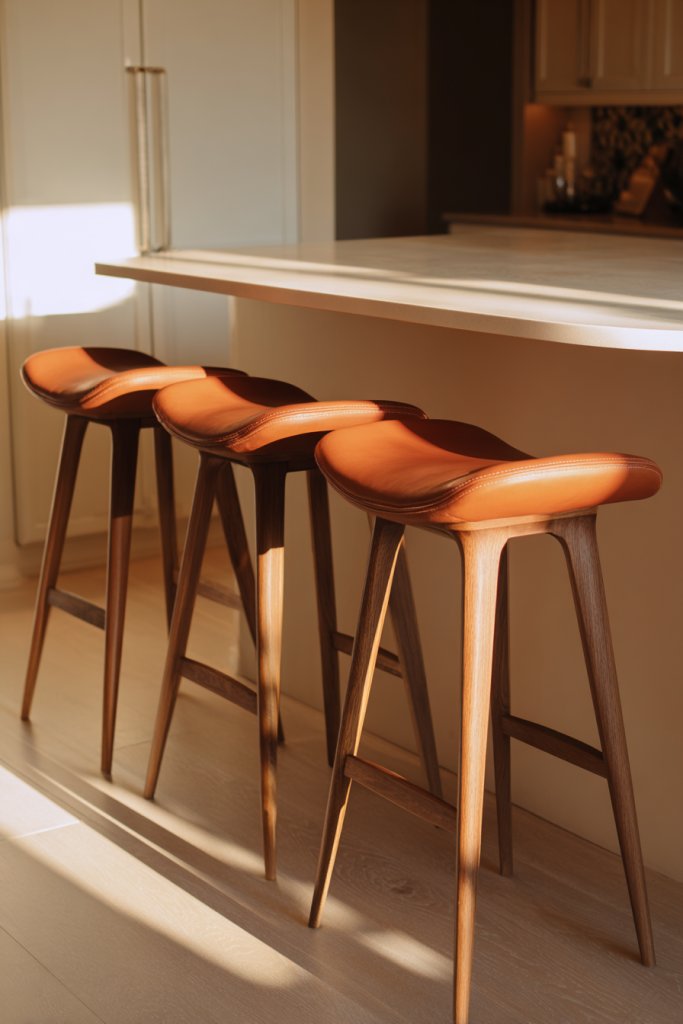
Looking to add a touch of retro charm to your kitchen? Mid-century style bar stools with wooden legs and comfy seats are just what you need. They create a casual dining vibe and make your space more inviting. Plus, they’re a quick way to upgrade your kitchen’s overall look without a full renovation.
Imagine sleek stools with tapered wooden legs, perhaps in walnut or teak, topped with plush leather or cushioned fabric seats. They line up perfectly along your island or breakfast bar, inviting friends or family to gather. The natural wood adds warmth, while the cushioned seats offer comfort after a long day. The overall effect is both stylish and functional.
Choose seats in earth tones or bold colors depending on your style. Mix and match different heights or finishes for an eclectic look. For small spaces, stackable or counter-height stools work best. In open-concept kitchens, they serve as both seating and decor accents. Layering with textured throws or pillows can add extra personality.
Select sturdy wooden legs with non-slip pads for stability. Opt for cushioned seats made from durable, easy-to-clean materials like faux leather or performance fabric. Attach seats securely to the frame, ensuring comfort and safety. Consider adjustable height options if you like flexibility. Regular cleaning and conditioning of wood and leather will keep them looking fresh.
Personalize with embroidered initials or contrasting piping on cushions. Use decorative cushions or throws to match seasonal decor. Incorporate metallic accents, like brass footrests or decorative trim, for added flair. Position them to balance the space, creating a lively yet cohesive look.
Mid-century bar stools are a stylish way to infuse your kitchen with retro flair while staying comfortable. They’re a versatile piece that invites casual conversations and cozy mornings. When chosen thoughtfully, they can become a signature element in your home’s design. Ready to sit back and enjoy the style?
6. Incorporate Vintage-Style Refridgerators or Appliances with Modern Energy Efficiency
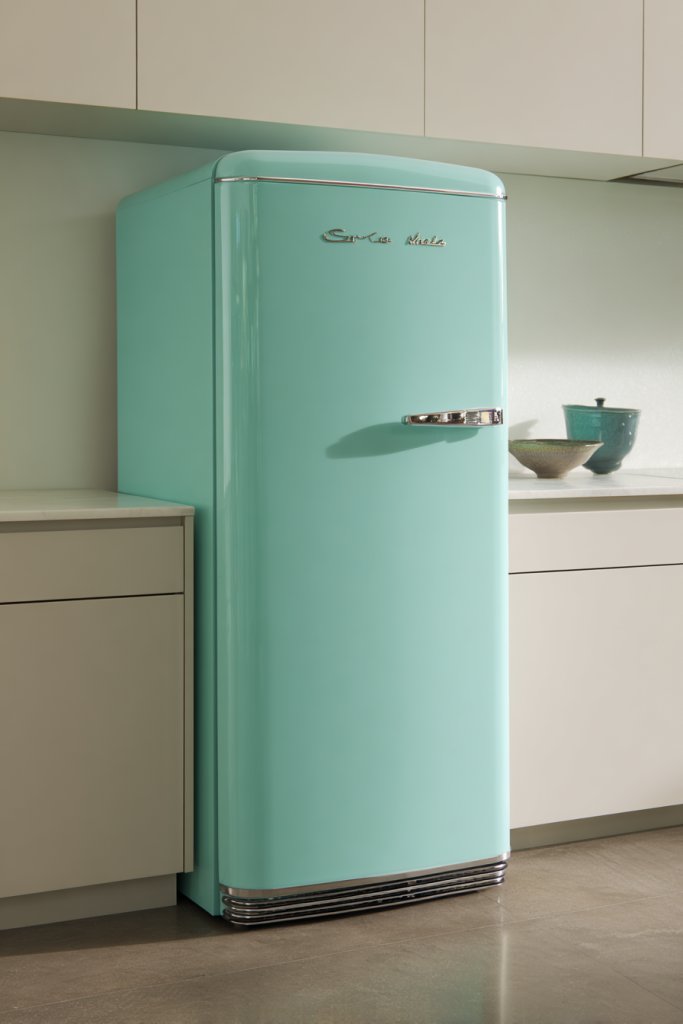
Craving vintage charm but don’t want sky-high energy bills? Incorporating vintage-style refrigerators or appliances that are energy-efficient gives you the best of both worlds. They add nostalgic flair while keeping your electricity costs in check. It’s a win-win for style and sustainability.
Picture a pastel pink or mint green refrigerator with rounded edges and chrome accents, standing out against sleek cabinetry. Modern tech ensures it runs efficiently, while its retro design sparks conversation. Nearby, matching toasters or mixers in similar styles create a cohesive, playful vibe. The mix of old-school charm and new-age performance makes the kitchen feel both cozy and functional.
Choose appliances in colors that complement your overall palette—bold hues for a statement or subtle shades for harmony. Incorporate vintage-inspired signage or decals for extra personality. These appliances work beautifully in small kitchens or open plans, especially when paired with mid-century furniture and decor. You can also mix and match with stainless steel for a more eclectic look.
Select appliances with high energy star ratings that mimic vintage aesthetics. Look for brands that offer retro styles with modern features—think frost-free, LED lighting, and smart technology. Measure your space carefully to ensure a good fit. Installation may require some plumbing or electrical work, so professional help is recommended. Regularly clean and maintain to keep their look pristine.
Add decorative magnets, chalkboard panels, or custom decals to personalize the fridge or appliances. Incorporate matching accessories like retro storage jars or vintage-style dish racks. Use open shelving nearby to display kitchen essentials or decorative items. Keep the color palette consistent for a harmonious, curated look.
Vintage-style appliances with modern efficiency prove that you don’t have to sacrifice function for style. They inject personality into your kitchen and make daily routines more delightful. With the right choices, your space will feel both nostalgic and cutting-edge. Ready to upgrade with a vintage twist?
7. Add a Wooden or Laminated Worktop with Rounded Edges for a Soft, Retro Feel
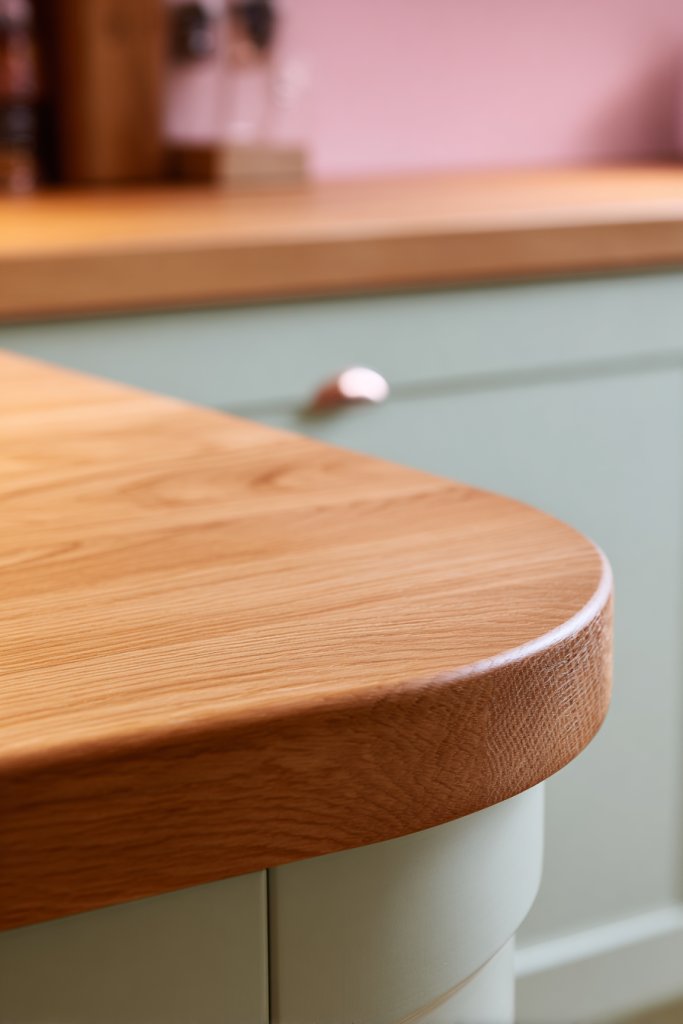
Stuck with cold, sterile countertops that lack charm? A wooden or laminated worktop with rounded edges can soften the look and add a cozy, inviting vibe. They bring a retro feel while being practical and durable. It’s like giving your kitchen a gentle hug every time you cook.
Imagine a butcher block or laminate surface with curved edges, echoing the smooth lines of mid-century furniture. The warm tones of natural wood or vintage-inspired laminate patterns create a welcoming atmosphere. The rounded corners eliminate sharp edges, making the space safer and more comfortable. The surface’s texture invites touch and use.
Choose lighter woods like maple or oak for a Scandinavian look, or darker woods like walnut for richness. Laminates in geometric or pastel patterns add a playful retro vibe. Rounded edges suit both small and large kitchens, blending seamlessly with other furniture. Seasonal accessories like a soft fabric runner or decorative bowls can refresh the look.
Opt for high-quality, moisture-resistant materials that withstand daily use. For wood, apply oil or sealant regularly to maintain luster and prevent damage. When installing, ensure smooth, curved edges are finished professionally to avoid splinters or chips. Laminates are easier—just cut to size and glue down, but precise measurement is key. Regular cleaning with non-abrasive products keeps the surfaces looking new.
Layer with colorful or textured placemats, or add a vintage-inspired cutting board in the corner. Use contrasting edge trims in metallic or painted finishes for a custom touch. Incorporate small decorative items like ceramic jars or a soft cloth towel with retro patterns. Think about combining different textures for a layered, inviting workspace.
A rounded-edged worktop adds warmth and personality to your kitchen, making it feel less clinical. It’s a small change with a big impact on comfort and style. When chosen thoughtfully, it becomes a functional centerpiece that you’ll enjoy every day. Want your kitchen to feel both retro and welcoming?
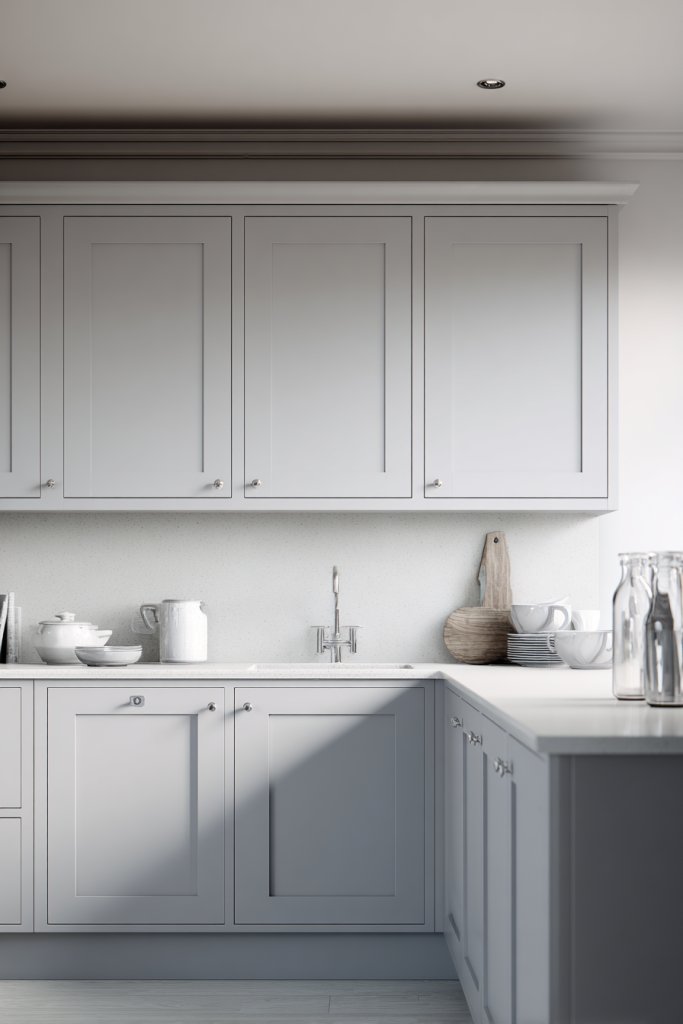
8. Install Classic, Minimalist Drawer Pulls and Knobs in Brass or Black Finish
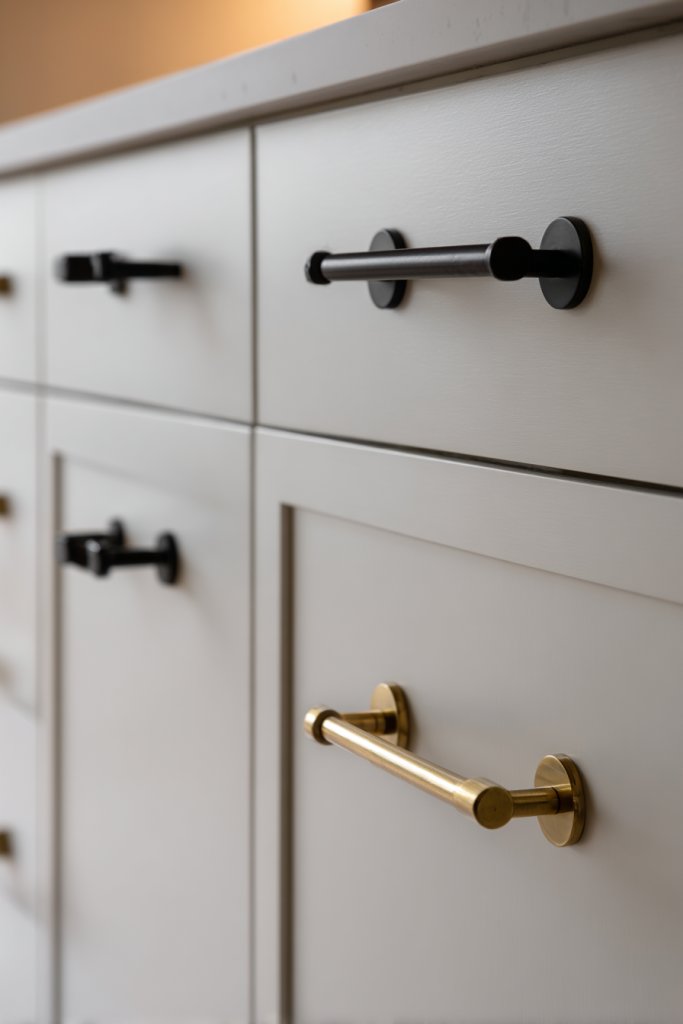
Tired of dull, outdated cabinet hardware dragging down your kitchen’s look? Classic, minimalist drawer pulls and knobs in brass or black finish can instantly elevate your cabinets. They add a subtle touch of sophistication without overwhelming the design. It’s a small detail that makes a big style statement.
Visualize sleek, cylindrical pulls in matte black or warm brass, contrasting beautifully with flat-front cabinets. The hardware’s simple design emphasizes clean lines and modern minimalism. Whether on light or dark cabinetry, these fixtures add a touch of elegance. The subtle metallic or matte finish catches light and adds depth without distraction.
Mix and match finishes for an eclectic look—black with brass accents, or matte with shiny. Use different sizes for drawers and cabinets to create visual rhythm. For a more vintage feel, opt for rounded or ornate hardware, but keep it minimalist for a sleek vibe. Replace old handles during a facelift or when updating your decor.
Choose hardware with sturdy, rust-resistant materials suitable for frequent use. Measure hole placement carefully for easy swaps—standard sizes make things simple. Use a screwdriver to attach fixtures securely, tightening just enough to avoid damage. For a uniform look, align all pulls and knobs precisely. Clean hardware periodically to maintain their shine.
Add decorative washers or caps for a custom touch. Consider engraving initials or small symbols for a personalized feel. Incorporate matching fixtures on other furniture or storage pieces for cohesion. Seasonal or color-themed hardware can refresh your kitchen’s look throughout the year.
Upgrading hardware is a quick, affordable way to modernize your kitchen. It reflects your attention to detail and personal style. When chosen well, these small accents tie the entire space together beautifully. Ready to update with timeless hardware options?
9. Use Neutral-Toned Walls with Textured or Patterned Wallpaper Accents
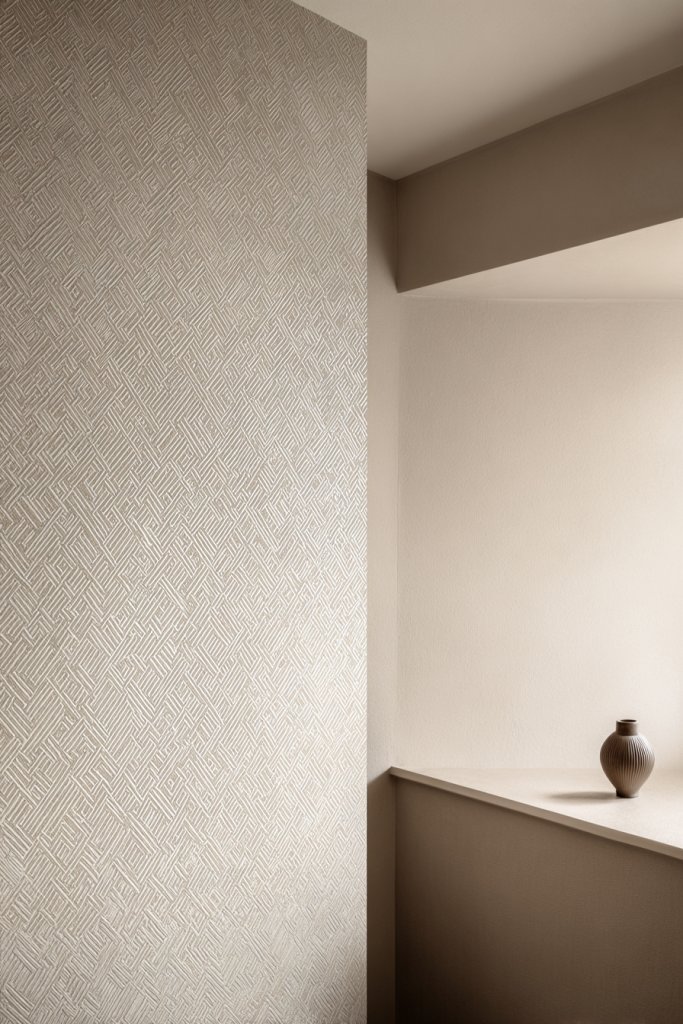
Plain walls can make a kitchen feel flat and uninspired. Using neutral tones as a backdrop creates a calming environment, while textured or patterned wallpaper accents add visual interest. They break up space and add personality without overwhelming the design. It’s the perfect balance of subtlety and style.
Imagine soft beige or light gray walls, serving as a quiet canvas. A textured wallpaper with geometric patterns or subtle embossed designs in one accent wall brings depth. The tactile surface invites touch and adds a layer of sophistication. Paired with sleek cabinetry and warm lighting, it creates a cozy, inviting atmosphere.
Use textured wallpaper in small doses, like behind the stove or near the dining area, to avoid overwhelming the space. Patterned wallpaper in muted tones complements minimalist decor and fits various styles. Seasonal updates can include changing wall colors or adding removable wallpaper for variety. In small kitchens, keep the palette light and airy.
Opt for high-quality wallpaper with a washable, durable finish. Prepare the wall surface by cleaning and smoothing out imperfections. Use paste that matches the wallpaper type and follow manufacturer instructions for application. For textured options, consider professional installation for a seamless look. Seal edges with clear caulk or trim for durability.
Add decorative molding or trim to frame wallpaper sections for a finished look. Incorporate textiles like cushions or curtains in matching or contrasting tones. Use artwork or open shelving nearby to balance visual weight. Seasonal or themed wallpaper can keep the space feeling fresh.
Textured or patterned walls elevate a simple space into a design statement. They show your style and attention to detail. With the right choice, your kitchen will feel more layered and inviting. Ready to add some texture and pattern?
10. Include Mid-Century Modern Rugs with Geometric Patterns and Warm Colors
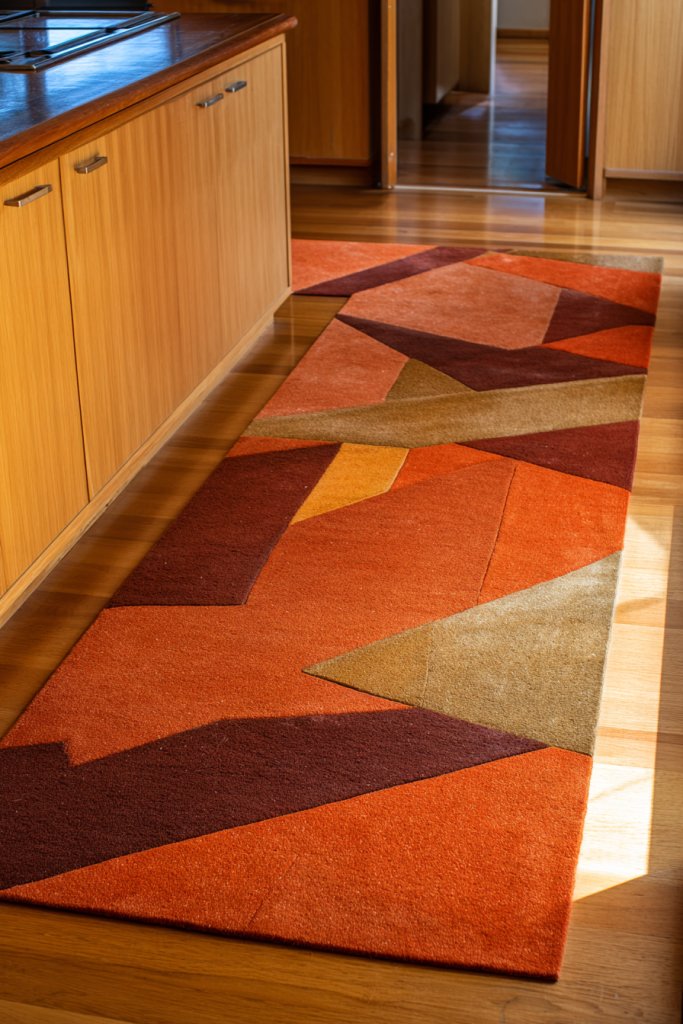
A plain floor can make your kitchen feel cold or uninviting. Mid-century modern rugs with geometric patterns and warm colors instantly warm up the space. They add texture, define zones, and inject personality. Plus, they’re practical—protecting your floors and making standing more comfortable.
Picture a soft, plush rug with bold triangles or chevrons in mustard, deep orange, or earthy browns. It anchors a seating area or runs along the kitchen’s main walkway, creating visual flow. The pattern adds a layer of interest and draws attention to your design choices. The warm hues complement wood finishes and neutral walls beautifully.
Choose low-pile or flat-weave rugs for easy cleaning and durability. Mix patterns or keep it simple with a single bold design—whatever fits your style. Seasonal swaps can include lighter, brighter patterns for summer or plush, darker options for winter. They work well in both small and large kitchens, adding coziness and style.
Select rugs made from durable, stain-resistant fibers like wool, nylon, or polypropylene. Measure your space carefully to ensure proper fit. Lay the rug flat and secure with non-slip pads underneath. Regular vacuuming and prompt cleaning of spills will keep it looking fresh. For larger areas, consider layered rugs for a textured look.
Accessorize with matching cushions or textured textiles nearby. Use colorful or patterned placemats and napkins to tie the look together. Incorporate complementary colors or geometric motifs in your kitchen accessories for cohesion. Seasonal or themed rugs can keep the space feeling lively year-round.
A well-chosen rug can transform your kitchen into a warm, inviting space. It reflects your personality and adds a layer of comfort. With the right pattern and color, you’ll love spending time in your upgraded kitchen. Ready to add that cozy finishing touch?
11. Incorporate Built-In Pantries with Fluted or Slatted Wood Doors
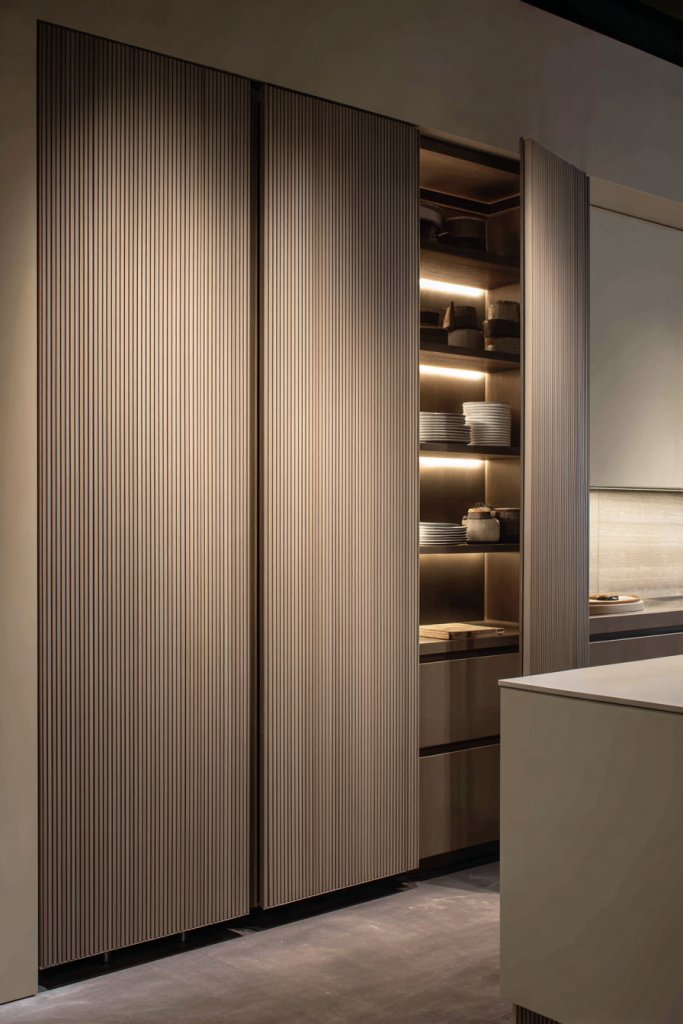
Cluttered countertops and chaotic cabinets? A built-in pantry with fluted or slatted wood doors offers sleek storage while hiding messes. It keeps everything organized and accessible, adding a sophisticated architectural element. Plus, it enhances your kitchen’s vintage-modern vibe.
Imagine tall, narrow cupboards with textured, slatted wood doors in warm oak or walnut. They blend seamlessly into the wall, creating a clean, continuous surface. The subtle pattern adds depth and interest, contrasting beautifully with smooth cabinetry. Inside, you find neatly organized shelves for everything from canned goods to small appliances.
Customize with different wood tones or slat widths for a personalized look. Incorporate glass panels or open shelving inside for display or quick access. In compact spaces, use vertical design to maximize storage without sacrificing style. For larger kitchens, pair with vintage metal hardware for an industrial touch.
Choose sturdy, moisture-resistant wood or MDF with a textured finish. Measure carefully to fit your space and ensure door openings are unobstructed. Install with concealed hinges and soft-close mechanisms for a sleek appearance. For DIY, precise cutting and fitting are essential—otherwise, professional installation is recommended. Regularly check hinges and clean the textured surfaces.
Add decorative handles or paint the slats in contrasting colors for a custom look. Incorporate small decorative labels or vintage signage for charm. Use lighting inside or above the pantry to highlight its texture and provide better visibility. Periodic updates with new hardware keep it fresh.
Built-in pantries with textured doors elevate your kitchen’s design and organization. They demonstrate a thoughtful approach to storage and style. When styled well, they become a stunning focal point that’s both functional and beautiful. Ready to upgrade your storage game?
12. Use Simple, Solid Color Plates and Utensils in Primary or Earth Tones
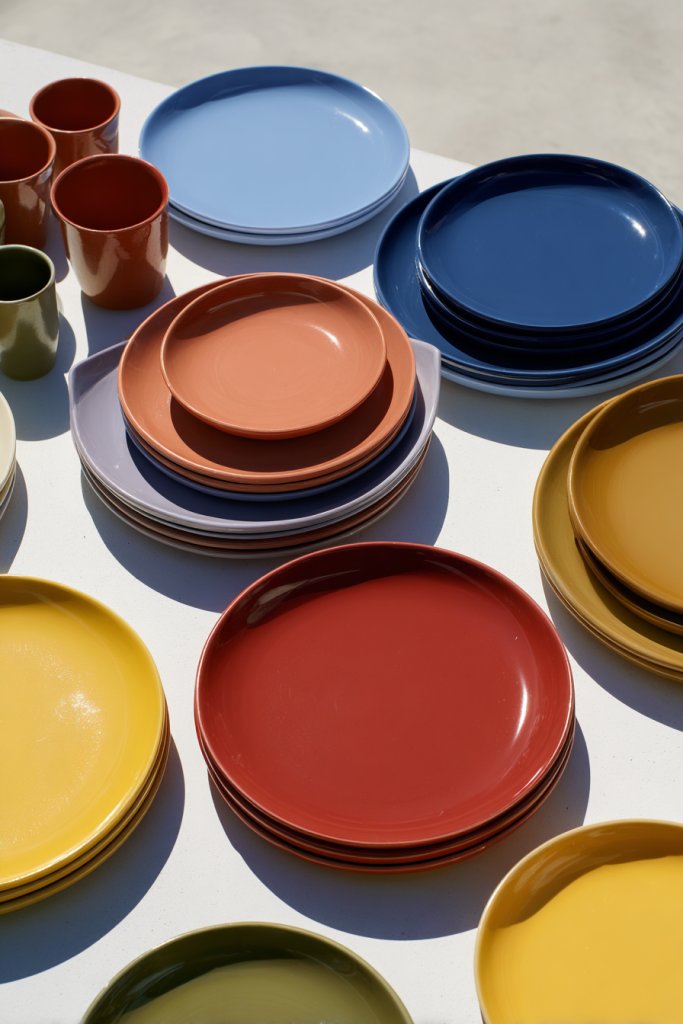
Overly ornate or busy dishware can clash with a clean, mid-century aesthetic. Simple, solid color plates and utensils in primary or earth tones provide a cohesive, understated look. They make your table setting feel intentional and stylish while complementing your overall decor. Plus, they’re versatile enough to mix and match.
Visualize a set of matte ceramic plates in muted olive, terracotta, or mustard, paired with matching utensils. Their minimalist design emphasizes color and form, allowing food to stand out. When arranged neatly, they create a cohesive, gallery-like display that’s both functional and beautiful. The matte finish adds a touch of vintage charm.
Mix different earth tones for a layered, eclectic look, or stick to a single color for a sleek, uniform appearance. Use bold primary colors for a playful vibe or softer neutrals for sophistication. Incorporate textured fabrics or woven placemats for added interest. These pieces work well in casual settings and can be layered with vintage or modern pieces.
Opt for durable ceramic or stoneware in matte or semi-matte finishes. Store in organized, accessible cabinets, grouping by color or size. Use dishwasher-safe options for ease of cleaning. When choosing utensils, select minimalist designs in matching materials—metal, wood, or composite. Keep items in good condition with gentle cleaning and occasional polishing.
Add personalized touches with hand-painted or vintage sourced pieces. Use colorful or patterned textile accessories to contrast or complement the dishware. Mix in textured serveware or bowls for variety. Seasonal or themed sets can keep your tabletop fresh and fun.
Solid color dishware in earthy or primary tones creates a calm, cohesive dining experience. They reflect a thoughtful, curated aesthetic that’s easy to maintain. When styled right, they’re a subtle yet impactful way to elevate your kitchen’s look. Ready to simplify and beautify your table?
13. Install Slim, Vertical Windows with Minimalist Frames for Natural Light
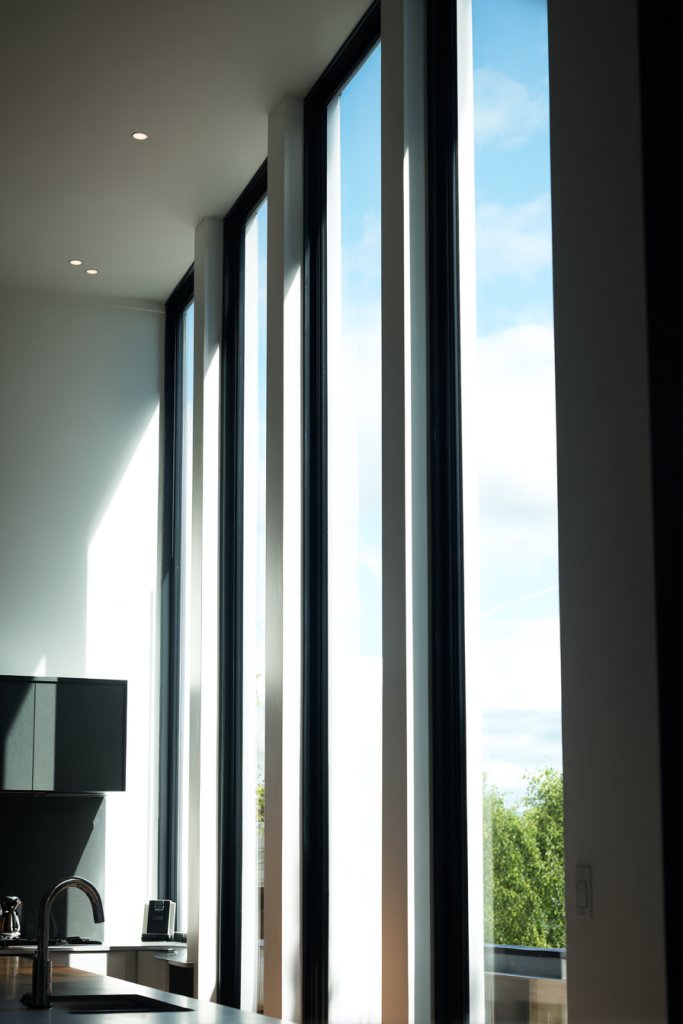
Dark, cramped kitchens drain energy from your space. Slim, vertical windows with minimalist frames flood the room with natural light and make it feel open and airy. They create a sleek, modern aesthetic while maximizing daylight. Plus, they’re a simple way to boost mood and reduce electricity use.
Picture tall, narrow windows stretching from countertop to ceiling, with thin metal or painted frames. They cast soft, even light across your workspace, highlighting textures and colors. The view beyond becomes part of your decor, connecting indoors and outdoors. The minimalist design emphasizes clean lines and unobstructed sightlines, enhancing the sense of space.
Choose black, white, or metallic frames to match your decor palette. Use frosted or tinted glass for privacy or to diffuse harsh sunlight. In small kitchens, vertical windows make a big impact without taking up much wall space. Large, uninterrupted panes work well in open plans, creating a seamless light flow.
Measure carefully to ensure proper fit and function. Select durable, energy-efficient glazing to improve insulation. Install with slim, unobtrusive frames and secure mounting brackets—consider professional help for precise fitting. Use blinds or shades sparingly to maintain the minimalist look while controlling light. Regular cleaning keeps glass streak-free and bright.
Opt for automated or motorized blinds for convenience. Use window trims or sills in matching wood or metal finishes for a polished look. Incorporate small decorative elements like a vintage latch or handle. Play with different glass finishes to create mood lighting or privacy as needed.
Slim vertical windows enhance your kitchen’s architecture and invite natural beauty indoors. They help create a sense of openness and calm, aligning with modern and mid-century styles. When installed effectively, they elevate the entire space and your daily experience. Want to brighten up your kitchen effortlessly?
14. Add Small, Iconic Decorative Accessories like Atomic-Style Clocks or Ceramic Vases
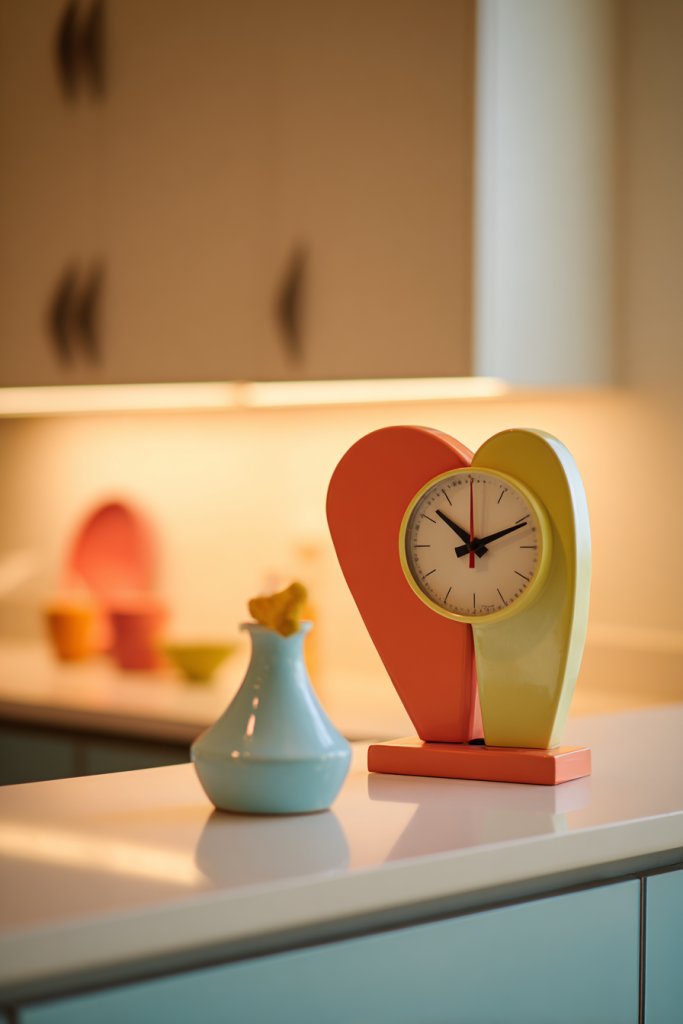
Your kitchen needs that extra touch of personality, right? Small, iconic accessories like atomic-style clocks or vintage-inspired ceramics inject instant character. They’re perfect for adding a playful yet sophisticated vibe without overwhelming the space. Small details make a big difference.
Visualize a retro clock with bold geometric shapes and bright colors, hung above a countertop. Nearby, a ceramic vase with a textured glaze and mid-century motifs holds a few fresh or faux blooms—no green thumbs required. These accents add visual interest and tie the room’s design together, creating a curated, vintage-inspired aesthetic.
Mix and match small accessories in different finishes—brass, matte black, or colorful glazed ceramics—for variety. Place them on open shelves, countertops, or wall-mounted hooks. Use them to highlight a particular theme or color palette. Rotate or update periodically to keep the look fresh and engaging.
Choose durable, high-quality items that withstand kitchen conditions. Secure clocks with proper wall anchors, and display ceramics on stable surfaces. Maintain with gentle cleaning to preserve finishes. Incorporate a variety of shapes and sizes for visual rhythm. Keep clutter minimal so each piece can truly shine.
Personalize with custom-painted or vintage finds that reflect your style. Add decals or subtle motifs to ceramics for a bespoke touch. Use these accessories as focal points during celebrations or everyday routines. Incorporate a mix of modern and vintage for an eclectic look.
Iconic accessories showcase your personality and design taste. They transform a standard kitchen into a curated space filled with character. When thoughtfully chosen, they inspire confidence in your decorating choices and make your home uniquely yours. Ready to add some iconic charm?
15. Implement Under-Cabinet LED Lighting for Practical Illumination
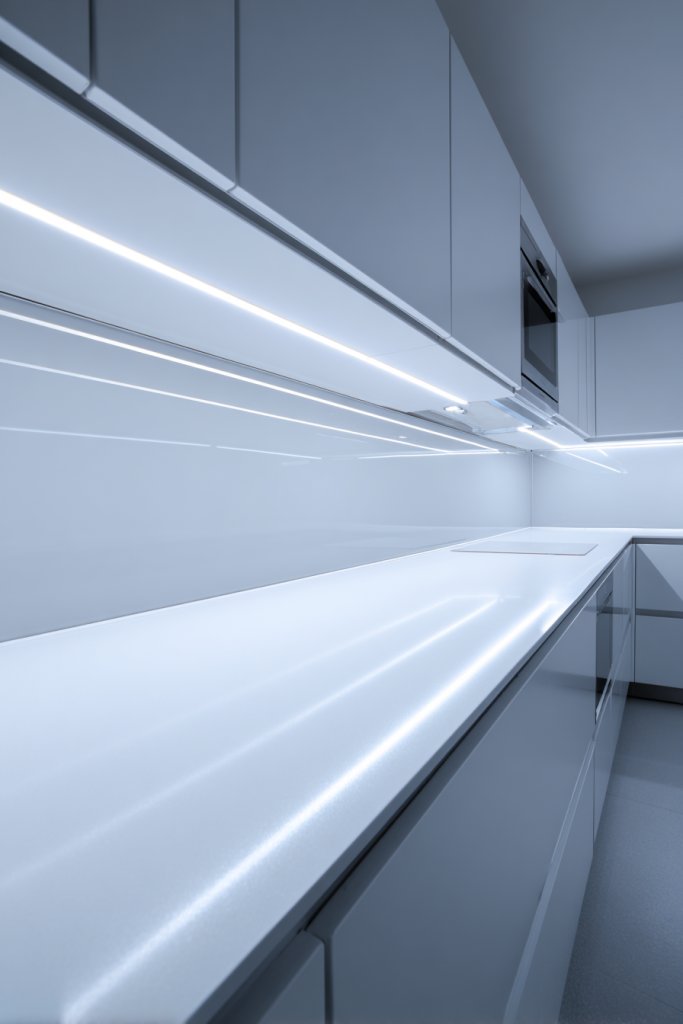
Ever stumble in your kitchen after sunset or try to prep in dim lighting? Under-cabinet LED lighting solves this problem with sleek, energy-efficient illumination. It brightens your workspace and adds a modern, high-tech vibe. Plus, it’s a subtle upgrade that makes a big difference.
Imagine slim, warm-white LED strips installed beneath open shelves or cabinets, casting a gentle glow over countertops. The light is evenly distributed, reducing shadows and highlighting textures. It creates a clean, streamlined look that complements your mid-century or minimalist decor. The soft glow invites you to cook and entertain with confidence.
Choose flexible, dimmable LED strips for mood control. Select warm or cool white to match your ambiance. Install with adhesive backing or mounting clips for a tidy finish. For a subtle look, hide the wiring behind cabinetry or molding. These lights work well in both small and large kitchens, providing essential task lighting.
Start by measuring cabinet length and selecting appropriate LED strip kits. Ensure compatibility with dimmer switches if desired. Follow manufacturer instructions for installation—clean the surface thoroughly, peel adhesive backing, and press firmly into place. Connect wiring discreetly, and test before sealing. Regularly clean the strips with a soft cloth to maintain brightness.
Use color-changing LEDs for fun or different moods. Add motion sensors for automatic lighting when you enter. Pair with smart home systems for voice control. Decorate with simple trim or molding to hide wiring and create a seamless look.
Under-cabinet LED lighting is a practical upgrade that adds style and function. It makes your kitchen safer and more inviting, especially during evening hours. When installed thoughtfully, it elevates your entire space and daily routines. Ready to brighten your workspace effortlessly?
16. Use Monochromatic or Complementary Color Schemes to Create Cohesion
A disjointed color palette can make your kitchen feel chaotic or unfocused. Monochromatic or complementary schemes tie everything together, creating a harmonious and sophisticated look. They make your space feel balanced and thoughtfully curated. Plus, they’re easier to style and update over time.
Visualize walls, cabinets, and accessories in varying shades of a single color—like soft gray or warm taupe—adding depth and interest. Alternatively, choose complementary colors like navy and mustard for a lively, vibrant atmosphere. The balanced palette guides the eye smoothly across the space, making it feel unified. Accents like textiles, dishes, or small decor items echo the main colors for consistency.
Experiment with different shades or textures within the same color family for added richness. Use bold or muted tones depending on your mood—bright for cheerful, subdued for calm. Layer with contrasting textures like matte, gloss, or textured fabrics for visual depth. These schemes work well in open plans, small kitchens, and transitional styles.
Start by choosing a dominant color and selecting shades that complement it. Use a color wheel or palette tool for guidance. Paint walls in a neutral or muted tone to serve as a backdrop. Incorporate matching or contrasting accessories, dishware, and textiles. Maintain balance by avoiding overuse of bright colors in small spaces. Consistency is key for a cohesive look.
Add metallic or textured accents to elevate the palette—think gold hardware or matte black fixtures. Incorporate artwork or patterned textiles that pick up your main colors. Change accent colors seasonally or for special occasions to keep the space lively. Keep the overall scheme simple to prevent visual overload.
A cohesive color scheme creates a calm, inviting environment that reflects your style. It makes decorating easier and gives you confidence in your choices. When everything aligns, your kitchen feels intentional and polished. Ready to create a harmonious space?
17. Incorporate Floating Shelves for Displaying Practical Items or Vintage Containers
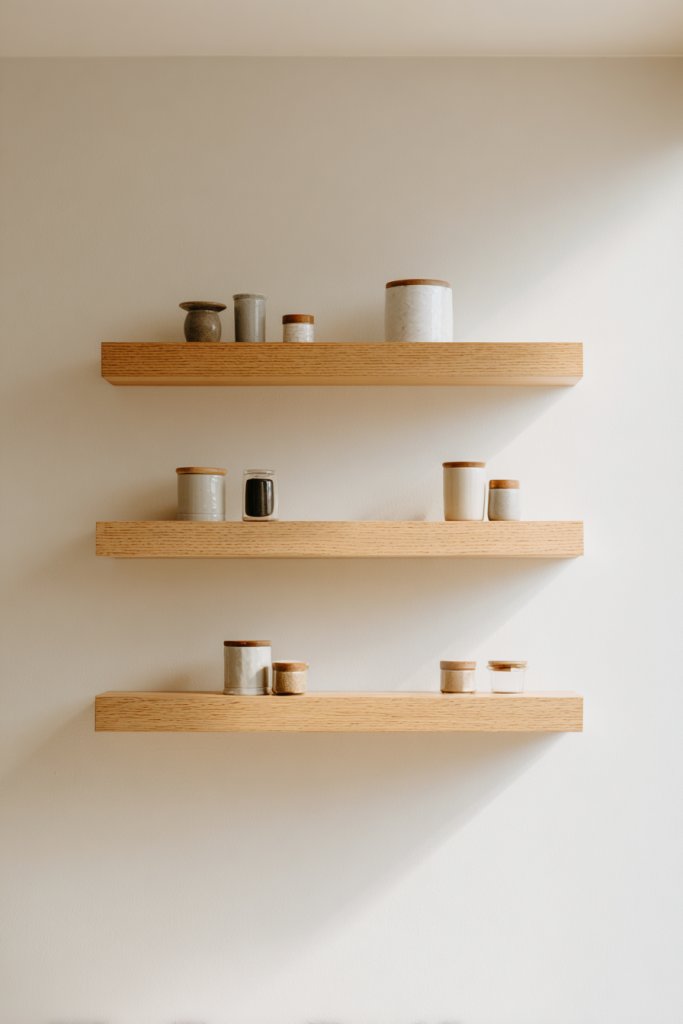
Counter clutter and limited storage making your kitchen feel chaotic? Floating shelves offer an elegant solution, providing accessible storage and display space. They add a modern, airy feel while showcasing practical items or vintage containers. It’s a smart way to organize and decorate simultaneously.
Picture sleek wooden or metal floating shelves mounted in a staggered pattern. They hold colorful bowls, spice jars, or vintage tins—items that add personality and function. The open design allows light to flow freely, opening up the space visually. The clean lines and simple supports keep the focus on what’s displayed.
Arrange items by size, color, or theme—like all vintage tins or modern glass jars. Use brackets or hidden supports for a minimalist look. In small kitchens, position shelves near work zones for easy access. Mix practical containers with decorative pieces for a curated, layered appearance.
Choose durable, moisture-resistant materials like wood or metal. Mount supports into wall studs for safety. Measure carefully to ensure level installation. Use a mix of open storage and closed cabinetry for a balanced look. Regularly dust and organize to maintain visual appeal. Incorporate small, decorative touches to personalize.
Add lighting underneath or inside shelves for display highlights. Use labeled jars or colorful containers for a vintage or eclectic look. Incorporate small plants or decorative signs—though avoid overloading. Change displays seasonally for a fresh feel. Keep it functional, beautiful, and clutter-free.
Floating shelves transform your kitchen into a gallery of your personality and style. They make everyday items part of your decor, adding charm and practicality. When styled thoughtfully, they become a focal point that’s both functional and beautiful. Ready to elevate your storage game?
18. Finish with a Classic, Retro-Inspired Kitchen Clock or Wall Art in Bold Shapes
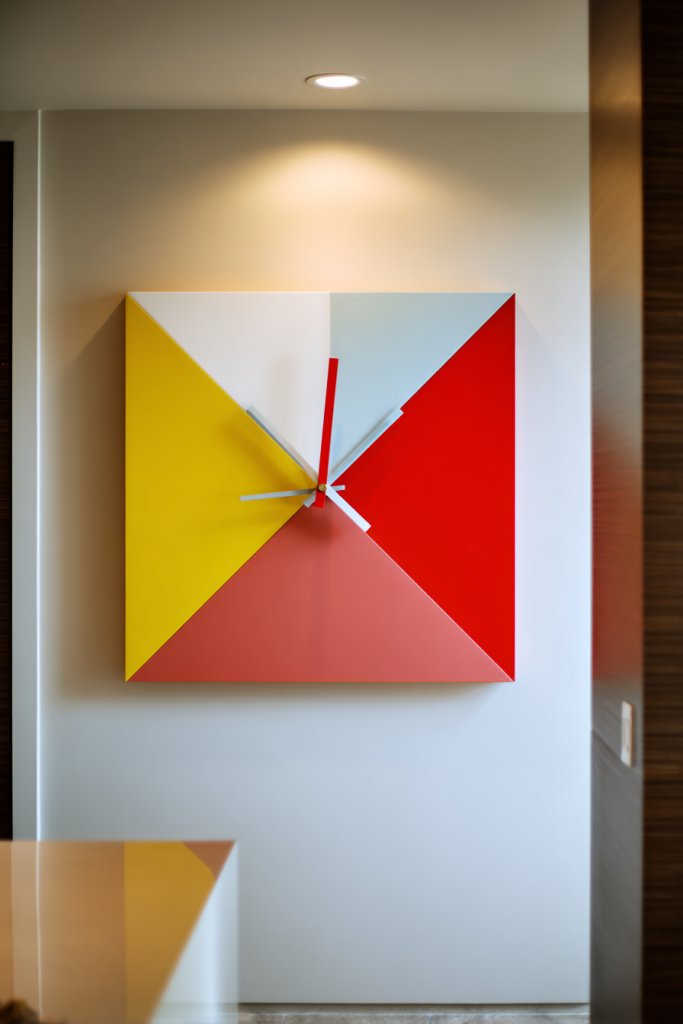
Every good kitchen needs a statement piece—something that instantly grabs attention and sets the tone. A retro-inspired clock or bold wall art in striking shapes adds personality and ties the space together. It’s a quick way to inject fun and nostalgia into your daily routine.
Imagine a large, round clock with geometric patterns and vibrant colors hanging above your workspace. The bold shapes and contrasting hues create a focal point that energizes the room. Alternatively, a piece of abstract, geometric wall art in bold shapes and colors adds visual interest without clutter. These pieces reflect your style and make your kitchen uniquely yours.
Choose clocks with vintage numerals or playful designs, or opt for abstract wall art with bold lines and shapes. Position these accents where they can be appreciated, such as above the sink or dining nook. Use frames or mounts that complement your cabinetry and hardware for a cohesive look. Change or update art seasonally for variety.
Select high-quality, durable wall art or clocks that resist moisture and temperature fluctuations. Use appropriate wall anchors and hooks for secure mounting. Keep the artwork clean and dust-free to preserve its vibrant colors. Ensure the size and placement create a visual anchor without overwhelming the space. Regularly check for stability and cleanliness.
Coordinate the colors with other decor elements—think matching towels, accessories, or furniture. Customize with vintage fonts or patterns that reflect your personality. Use lighting to highlight the piece, especially in darker corners or above key areas. Rotate art pieces to keep your space fresh and inspiring.
A bold clock or wall art completes your kitchen’s aesthetic, making it both functional and decorative. It demonstrates your eye for style and adds a touch of personality to your daily space. When chosen thoughtfully, it becomes a signature element that elevates your entire home. Ready to add that finishing touch?
Conclusion
From statement lighting to vintage-inspired cabinetry, this collection of Mid-Century Modern kitchen ideas showcases a variety of ways to achieve that perfect balance of style and function. Embrace these concepts to refresh your space and reflect your personal taste. Don’t wait—transform your kitchen into a stunning retro-modern oasis today and enjoy the timeless appeal of Mid-Century Modern design!