Ever find yourself dreaming of a bathroom upgrade but feeling limited by space? Small bathroom remodel ideas are incredibly popular because they prove that even the tiniest spaces can be transformed into functional, stylish retreats.
In this article, you’ll discover a variety of clever and practical ideas to maximize every inch of your small bathroom. From space-saving storage solutions to eye-catching design tips, these ideas will inspire you to create a more efficient and beautiful bathroom that feels larger than life.
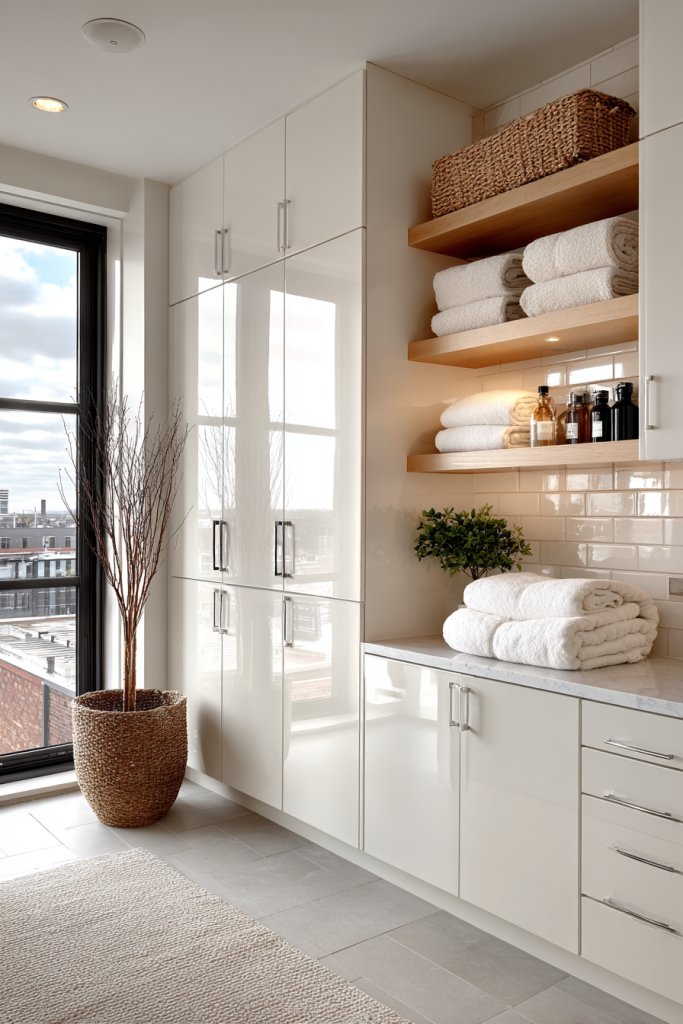
1. Optimize Vertical Space with Tall Storage Cabinets
Ever feel like your tiny bathroom is fighting you at every turn? Clutter piles up quickly, and finding space for essentials feels like a puzzle. Everyone wants a sleek, organized look without sacrificing functionality, right? Using vertical storage can be the game-changer that transforms chaos into calm.
Imagine a tall, slim cabinet reaching from floor to ceiling, painted in a soft matte hue that matches your walls. Its shelves are filled with neatly stacked towels, jars, and baskets, all within easy reach. The design is minimalist but smart, blending into the room without overwhelming it. The space above the cabinet remains open, giving the illusion of height and openness.
Choose sleek, modern units for a contemporary vibe or vintage-inspired tall cabinets for a cozy feel. In small bathrooms, opt for narrow, multi-tiered units that maximize storage without crowding. During winter, consider adding hooks or small baskets on the doors for seasonal items, while in summer, store lightweight accessories. The key is balancing storage and style.
Start by measuring your wall space carefully to select the right height and width. Look for cabinets with adjustable shelves for flexibility. Mount units securely to avoid wobbling, especially in high-traffic areas. Use wall anchors for added stability, and consider a finish that’s moisture-resistant to withstand humidity. Organize frequently used items at eye level for convenience.
Personalize your vertical storage with decorative baskets or labels to keep things tidy. Add a coat of paint or a wood veneer to match your decor for a seamless look. Incorporate small hooks or hangers on the sides for towels or robes. You could even use LED strip lighting inside for a touch of elegance and improved visibility.
Vertical storage isn’t just practical; it can elevate your entire bathroom aesthetic. With the right design, you create a space that feels larger and more polished. Once you see how much extra space you gain, you’ll wonder why you didn’t do this sooner. Go ahead, give your bathroom that tall, sleek upgrade—it’s worth it!
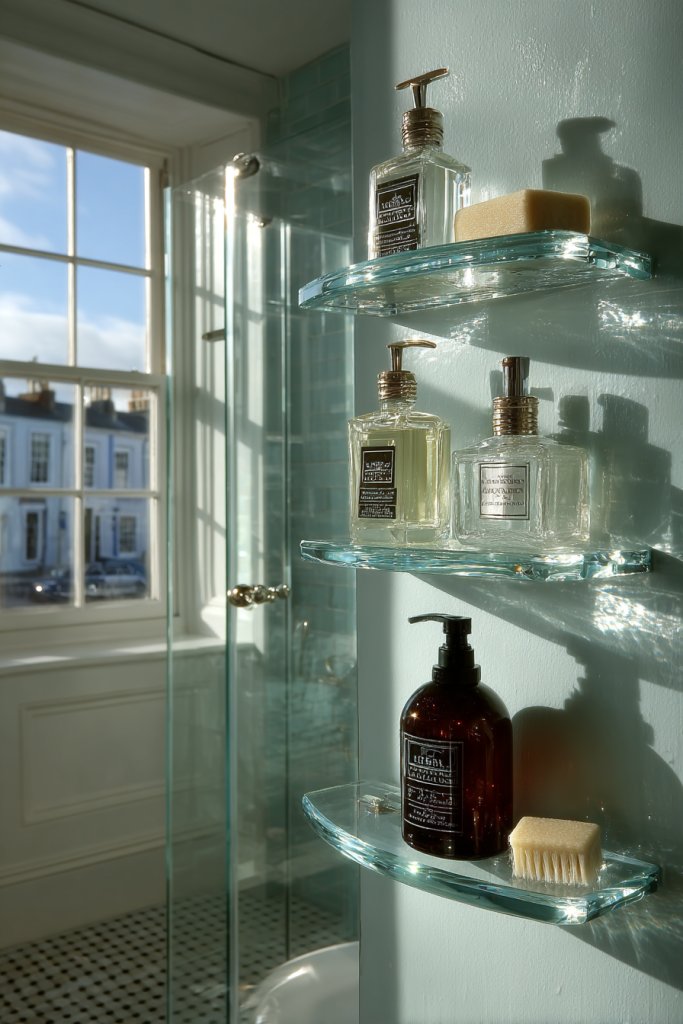
2. Install Corner Shelves for Easy Access
Is your bathroom feeling like a cluttered corner? Corner spaces often go underused, yet they’re perfect for keeping essentials within arm’s reach. No more reaching over or stacking things precariously on the sink. Installing corner shelves is the smart way to make every nook functional.
Picture a set of sleek, floating shelves snug in the corner, made of warm wood or chic glass. They hold your daily toiletries, a few decorative jars, or even a small plant (if you ignore Step 8, LOL). The floating design keeps the space feeling open, while the layered shelves add visual interest. When lit from above, they cast a gentle glow, making your bathroom inviting.
Choose from open or closed corner shelves, depending on your need for organization or style. In small bathrooms, stack smaller shelves vertically to save space. For a coastal vibe, use baskets or woven containers; for a modern look, go with glass and metal. You can even paint the shelves a contrasting color to add a pop of personality.
Measure your corner precisely to select the right size shelves. Use a sturdy mounting system—preferably brackets or wall anchors—to prevent wobbling. For tiles, use a drill with a masonry bit, and apply silicone sealant to prevent water damage. Arrange your items thoughtfully—keep daily essentials at the most accessible level. Clean the surface thoroughly before installation.
Personalize your corner shelves with decorative liners or labels. Add a small LED puck light underneath for better visibility at night. Use stylish containers that match your decor theme, like matte black or brass accents. You could also add a small piece of artwork or a decorative tray for a sophisticated touch.
Corner shelves turn unused space into a feature, making your bathroom more organized and stylish. They’re easy to install and customize, so you can adapt them to any aesthetic. Once you see how much easier it is to grab your items, you’ll wonder why you didn’t do this earlier. Get creative and make every inch count!
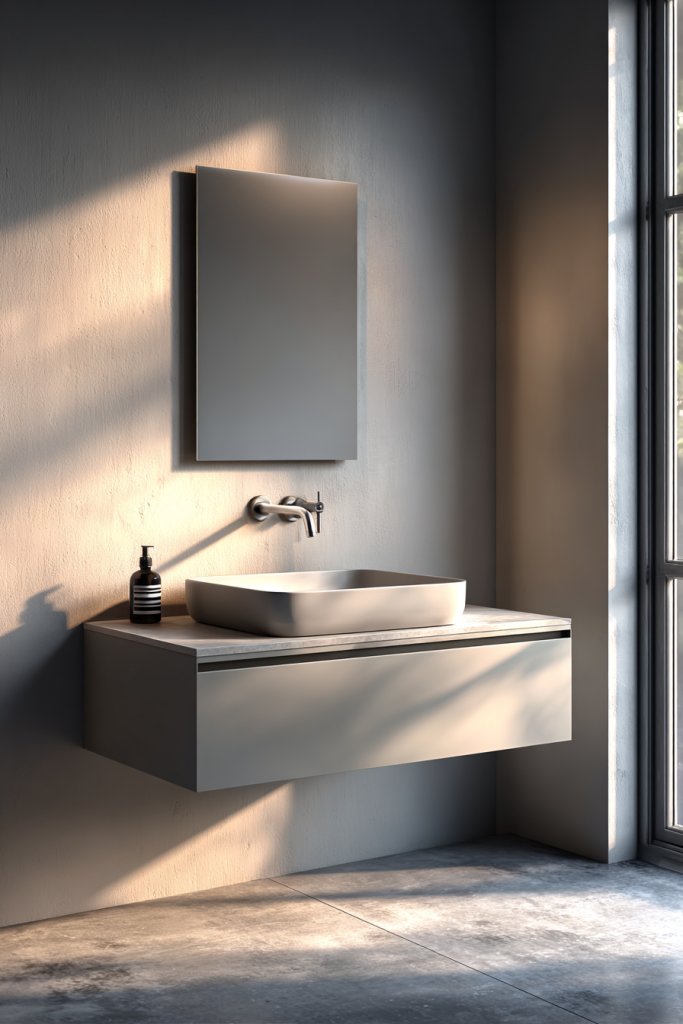
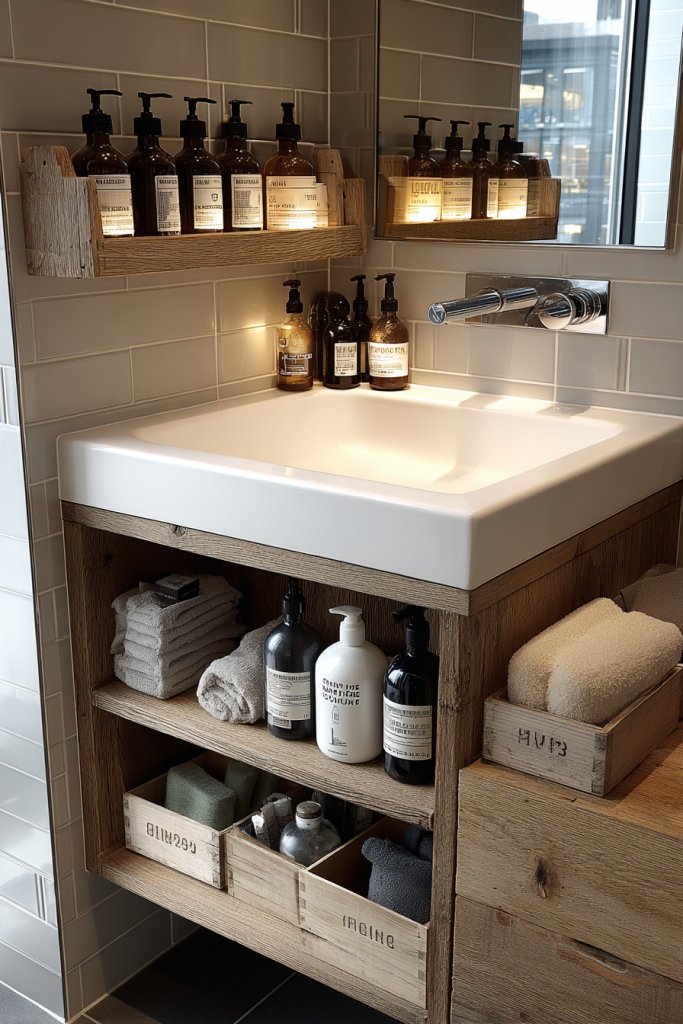
3. Incorporate a Wall-Mounted Vanity for Sleekness
Does your bathroom feel cramped and cluttered? Traditional vanities take up precious floor space, making the room look even smaller. A wall-mounted vanity can free up the floor, creating a sleek, open feel. Plus, it’s easier to clean underneath—no more dust bunnies hiding in corners.
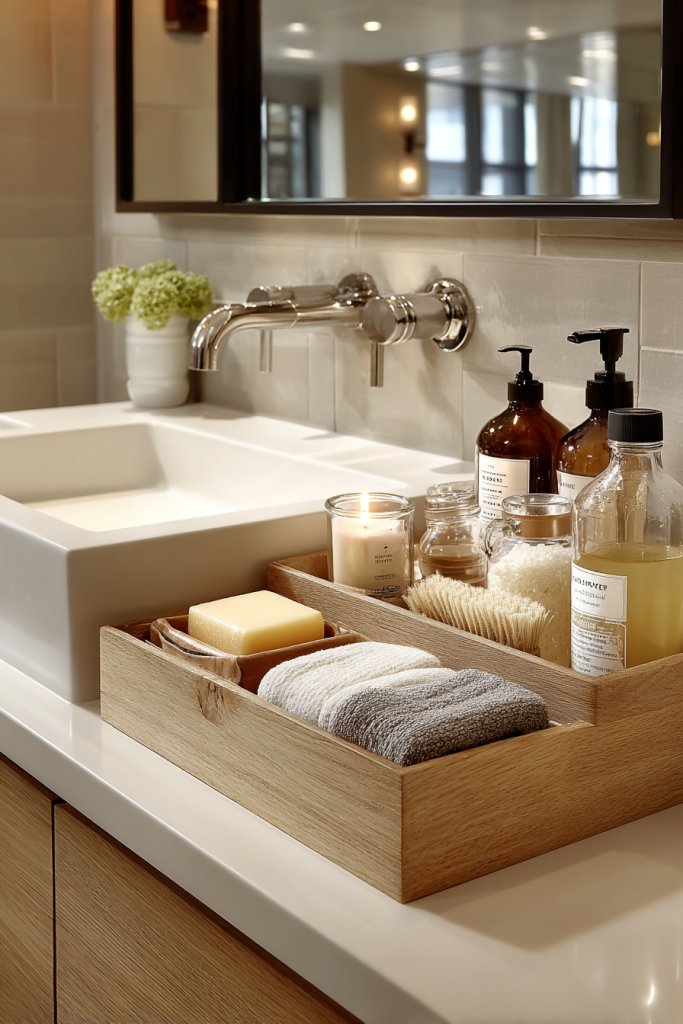
Imagine a floating vanity with a smooth stone countertop, illuminated softly by wall sconces or hidden LED strips. The vanity’s slim profile emphasizes space, while the open space underneath adds an airy vibe. You could add a decorative bowl or tray for your daily essentials—minus the clutter mess. The minimalist design complements modern, rustic, or even eclectic styles.
Choose a vanity with a finish that matches your decor—matte black, glossy white, or natural wood. For small bathrooms, opt for a narrow, single-sink unit; for larger spaces, double vanities work well. Incorporate storage drawers or open shelves below for towels or toiletries. During different seasons, swap out accessories to match your decor mood.
Start by measuring your space carefully to select a vanity with appropriate dimensions. Mount it securely using wall anchors designed for drywall or tile. Use a level to ensure perfect alignment, and seal edges with waterproof caulk. Connect plumbing with flexible hoses for easier installation, and hide unsightly pipes with decorative panels or skirts. Finish by adding a mirror or lighting fixtures that complement the sleek profile.
Add a pop of color with a vibrant soap dispenser or a textured hand towel hook. Install a small shelf or niche nearby for accessories—just avoid clutter. Incorporate a stylish faucet with a matte or brushed finish for durability and aesthetic appeal. Use decorative storage baskets beneath if space allows, for extra organization.
A wall-mounted vanity instantly modernizes your bathroom and makes cleaning a breeze. It’s a simple upgrade that adds a touch of luxury without breaking the bank. Once installed, you’ll love how open and airy your space feels. This sleek look is trending for a reason—try it and see your bathroom transform!
4. Use Light Colors and Reflective Surfaces to Enhance Brightness

Feeling like your bathroom is darker than it needs to be? Small spaces can easily feel cramped and gloomy, especially if you’re stuck with heavy colors or poor lighting. Brightening up with light hues and reflective surfaces instantly makes a room feel larger and more inviting. Who doesn’t want a space that feels fresh and airy?
Visualize walls painted in soft creams or icy pastels, bouncing light around the room. Mirrored cabinets or large wall mirrors reflect both natural and artificial light, amplifying brightness. Glossy tiles or high-shine countertops reflect light, adding a luminous quality. The overall effect is a cheerful, open space that invites you in without feeling overwhelmed.
Choose light-colored paint or waterproof wallpaper in shades like pale blue, beige, or mint. Use reflective tiles on the floor or walls, like subway tiles or large-format gloss finishes. During summer, maximize natural light by installing frosted windows or skylights. In winter, add warm-toned textiles and soft lighting to keep the space cozy while maintaining brightness.
Start with a fresh coat of light-colored paint on walls and ceiling. Replace heavy, dark fixtures with sleek, matte or chrome finishes. Install large mirrors or mirrored panels that cover entire walls for maximum reflection. Use glossy or semi-glossy tiles on the floor and walls—these are easy to clean and brighten up the space. Add layered lighting—overhead, task, and accent—to ensure no corner feels dull.
Incorporate subtle pops of color through towels, rugs, or accessories, but keep the dominant palette light. Hang a large mirror with a decorative frame that complements your decor style. Use metallic or glass accessories sparingly to reflect light and add sophistication. Consider installing dimmable LED lights to adjust brightness based on time or mood.
Bright, reflective bathrooms boost your mood and make daily routines more enjoyable. They also create the perfect backdrop for any style, from minimalist to vintage. Once you see how much bigger and fresher your space feels, you’ll wonder why you didn’t do this sooner. Bright ideas make a big difference—trust me!
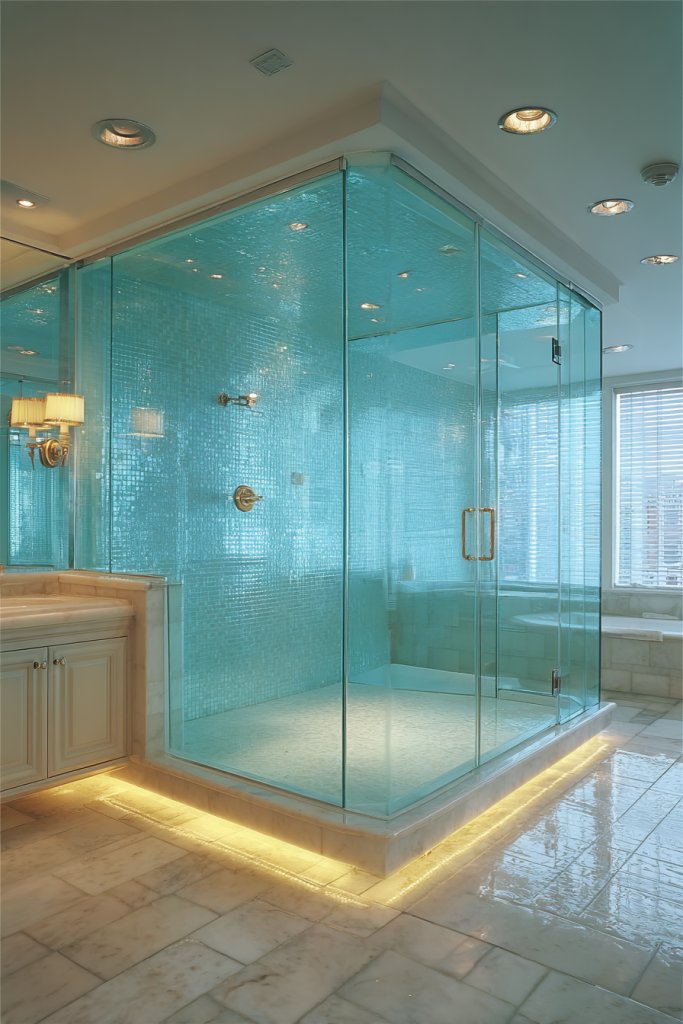
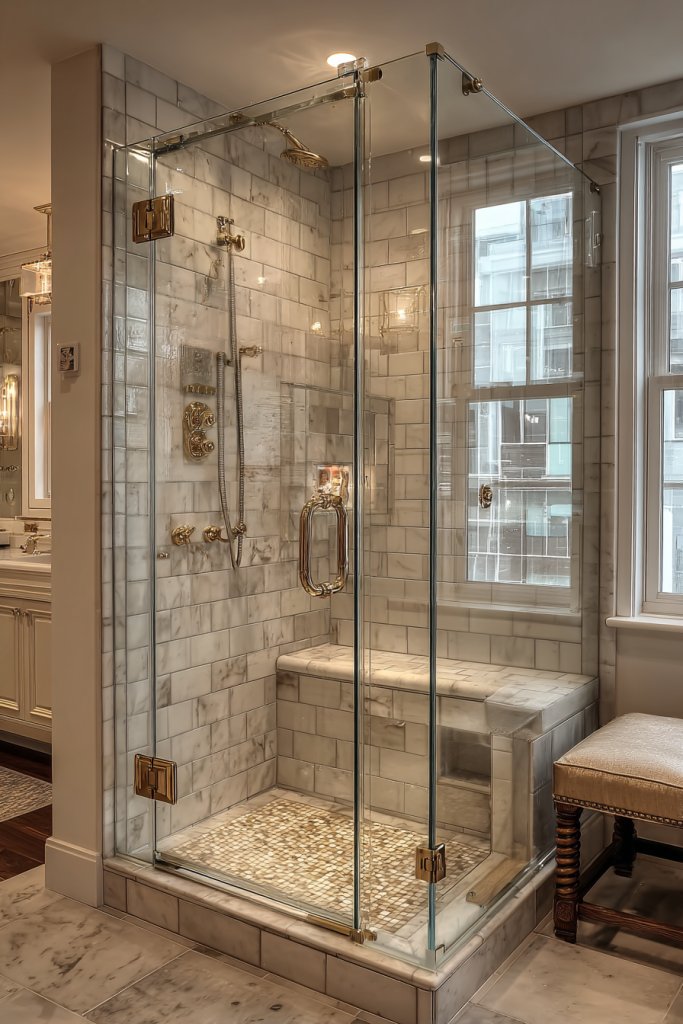
5. Choose Clear Glass Shower Doors to Visualize Space
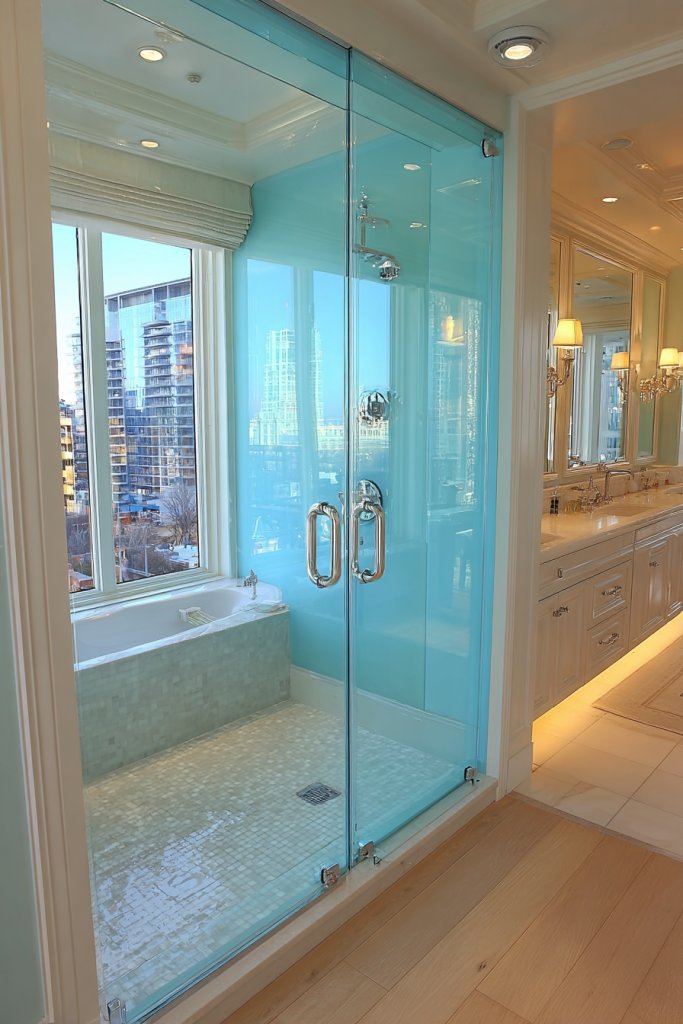
Tired of feeling boxed in every time you step into your shower? Opaque curtains and frosted doors can block light and make your bathroom seem smaller. Clear glass shower doors open up the space visually, giving an instant upgrade. Plus, they add a sleek, modern look that’s hard to beat.
Picture a frameless glass shower with minimal hardware, making the enclosure almost disappear. Light from the bathroom’s fixtures flows freely into the shower, creating a seamless, bright space. The transparent surface showcases your beautiful tile work and keeps the room feeling open. When the glass is spotless, it’s like a piece of art that elevates your entire bathroom aesthetic.
Opt for frameless, pivot, or sliding glass doors depending on your space constraints. For a more decorative touch, choose tempered glass with subtle etchings or a slight tint. In smaller bathrooms, a single-panel door works best; in larger spaces, multiple panels can create a luxurious spa-like feel. Pair with neutral tiles and minimal hardware for maximum effect.
Measure your shower opening carefully to select the right size and style of glass door. Hire a professional for precise installation—especially if you want frameless doors, which need sturdy hinges and seals. Use waterproof silicone sealant to prevent leaks, and keep the glass clean with non-abrasive cleaners. Regularly check for water spots and mineral buildup to maintain clarity.
Add a touch of elegance with subtle hardware finishes—brushed nickel or matte black work well. Incorporate a towel bar or handle that complements your fixtures without cluttering the sleek look. Consider installing a small bench or niche inside the shower for toiletries, keeping everything streamlined. Use decorative towels or mats outside to add a splash of color.
Clear glass doors instantly modernize your bathroom and make it feel more spacious. They’re a smart investment that pays off visually and practically. With proper care, they stay pristine for years. Go ahead—ditch the curtains and embrace the sleek, transparent look!
6. Implement Recessed Niche Shelves in Shower Area
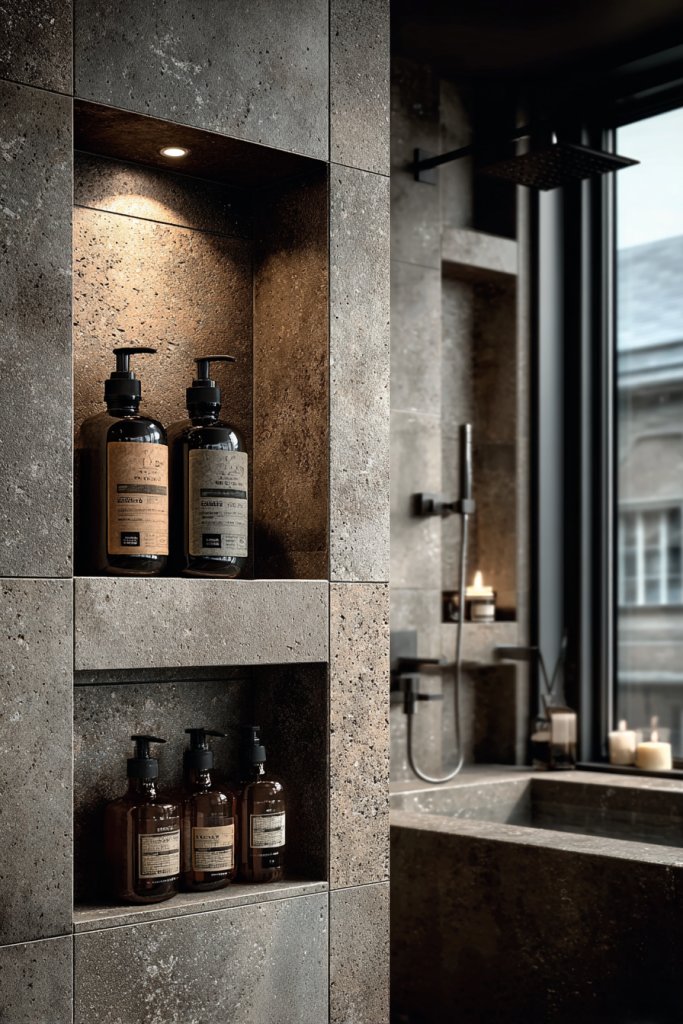
Does your shower feel cluttered with bottles and soaps everywhere? Freestanding caddies or shelves can look messy and cluttered. Recessed niche shelves are the perfect solution—built right into the wall, they keep essentials organized and out of sight. Plus, they add a sleek architectural touch to your shower.
Visualize a clean, tiled shower with a deep, rectangular niche carved into the wall. Inside, shampoo bottles, soaps, and razors are neatly arranged, giving a minimalist, streamlined look. The niche is lined with matching tiles, creating a seamless appearance that blends into the wall. When illuminated with soft lighting, it becomes a subtle focal point that elevates your shower design.
Opt for different shapes—square, rectangular, or even curved niches—to match your style. Position niches at eye level or slightly higher for easy access. Use waterproof grout and tiles that match or contrast with your shower walls. During renovations, consider multiple niches for different needs, or a single large niche for a bold statement.
Plan your tile layout carefully before cutting into the wall. Use a waterproof membrane behind the tiles to prevent water intrusion. Measure and mark the location precisely, then cut into the wall using a wet saw or angle grinder. Install the niche frame securely, making sure it’s level and flush with the wall surface. Tile around the niche, sealing all edges to prevent water leaks.
Line the niche with waterproof glass or elegant stone to add a touch of luxury. Use small LED lights inside for better visibility, especially in darker showers. Customize with different tile patterns or colors inside the niche for visual interest. Keep it clutter-free by only storing essential items, and consider adding a small decorative element like a textured tile inset.
Recessed niches combine form and function, creating a tidy, modern look. They’re a smart upgrade that adds value to your bathroom. Once installed, these niches will keep your shower organized and stylish for years. It’s a simple fix with a big impact—go for it!
7. Opt for Compact Fixtures and Fixtures with Slim Profiles
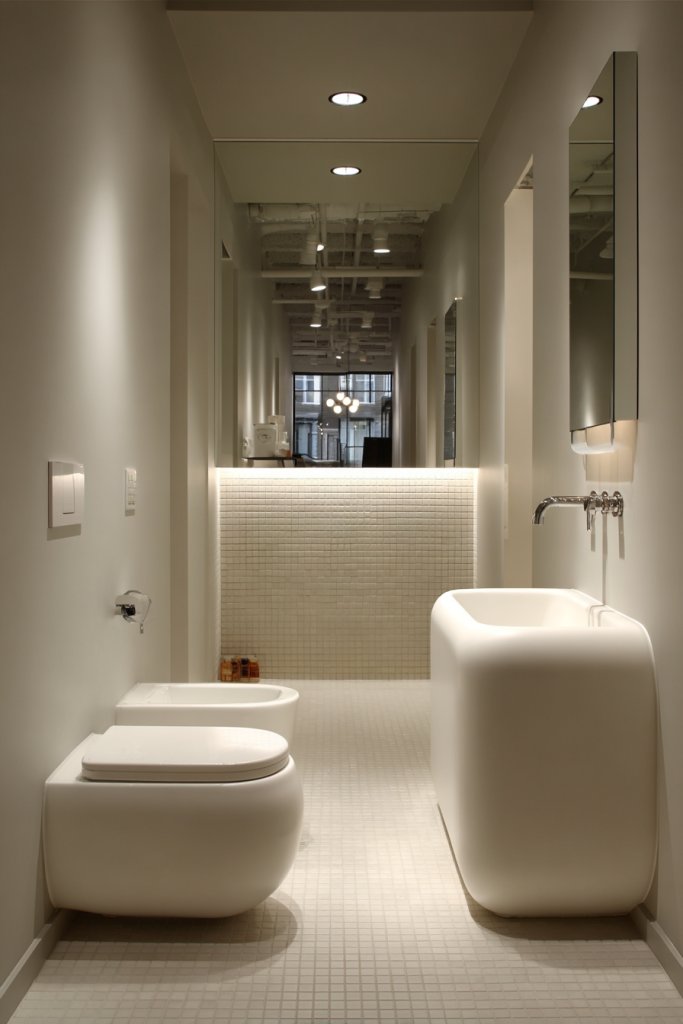
Big, bulky fixtures can make a small bathroom feel even more cramped. Choosing compact, slim-profile fixtures instantly frees up space and creates a sleek, modern aesthetic. It’s all about making functionality look effortless and stylish at the same time.
Imagine a petite, wall-mounted sink with thin, streamlined edges that seem to float above the floor. The toilet is a wall-hung model with a narrow tank, giving the room a spacious feel. Faucets are sleek and minimalist, with clean lines that complement the fixtures. The overall look is airy, uncluttered, and designed for easy cleaning.
Choose fixtures in matte black, brushed nickel, or chrome to match your decor. Smaller, round sinks or vessel-style basins can add personality without overwhelming the space. For a more luxurious feel, opt for fixtures with built-in storage or integrated towel bars. During renovations, prioritize fixtures that are designed specifically for small bathrooms.
Measure your existing plumbing connections before selecting fixtures. Install wall-mounted models to create more floor space and ease cleaning. Use a level during installation to ensure everything lines up perfectly. Seal all connections with waterproof grout or silicone to prevent leaks. Test each fixture thoroughly before finishing the wall surfaces.
Select fixtures with unique handles or finishes to add a custom touch. Pair with a compact mirror or a small shelf for toiletries. Consider adding a transparent soap dish or a slim towel hook that doesn’t clutter the visual flow. Keep the color palette light and neutral to enhance the sleekness.
Slim fixtures are a simple yet effective way to make your bathroom feel more open and modern. They’re also easier to clean and maintain, saving you time in the long run. Once you see the spacious, uncluttered results, you’ll wonder why you didn’t switch sooner. It’s a smart upgrade that pays off!
8. Add Over-the-Door Hooks and Towel Racks for Extra Storage
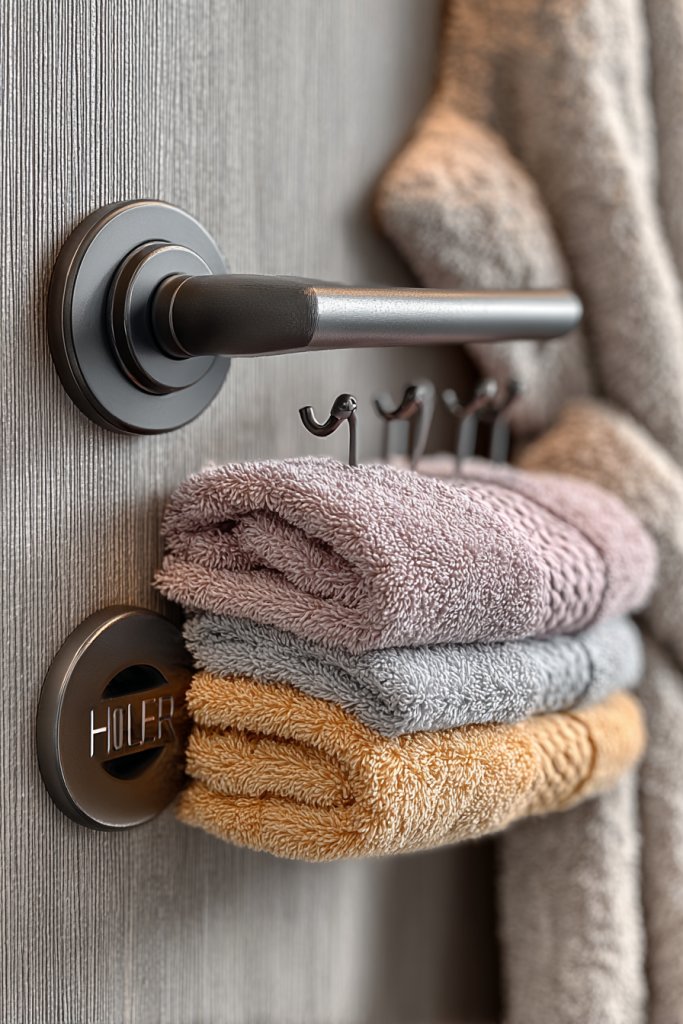
Cluttered countertops and cramped corners make small bathrooms frustrating. Over-the-door hooks and racks are a simple, inexpensive way to add instant storage—perfect for towels, robes, or accessories. They utilize space that often goes unused, keeping essentials within easy reach.
Visualize a sturdy hook mounted over the bathroom door, holding a colorful towel or robe. Adjacent, a slim rack hangs on the door’s back, neatly holding hair tools or extra towels. The hooks are sleek, unobtrusive, and blend seamlessly with the room’s decor. When not in use, they stay out of the way, maintaining a clean look.
Choose from hooks, racks, or combination units in finishes like matte black, chrome, or brass. Use multiple hooks for different items—shower caddies, towels, or clothing. For a cohesive look, coordinate with your existing hardware or fixtures. During seasonal changes, swap out textiles to match your decor theme.
Select durable hooks that can handle the weight of your towels or robes. Install them securely onto the door frame or wall using appropriate anchors or screws. Make sure they are level and spaced properly for easy access. Clean the mounting area thoroughly before installation. Consider using adhesive hooks for less permanent solutions or in rental spaces.
Add decorative touches like fabric covers or personalized labels on your hooks. Use matching towels or textiles to create a coordinated look. Incorporate small baskets or containers on racks for toiletries or cleaning supplies. Keep the setup clutter-free for maximum visual appeal.
Over-the-door storage is a quick fix that can dramatically improve organization. It’s perfect for renters or anyone wanting to avoid permanent fixtures. Once you see how much this simple addition helps, you’ll be motivated to find more smart storage solutions. Easy, effective, and budget-friendly!
9. Use Multi-Functional Furniture, like Storage Bench Seats
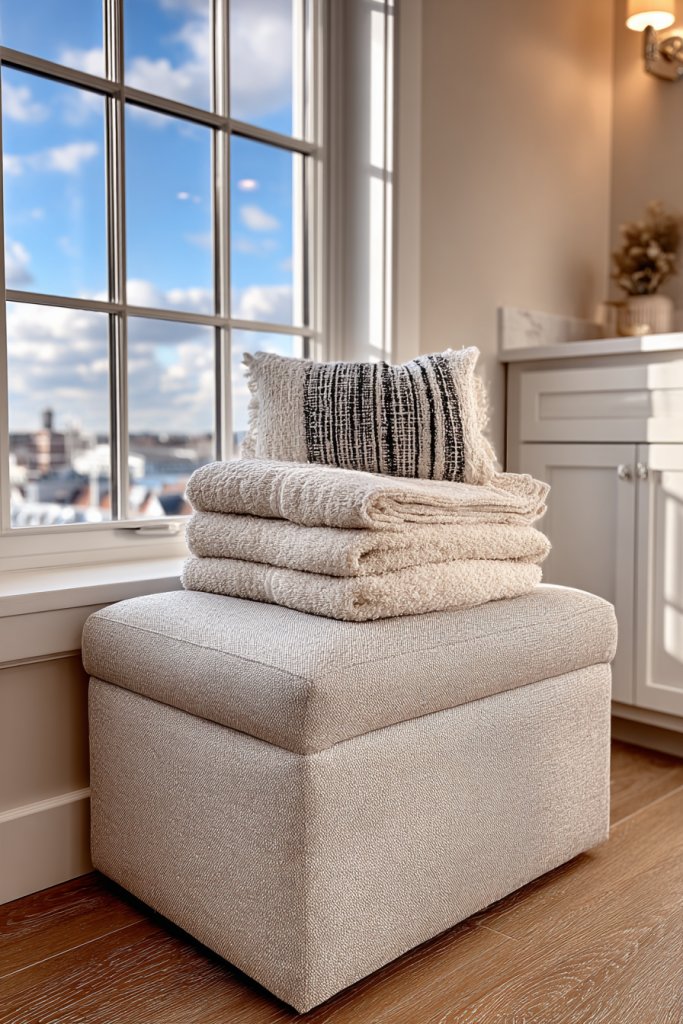
Small bathrooms often lack seating or extra storage, making daily routines less comfortable. Multi-functional furniture combines comfort and practicality—think storage benches or seats that double as hidden organizers. They help you maximize space and add a cozy touch.
Picture a wooden bench at the foot of your shower, with a plush cushion on top. Inside, it’s filled with extra towels, cleaning supplies, or toiletries. The bench’s sleek design complements your decor, whether rustic or modern. When not in use, it’s a stylish accent that blends into the room seamlessly.
Choose from materials like wood, resin, or upholstered fabrics, depending on your decor style. For small bathrooms, opt for slim-profile benches with hidden storage compartments. During different seasons, swap cushion covers or add decorative pillows for a personalized look. Consider adding a small side table for convenience.
Select a durable, moisture-resistant material to prevent warping or mold growth. Assemble the furniture according to the manufacturer’s instructions, ensuring all parts are secure. Place the bench in a strategic spot—near the shower or vanity—to maximize utility. Use waterproof cushions or covers to maintain freshness.
Add decorative textiles like a soft throw blanket or a textured cushion cover. Label storage compartments inside for easy organization. Incorporate small baskets or trays on top for daily essentials. Personal touches like Monogram initials or patterned fabrics can make it uniquely yours.
Multi-functional furniture turns everyday items into smart storage solutions, making your bathroom more inviting. It’s a small investment with a big payoff in comfort and organization. Once you experience the convenience, you’ll wonder how you ever did without it. Embrace the dual-purpose trend!
10. Incorporate a Fold-Down or Retractable Vanity Mirror
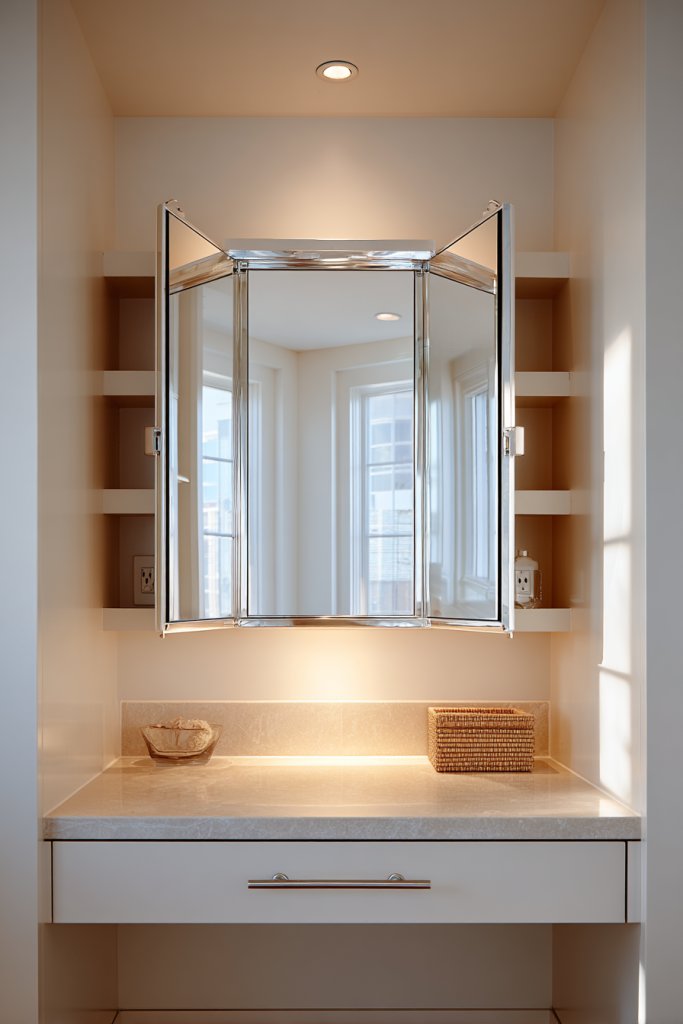
Does your mirror take up valuable space or get in the way? A fold-down or retractable mirror offers a practical solution—saving space while providing full functionality. It’s perfect for small bathrooms where every inch counts and clutter is the enemy.
Visualize a sleek mirror mounted on a fold-down arm or retractable track, tucked neatly into the wall when not in use. When needed, it swings out smoothly, revealing a clear reflection. Its minimalist frame blends seamlessly with your decor, creating a clean, tidy look. The mirror’s compact design maintains your room’s openness.
Choose from different mounting mechanisms—pivot, telescoping, or slide-out—based on your space and style preferences. Use waterproof finishes or frameless designs for a modern look. For a vintage vibe, opt for ornate brackets or antique finishes. During seasons or special occasions, swap out the mirror frame for different styles.
Install the mounting bracket securely into wall studs or anchors suitable for your wall type. Ensure the mirror is level and operates smoothly without wobbling. Seal edges with waterproof caulking to prevent moisture damage. Choose a mirror size proportional to your vanity or wall space. Test the folding or sliding mechanism regularly for ease of use.
Decorate the surrounding area with small, stylish storage containers or hooks for accessories. Add LED lights around the mirror’s edge for perfect illumination. Customize the mirror with decorative trims or painted accents for a personal touch. Keep the mirror clean and streak-free for optimal reflection.
A fold-down or retractable mirror combines practicality with style, perfect for small spaces. It makes your bathroom more functional without sacrificing aesthetics. Once installed, it’s a feature you’ll wonder how you lived without—space-saving, sleek, and smart!
11. Create a Narrow, Wall-Mounted Linen Closet
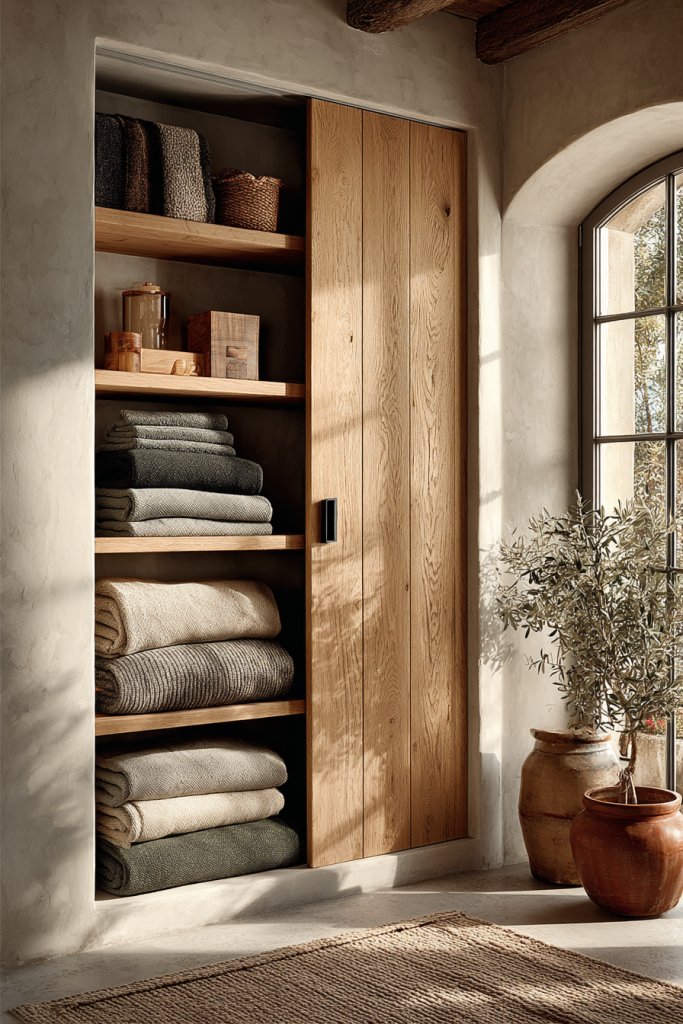
Cluttering your bathroom counters with towels and linens is a common frustration. A narrow, wall-mounted linen closet is the perfect way to organize these essentials without sacrificing space. It keeps everything tidy, accessible, and out of sight, which makes a huge difference.
Picture a slim, tall cabinet with multiple shelves, mounted high on the wall. It holds neatly folded towels, washcloths, and extra linens, all arranged by size or color. The finish matches your decor—perhaps a soft matte or natural wood tone. The closet’s vertical design keeps the floor clear, making the room appear larger.
Choose a minimalist design with sliding or barn doors to save space. Use baskets or fabric bins inside to keep smaller items organized. During different seasons, swap out linens or add decorative handles for a personalized touch. For rental spaces, consider adhesive or tension-mounted units that require no drilling.
Measure the available wall space carefully before purchasing. Use a level and drill to mount the closet securely into wall studs. Seal all edges with waterproof caulk to prevent moisture damage. Organize linens by stacking or folding, using labels if needed. Regularly check for any signs of moisture or mold.
Decorate the closet with stylish knobs, or paint it in a bold hue to add a pop of color. Add small, decorative fabric liners or labels for easy identification. Incorporate a small, mounted towel rack nearby for quick access. Keep it neat with a routine fold and organization system.
A dedicated linen closet keeps your bathroom tidy and functional. It’s a small upgrade that makes everyday routines smoother. Seeing neatly stored linens will motivate you to keep the space clutter-free. Trust me, organization feels so much better!
12. Use Bright, Energy-Efficient LED Lighting
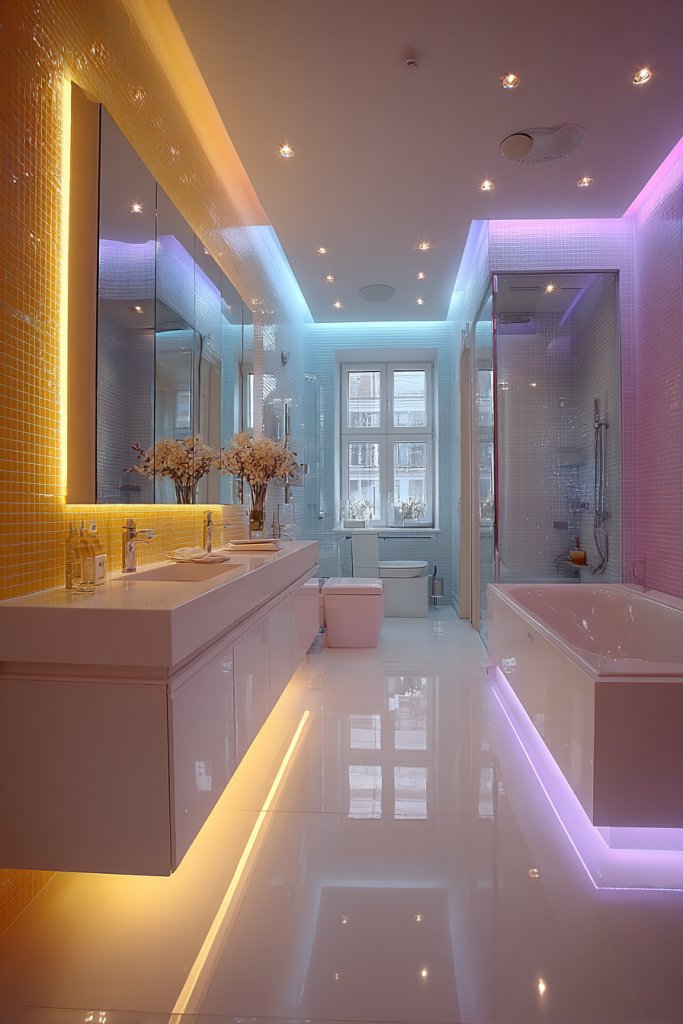
Dim lighting can make even the brightest small bathroom feel dull and uninviting. Upgrading to bright, energy-efficient LED lighting instantly transforms the space into a cheerful haven. It’s a simple change with a big impact on functionality and mood.
Imagine crisp, white LED strips installed under cabinets, along shelves, or circling the mirror. They cast a clean, even glow that eliminates shadows and brightens every corner. The light’s cool tone complements modern fixtures, making your bathroom look fresh and new. When dimmed, it creates a cozy ambiance for relaxing baths.
Choose from different color temperatures—warm for a cozy feel, cool for task lighting. Install dimmers to control brightness levels based on needs or mood. Use accent lighting in niches or behind mirrors for added depth. During holidays, swap out bulbs for colored or decorative LEDs to match the season.
Decide on the placement of your lighting zones—overhead, task, or accent. Use high-quality LED fixtures with waterproof or moisture-resistant features suitable for bathrooms. Install fixtures securely, following electrical codes, and connect to a dedicated circuit. Use dimmer switches for adjustable ambiance, and test for flickering or uneven light.
Add decorative light covers or diffusers to soften the glow. Incorporate smart lighting controls for remote adjustment or scheduling. Use color-changing LEDs to set different moods and add a fun twist. Keep the wiring tidy with cable clips and concealment behind cabinetry or crown molding.
Energy-efficient LED lighting is a long-term investment that saves money and adds style. It brightens your routine and enhances the overall aesthetic. Once you see your bathroom illuminated perfectly, you’ll wonder how you ever managed without it. Bright ideas lead to bright spaces!
13. Install a Space-Saving, Wall-Mounted Toilet
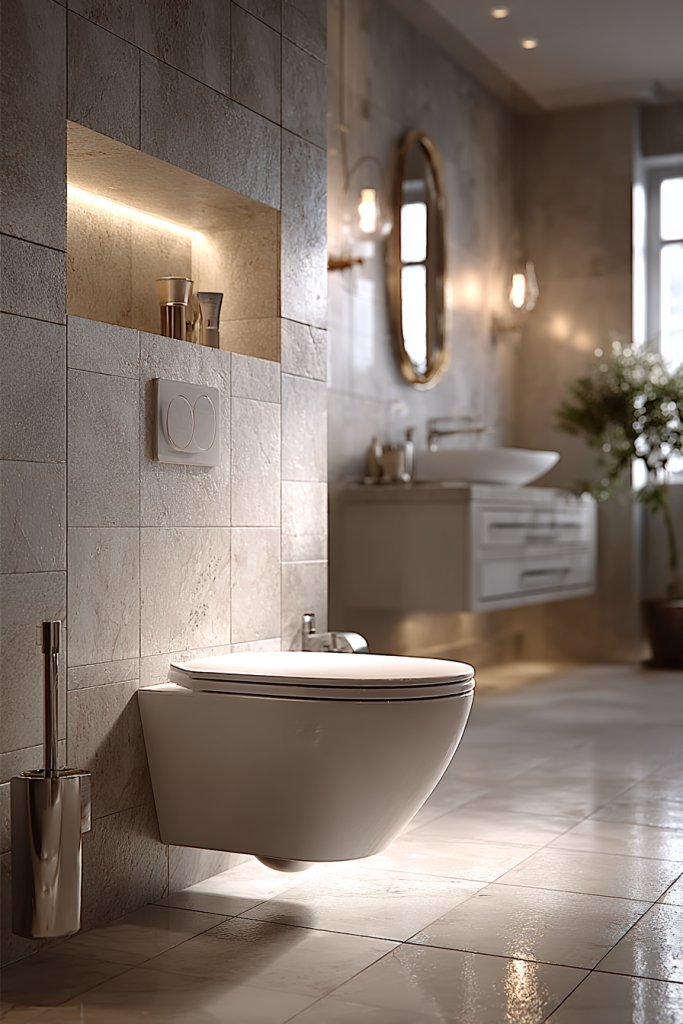
A bulky toilet can dominate a small bathroom, making it feel cramped and cluttered. Wall-mounted toilets are a sleek solution that frees up floor space and simplifies cleaning. They’re the modern upgrade your tiny bathroom desperately needs.
Picture a streamlined, wall-hung toilet with a soft-close seat, mounted just inches above the floor. Its minimalist design creates a floating effect, making the room appear larger. The concealed tank is hidden behind the wall, contributing to a clean, clutter-free look. The overall vibe is contemporary and spacious.
Choose from various finishes—white, matte black, or metallic—to match your fixtures. For smaller bathrooms, opt for a compact elongated bowl; for larger spaces, a round bowl provides extra clearance. Pair with a wall-mounted flush plate for a cohesive look. During renovations, consider dual-flush options for water savings.
Hire a professional to cut into your existing plumbing and wall to install the concealed tank. Mount the toilet securely using appropriate anchors, and connect the water supply carefully. Seal all joints to prevent leaks, and test for stability. Finish by installing a matching flush plate and touching up the wall paint if needed.
Add a soft-close lid or a heated seat for extra comfort. Decorate the surrounding area with a stylish toilet paper holder or a small shelf. Use a matching color scheme or finish to keep everything cohesive. Consider adding a small, framed mirror or artwork nearby for a polished look.
A wall-mounted toilet not only saves space but elevates your bathroom’s style quotient. It’s a smart, long-lasting upgrade that’s easy to maintain. Once installed, you’ll appreciate the clean, modern feel it brings. Small space, big impact!
14. Incorporate a Compact, Corner Sink with Storage
Limited space around your sink area often leads to cluttered countertops. A corner sink is a clever way to save space and still get all the functionality you need. Plus, many models include built-in storage options to keep essentials handy.
Envision a sleek, small sink tucked neatly into the corner, with a curved or angular design that fits snugly. Beneath, a cabinet or open shelf provides room for toiletries, towels, or cleaning supplies. The compact fixture maintains a modern aesthetic, with a faucet that’s streamlined and unobtrusive.
Choose from corner vanities with open shelving, cabinets, or integrated drawers. Materials like light wood or glossy finishes keep the space feeling open and airy. During different seasons, swap out accessories or add decorative containers for added flair. For a touch of luxury, select a vessel sink or a textured basin.
Measure your corner precisely to pick a sink that fits well without blocking access. Install the plumbing connections carefully, ensuring no leaks. Secure the unit firmly to the wall, and seal all edges to prevent water damage. Use waterproof caulk around the edges and test the faucet and drainage thoroughly.
Decorate with a matching soap dispenser or a small plant (Step 8 aside, LOL). Add a stylish mirror above that complements your decor style. Use colorful towels or patterned mats to bring personality to the space. Keep it organized with small baskets or labeled containers.
A corner sink with storage maximizes functionality in tight spaces. It adds a modern touch and keeps clutter at bay. Once you see how efficiently it works, you’ll be inspired to keep your entire bathroom tidy. Small footprint, big style—go for it!
15. Use Light-Colored, Slip-Resistant Floor Tiles
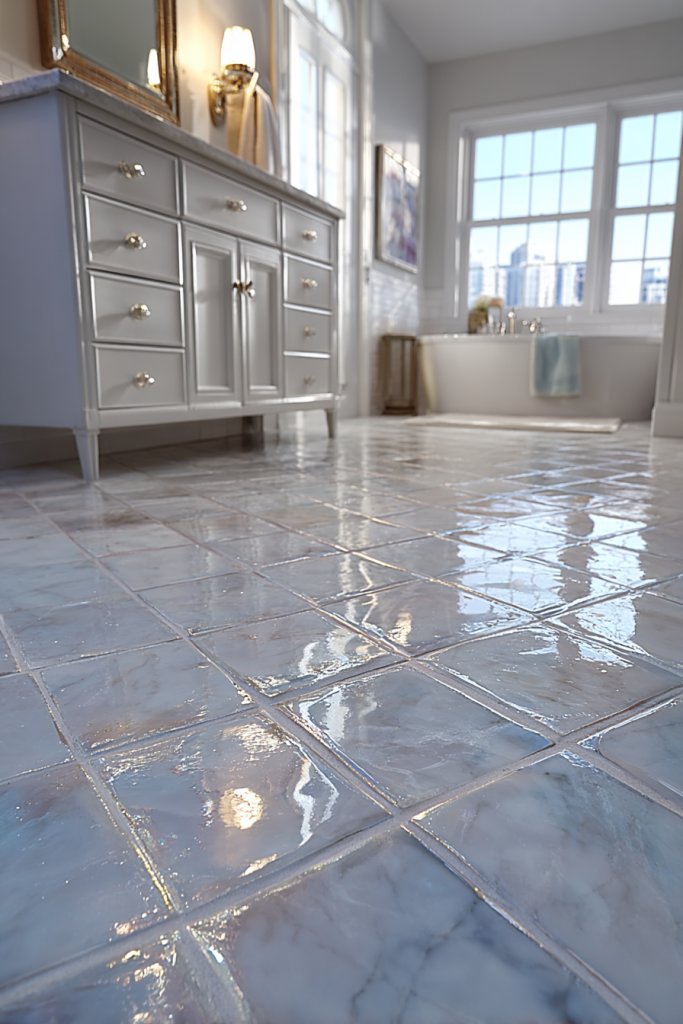
Dark, heavy tiles can make a small bathroom feel like a cave. Bright, light-colored tiles open up the space and reflect more light, making everything appear larger. Plus, slip-resistant options keep safety in mind without sacrificing style.
Imagine a floor of large, matte tiles in soft beige or pale gray. The textured surface provides grip underfoot, even when wet. The neutral tone pairs easily with colorful accessories or subtle decor, creating a cohesive, airy atmosphere. When paired with bright walls and mirrors, the space feels fresh and inviting.
Choose from various textures—matte, honed, or textured—to enhance slip resistance. Use tiles with subtle patterns or subtle color variations to hide dirt and water spots. During different seasons, incorporate rugs or mats for added comfort and style. For a bold look, mix tiles of different shades or sizes in a geometric pattern.
Select high-quality, slip-resistant tiles rated for wet areas. Prepare the subfloor thoroughly, ensuring it’s clean and level. Use waterproof adhesive and grout, sealing all joints carefully. Install with a professional for perfect alignment and finish. Regularly clean and reseal to maintain safety and appearance.
Add colorful, textured rugs or mats for a pop of personality. Incorporate matching or contrasting grout colors for visual interest. Use decorative baseboards or trim to finish the look. Keep the tiles looking fresh with gentle cleaning and occasional resealing.
Light-colored, slip-resistant tiles boost your bathroom’s brightness and safety. They’re a practical upgrade that enhances style and peace of mind. Once you see the brighter, safer floor, you’ll be motivated to maintain a tidy, cheerful space. Small details, big results!
16. Add a Mirrored Medicine Cabinet for Hidden Storage
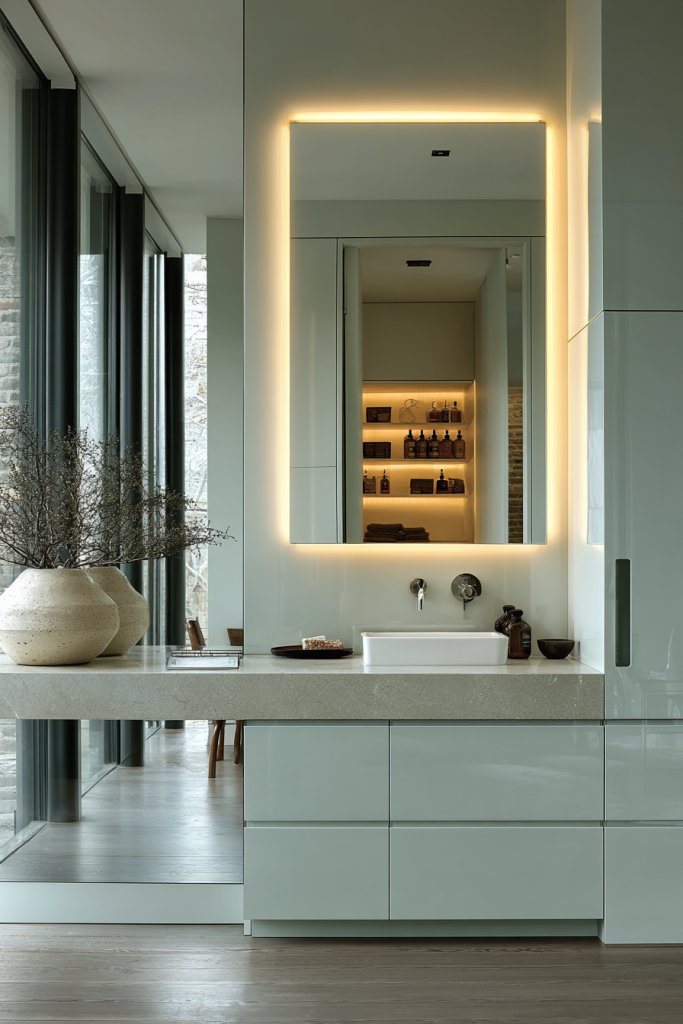
Counter clutter and lack of storage are common in tiny bathrooms. A mirrored medicine cabinet offers hidden storage for toiletries, medications, and grooming essentials. It keeps your space looking sleek while hiding messes behind a mirror—a win-win.
Envision a sleek, wall-mounted mirror with a subtle frame that doubles as a cabinet door. When opened, it reveals neatly organized shelves filled with daily necessities. The reflective surface enhances the room’s brightness and makes it feel more spacious. Its clean design complements modern or traditional decor.
Choose from different sizes and configurations—single or multiple-door units, with or without built-in lighting. For small bathrooms, a narrow, vertical cabinet fits perfectly. During seasonal updates, swap out the interior organizers or add small baskets. For a vintage look, opt for distressed finishes or decorative trims.
Measure your available wall space carefully before purchasing. Mount the cabinet securely into wall studs for stability. Use a level and appropriate anchors for drywall or tile. Install the mirror door with hinges that open smoothly, and add seals to prevent moisture infiltration. Organize your items inside with small containers or adjustable shelves.
Decorate the interior with small, labeled containers or baskets to keep things tidy. Add LED lighting inside for better visibility. Customize the exterior with paint or decorative hardware for a personalized touch. Keep the mirror spotless for maximum brightness.
A mirrored medicine cabinet combines style and function, making your bathroom more organized and spacious. It’s a small upgrade with a big payoff. Once you see how much tidier your space becomes, you’ll be motivated to keep it pristine. Smart storage made simple!
17. Use Transparent or Slim Profile Shower Enclosures
Opaque shower doors or curtains can make your bathroom feel closed off. Transparent or slim-profile enclosures open up the space visually, creating a seamless, modern aesthetic. They’re the perfect way to make a small bathroom look bigger and brighter.
Picture a frameless glass shower with minimal hardware, almost disappearing into the room. The clear panels allow the eye to travel freely, showcasing beautiful tile work and making the bathroom appear larger. The sleek, slim profile keeps the enclosure unobtrusive, emphasizing openness and cleanliness. Soft lighting enhances the transparency, adding a luxurious glow.
Choose frameless, semi-frameless, or slim-profile enclosures depending on your style. Use tempered glass with a slight tint or etched patterns for privacy, if needed. For small spaces, a single-panel door might suffice; larger bathrooms can accommodate multi-panel designs. Pair with neutral tiles and minimal hardware for maximum visual flow.
Measure your shower opening precisely to ensure a perfect fit. Hire a professional installer experienced with glass enclosures—precision is key. Seal all edges with waterproof silicone to prevent leaks. Regularly clean the glass with non-abrasive cleaners to keep it pristine and clear. Test the door’s operation to ensure smooth opening and closing.
Add a subtle decorative element with etched or frosted glass patterns. Incorporate a small, built-in niche or shelf inside the shower for toiletries—keeping surfaces clutter-free. Use matching hardware in finishes like matte black or brushed nickel to complement your fixtures. Keep the enclosure spotless for maximum clarity.
Transparent shower enclosures are a subtle, stylish upgrade that packs a visual punch. They make your bathroom look more spacious and luxurious without adding clutter. Once installed, you’ll love how open and clean your shower area feels. Minimalist design, maximum impact!
18. Integrate Under-Sink Storage Solutions
Cluttered countertops and disorganized cabinets can make even simple routines frustrating. Under-sink storage solutions turn this space into a practical, tidy zone. They keep your essentials close at hand while hiding the mess from sight—total game-changer.
Imagine a sleek cabinet with pull-out drawers or stackable baskets beneath your sink. Inside, neatly organized toiletries, cleaning supplies, and spare toilet paper sit in designated spots. The design is clean, with labels or color-coded containers for easy access. When closed, it looks like a seamless part of your vanity.
Choose from open shelving, baskets, or drawers based on your style and needs. Use moisture-resistant materials like plastic or sealed wood to prevent warping. During seasonal changes, swap out items for lighter or heavier supplies. Incorporate small dividers or containers for better organization.
Measure your under-sink space carefully to select compatible organizers. Install pull-out shelves or baskets for easy access. Seal all surfaces with waterproof paint or laminate to prevent moisture damage. Keep plumbing in mind, and ensure your storage doesn’t obstruct access to pipes or valves. Regularly clean and reorganize for maximum efficiency.
Label containers for quick identification and add decorative touches like patterned liners or colorful baskets. Incorporate a small, mounted mirror or a few decorative hooks nearby for extra utility. Use matching or contrasting colors to suit your decor. Keep the area tidy with weekly maintenance.
Under-sink storage turns a hidden corner into a practical asset. It simplifies routines, keeps clutter out of sight, and adds a polished look. Once you see how easy it is to maintain, you’ll be motivated to keep the entire bathroom organized. Smart storage, simplified!
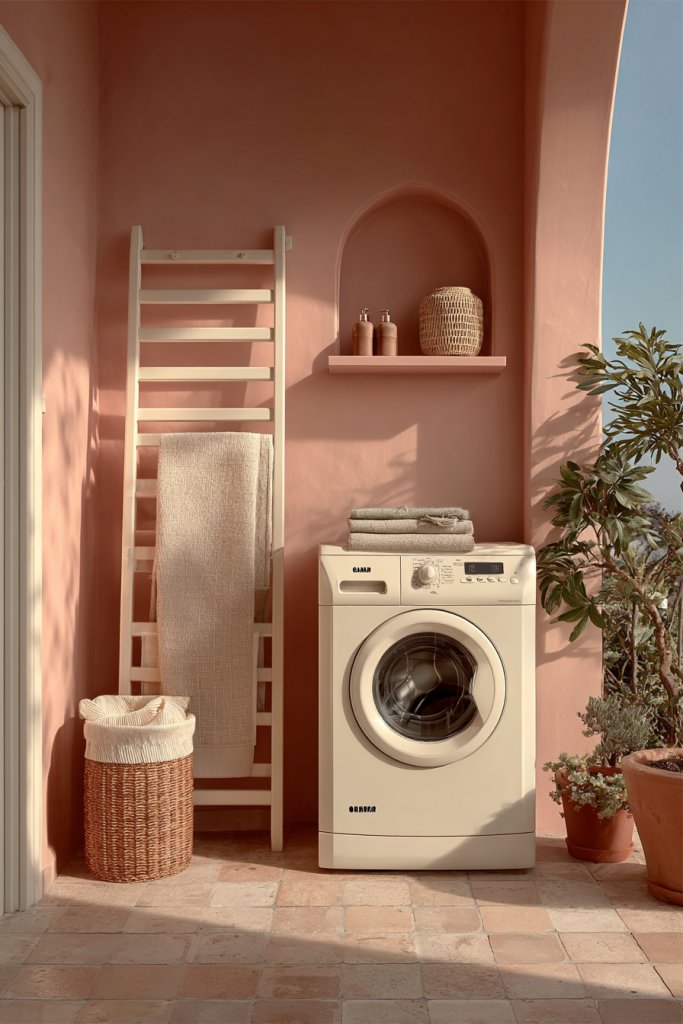
19. Incorporate a Small, Wall-Hung Laundry Bin
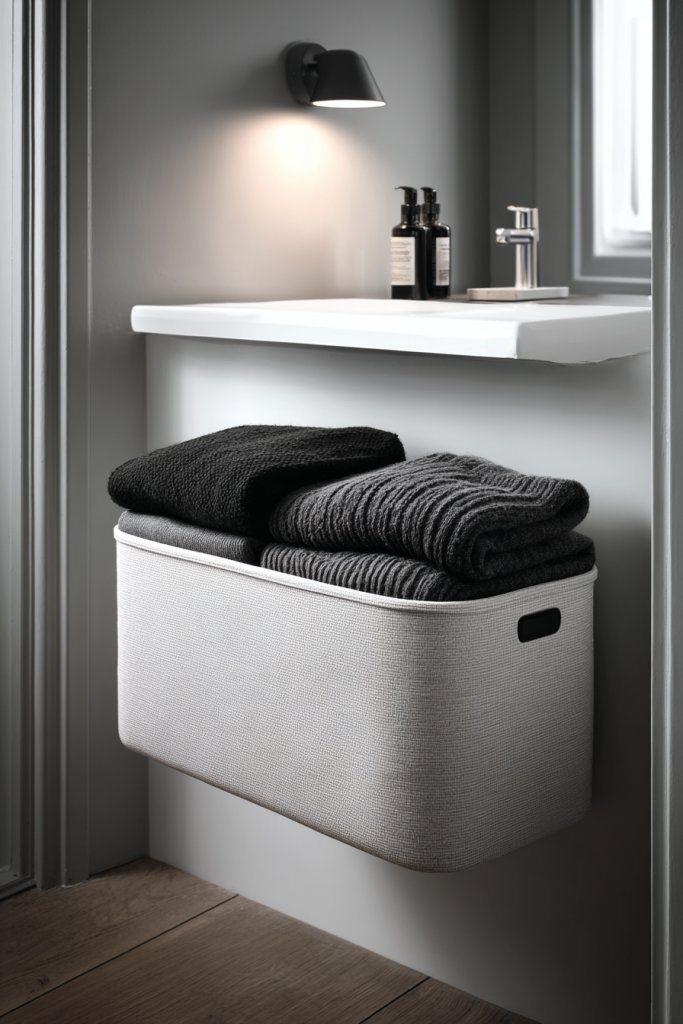
Laundry hampers can clutter up a small bathroom, making the space feel chaotic and unorganized. A wall-hung laundry bin is a smart, space-saving solution that keeps dirty clothes out of sight. It adds convenience and maintains a tidy look—no more piles on the floor.
Picture a compact, sleek bin mounted on the wall near your shower or vanity. It has a fabric or plastic liner, allowing for easy removal and washing. The design blends into the wall, with a cover or lid that keeps odors contained. When not in use, it stays discreet, maintaining the room’s clean aesthetic.
Choose from various shapes—rectangular, round, or square—to match your decor. Use neutral tones or vibrant colors to add personality. During different seasons, swap out liners or add decorative covers. Mount it at a height that’s comfortable for everyone in the household.
Select a sturdy wall mount that can handle the weight of full laundry loads. Install into wall studs or use heavy-duty anchors, ensuring safety. Seal around the mounting points with waterproof sealant. Keep the liner clean and replace it regularly to prevent odors. Position it conveniently near your laundry area or bathroom entrance.
Add decorative touches like patterned liners or labels for sorting laundry types. Incorporate a small shelf or hook nearby for detergents or brushes. Use matching hardware and finishes to coordinate with fixtures. Keep the space functional but stylish—less clutter, more comfort.
A wall-hung laundry bin keeps your space tidy and makes laundry chores feel less like a burden. It’s a small change that improves daily routines and adds a modern touch. Once you see how neat and organized it makes your bathroom, you’ll wonder why you didn’t do it sooner!
20. Install Pocket Doors Instead of Swinging Doors

Swinging doors can take up precious space in small bathrooms, making movement awkward or blocking access. Pocket doors slide neatly into the wall, saving space and providing a sleek, modern look. They’re perfect for tiny bathrooms where every inch counts.
Imagine a smooth, flush pocket door that disappears into the wall when opened. It glides quietly on a track, revealing or hiding the shower or toilet area. The clean wall surface remains uninterrupted, giving the room a streamlined, minimalist appearance. The door’s finish matches your decor—white, wood, or metallic.
Choose from various track systems—single or double sliding doors—based on your space. Use frosted or clear glass panels for privacy or openness. During renovations, consider pocket doors with decorative hardware or painted finishes for a personalized touch. Use soft-close mechanisms to enhance the experience.
Hire a professional to modify your wall and install the track system securely. Ensure the wall cavity is deep enough to accommodate the door fully. Seal all edges to prevent drafts or moisture intrusion. Test the sliding mechanism thoroughly and adjust for smooth operation. Finish with paint or wall covering that matches the surrounding walls.
Decorate the door with a unique paint finish or hardware that complements your style. Add a small, decorative handle or pull for easy operation. Use a contrasting wall color or pattern to highlight the door. Keep the track clean and lubricated for longevity.
Pocket doors are a space-saving upgrade that instantly modernizes your bathroom. They eliminate door clearance issues and create a cleaner look. Once you see the extra space and sleek design, you’ll be hooked. It’s a smart, stylish choice for small bathrooms!
21. Utilize Under-Eaves Space for Custom Shelving
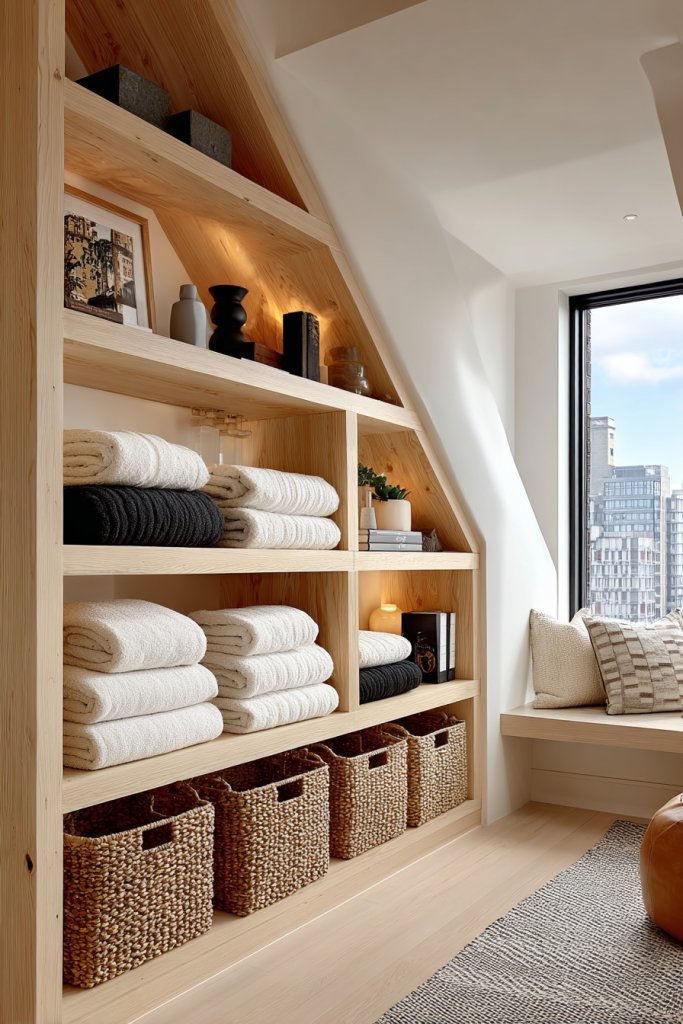
Unused attic or eaves spaces often go ignored but can be perfect for extra storage. Custom shelving here maximizes every inch of your small bathroom. It’s an innovative way to hide clutter and keep essentials close without sacrificing style or space.
Picture a set of sturdy, built-in shelves nestled under the sloped ceiling, painted to match the walls. They hold neatly folded towels, baskets, or small toiletries. The design is seamless, whether rustic with reclaimed wood or sleek with painted MDF. When finished with proper lighting, it becomes a hidden gem of organization.
Design the shelves in varying depths and widths to fit your specific needs. Use moisture-resistant materials for durability. During seasonal changes, store out-of-season items here—like holiday towels or specialty products. Decorate with baskets or small decorative items to add personality.
Measure the space carefully, including ceiling height and angle. Build or order custom shelving units that fit precisely. Secure shelves into wall studs or ceiling joists for safety. Finish with paint or stain, and ensure all materials are water-resistant. Organize your items thoughtfully for easy access.
Add small LED lights underneath or inside shelves for better visibility. Use decorative bins or labeled containers for different items. Incorporate a small hook or peg rack for hanging items like robes or accessories. Match the shelving finish to your room’s decor for a cohesive look.
Utilizing under-eaves space cleverly boosts your storage capacity without cluttering the main room. It’s a subtle upgrade that makes your bathroom more functional and organized. Seeing everything neatly stored out of sight will motivate you to keep the space tidy. Creative solutions make small spaces feel twice as big!
22. Add a Mirrored Sliding Door for Closet Access
Traditional closet doors can clutter small bathrooms, making the space feel boxed in. Mirrored sliding doors serve dual purposes—access and reflection—while saving space. They instantly brighten and enlarge your room, giving it a fresh, modern vibe.
Picture a sleek, sliding mirror door that glides smoothly open, revealing your closet or storage area. When closed, it reflects the room, creating the illusion of a larger space. The mirror’s surface is spotless, casting natural and artificial light across the room. It’s a simple, elegant upgrade that’s both functional and decorative.
Choose from full-length or multi-panel sliding mirrors, depending on your closet size. Frame options range from minimalist aluminum to ornate finishes for a vintage look. During seasonal updates, swap out the mirror panels or add decorative trims. Use matching hardware finishes for a cohesive aesthetic.
Install a sturdy track system, ensuring it’s level and securely anchored into wall studs. Measure opening precisely to avoid gaps or misalignment. Seal around the track to prevent moisture intrusion. Test sliding operation thoroughly before finishing touches. Keep the mirror clean and streak-free for maximum effect.
Add decorative handles or accents to the sliding panels for a customized look. Incorporate lighting inside or around the closet for better visibility. Use a protective coating or anti-fog spray to keep the mirror clear. Coordinate with your overall decor by choosing finishes that match faucets or fixtures.
A mirrored sliding door maximizes space while adding a touch of elegance. It makes your closet easily accessible and visually enlarges the room. Once installed, it’s a feature you’ll love showing off. Small changes, big style impact!
23. Use Floating Shelves for Decorative and Practical Storage
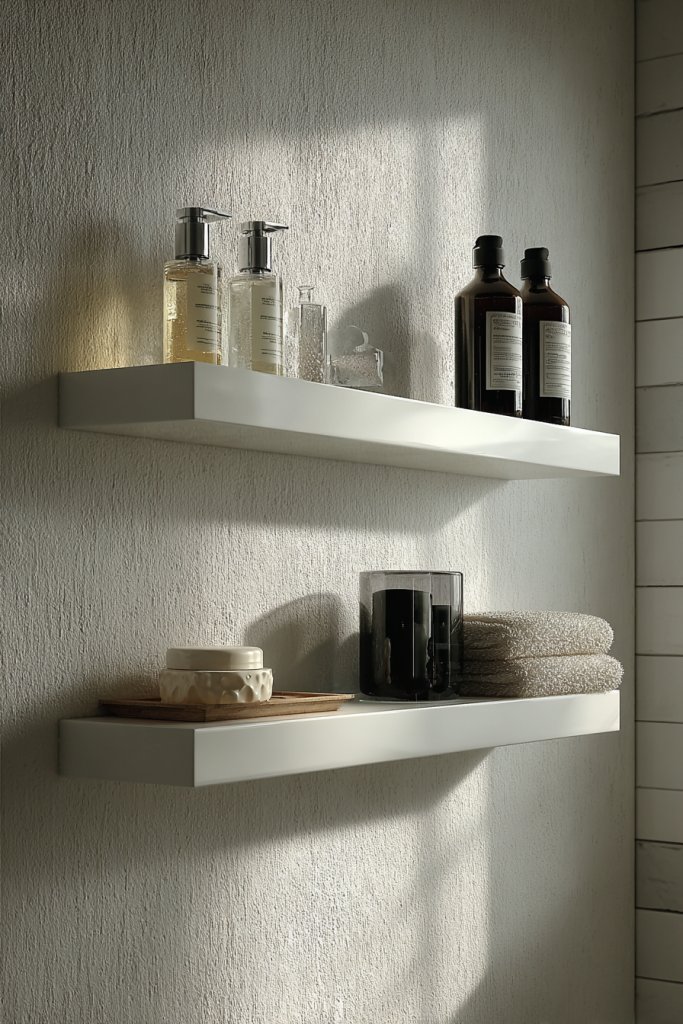
Cluttered countertops and crowded shelves make small bathrooms feel chaotic. Floating shelves are a minimalist, stylish solution—adding storage without bulk. They keep essentials organized and surfaces clear, boosting your space’s overall vibe.
Imagine a set of sleek, wood or metal floating shelves mounted above the toilet or vanity. They hold neatly folded towels, decorative jars, or daily-use items. The open design creates a sense of airiness, while the clean lines add a modern touch. When styled with accessories, they become a focal point rather than clutter.
Select different lengths, depths, and finishes to match your decor—think matte black, natural wood, or painted surfaces. Use multiple levels for visual interest or staggered heights for a dynamic look. During seasons, swap out decorative items or textiles for a fresh feel. Keep the style cohesive with your overall decor theme.
Mark the wall carefully for even spacing and level placement. Use appropriate anchors and screws for your wall type—drywall, tile, or plaster. Secure each shelf firmly, ensuring weight capacity is not exceeded. Seal around edges with waterproof caulk if needed. Organize your items neatly, balancing functionality and aesthetics.
Decorate with small, decorative containers or labels. Add LED strip lights underneath for accent lighting. Incorporate small plants or textured accessories, avoiding restricted content. Choose a color scheme that complements your walls and fixtures for a harmonious look.
Floating shelves combine style and function, transforming your bathroom into a chic, organized space. They’re easy to install and highly customizable, giving you control over your decor. Once you see how much tidier everything looks, you’ll want to add more. Stylish storage is always a good idea!
24. Incorporate a Small, Foldable Laundry Station
Laundry can quickly turn a small bathroom into a chaotic laundry zone. A foldable laundry station offers a compact, organized way to handle laundry chores. When not in use, it folds away neatly, keeping your space clean and clutter-free.
Visualize a sleek, foldable table with a built-in hamper or basket underneath. When unfolded, it provides a sturdy surface for sorting or folding clothes. When folded up, it tucks neatly against the wall or into a closet corner. The design is minimalist, with a neutral finish that blends seamlessly into your decor.
Choose models with different sizes, materials, and features—like removable baskets or collapsible legs. Use moisture-resistant materials like laminated wood or plastic. During different seasons, change out the baskets or add decorative labels. Incorporate a hanging rack or hooks nearby for clothes hanging or additional storage.
Measure your available space before selecting a unit. Install the station on a sturdy wall or inside a closet, ensuring safety and stability. Use wall anchors or screws suitable for your wall type. When unfolded, ensure the surface is level and secure. When not in use, fold it away carefully, and clean regularly to prevent dust buildup.
Add decorative touches like colorful baskets or labels. Use a stylish cover or cushion on the folding surface for comfort. Incorporate small hooks or a drying rack nearby for convenience. Coordinate the station’s finish with your room’s decor for a cohesive look.
A foldable laundry station makes chores easier and keeps your bathroom looking tidy. It’s a smart space-saving solution that’s both practical and stylish. Once you experience the convenience, you’ll wonder how you managed laundry without it. Small space, big utility!
25. Choose a Compact, Space-Efficient Bathtub or Shower Combo
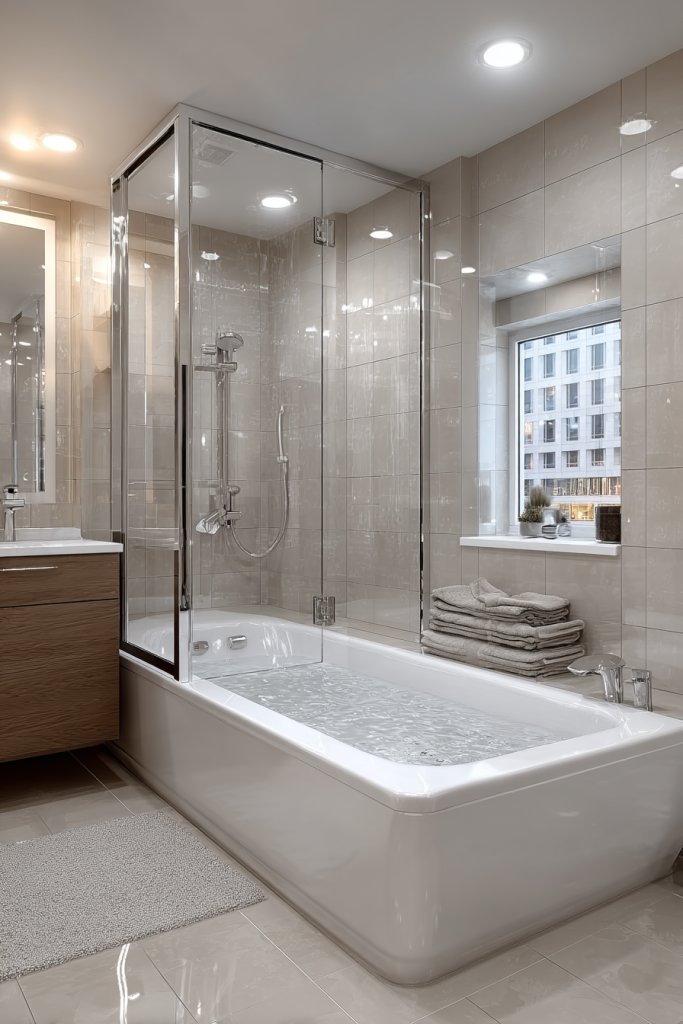
A large, traditional bathtub can dominate a small bathroom, leaving little room for anything else. A compact, space-efficient shower and tub combo maximizes utility without sacrificing comfort. It’s the perfect solution for relaxing and refreshing in a limited space.
Imagine a sleek, combined shower and small bathtub with a streamlined design, fitting snugly into a corner. The enclosure features clear glass panels and a minimalistic faucet, creating a seamless look. The space feels open, with neutral tiles and subtle lighting enhancing the calm atmosphere. It’s a cozy retreat that doesn’t overwhelm the room.
Select models with integrated storage or corner shelves for toiletries. Choose finishes that match your fixtures—brushed nickel, matte black, or white. During renovations, consider a walk-in design with a low step or a curbless entry for accessibility. For a spa-like feel, add textured tiles or a pebble floor.
Measure your space carefully to choose the right size and shape of combo unit. Hire professionals for precise installation, ensuring plumbing and drainage are secure. Seal all edges with waterproof caulk and test for leaks. Use non-slip tiles or mats inside the shower area for safety. Finish with matching fixtures and lighting.
Decorate with textured towels or a decorative shower curtain (Step 8 aside, LOL). Add a small bench or seat for convenience, and incorporate a few decorative elements that fit your style—like pebbles or LED accents. Keep the space clutter-free for a calming experience.
A compact shower and tub combo offers versatility and style in small bathrooms. It makes bathing relaxing and space-efficient, all in one. Once installed, you’ll love how it transforms your space into a functional sanctuary. Small footprint, big comfort!
Conclusion
With a diverse range of small bathroom remodel ideas, you’re equipped to turn your cramped space into a practical haven. Embrace these creative solutions to boost functionality and style effortlessly. Don’t wait—start transforming your bathroom today and enjoy the rewarding results of your inspired efforts!