Imagine walking into a room that instantly sparks joy and creativity—sounds dreamy, right? Pinterest has become the go-to platform for home decorators and design enthusiasts alike, offering a treasure trove of inspiring room decor ideas. Its popularity lies in the endless variety, trendsetting styles, and the ability to visualize your dream space before making any changes.
In this article, you’ll find a diverse selection of Pinterest-inspired decor ideas that cater to every taste and style. From cozy boho corners to sleek modern setups, these ideas will ignite your imagination and help you transform your space into a personal sanctuary filled with personality and charm.
1. Floating Wall Shelves with Colorful Accents
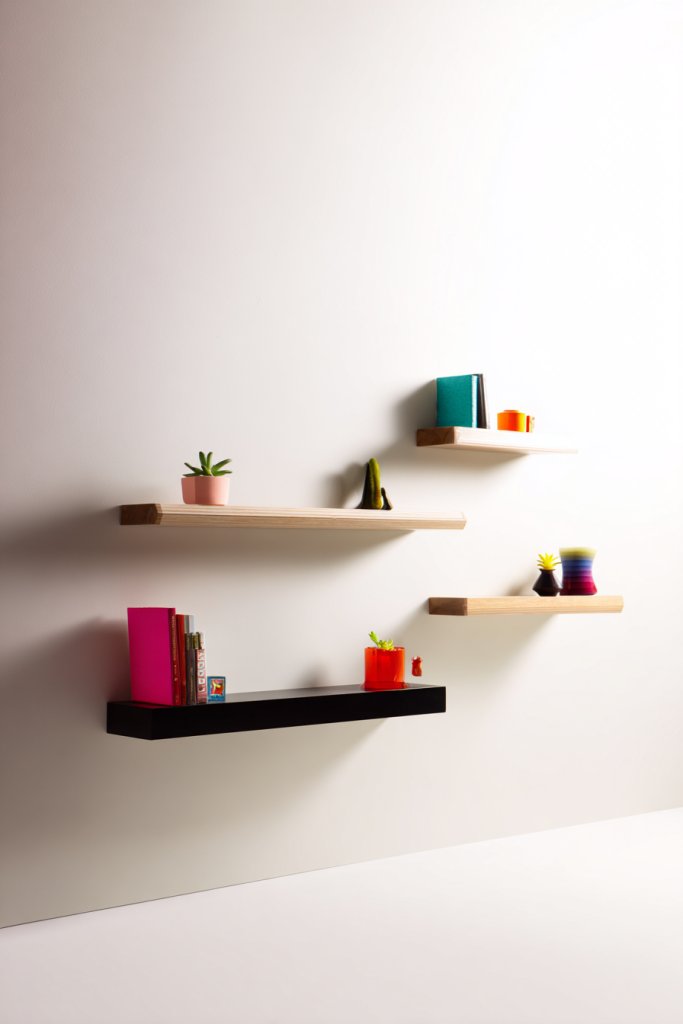
Ever feel your walls look a little too plain or empty? Want to add personality and function without cluttering your space? Floating wall shelves are a stylish way to showcase your favorite items while keeping things organized. They transform blank walls into focal points and make your room feel more lived-in.
Imagine sleek, minimalist shelves floating effortlessly on a wall, painted in a bold hue or a soft pastel. They hold a curated collection of books, small planters, or decorative objects that add pops of color and texture. The clean lines create a modern vibe, while the layered arrangement adds depth and visual interest. The overall effect feels fresh and inviting.
Adjust shelf styles to match different decor themes—metallic brackets for industrial looks, or wood for cozy, rustic charm. Change the color accents seasonally or according to your mood. Smaller shelves suit compact spaces, while longer ones can span entire walls for maximum impact. You can also stagger shelves for a dynamic, asymmetrical design.
Start by measuring your wall and choosing the right size and number of shelves. Use sturdy brackets and high-quality floating shelf kits for safety and durability. Mark the wall with a level and pencil before drilling, ensuring perfect alignment. Decorate with a mix of functional items like small storage boxes or decorative objects like ceramics. Keep the setup minimal to avoid overwhelm.
Personalize your shelves with items that tell your story—travel souvenirs, favorite candles, or framed quotes. Use color-coordinated accents for a cohesive look. Incorporate different textures—metal, wood, or glass—to add visual richness. Change out decor periodically to keep the vibe fresh and engaging.
Floating shelves are versatile and easy to install, giving you instant style upgrades. They show that small touches can make a big difference in your room’s personality. Ready to elevate your space with simple, impactful decor? Go ahead—your walls are waiting for a splash of color and creativity!
2. DIY Macramé Wall Hangings for Textured Elegance
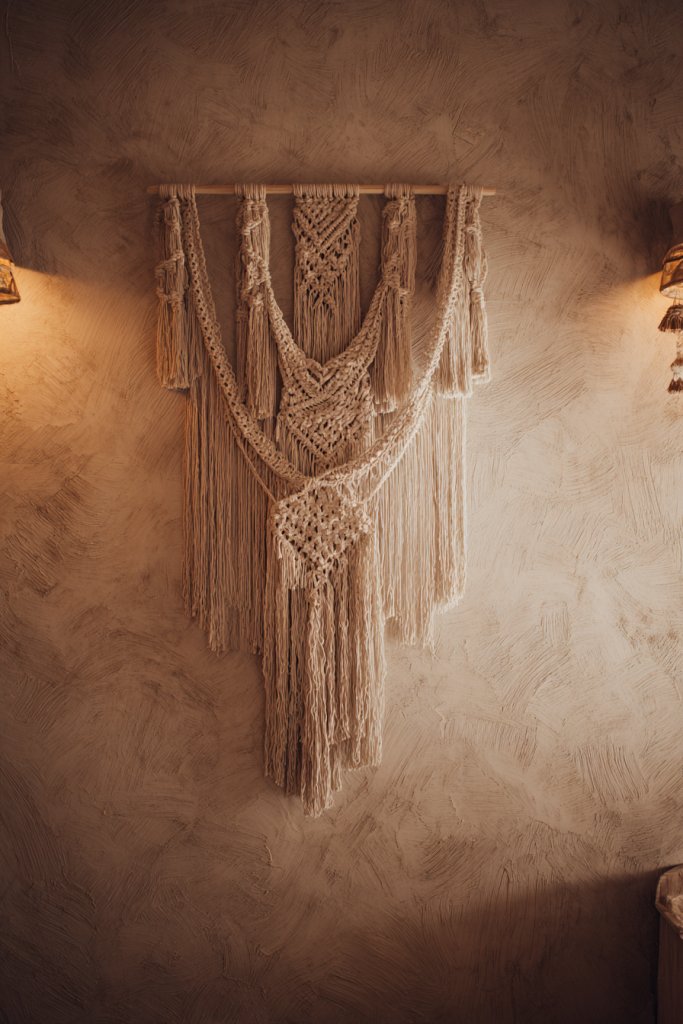
Craving a cozy, boho-chic vibe in your space but not keen on buying mass-produced art? Macramé wall hangings are a fantastic way to add texture and personality without breaking the bank. They bring a handcrafted, artistic flair that elevates any wall.
Picture a large, intricate macramé piece hanging in a corner, its knots forming geometric patterns or flowing fringes. The natural fibers create a tactile, textured surface that invites touch and adds warmth. The neutral tones blend seamlessly with various color schemes, while the layered knots add depth and dimension. It’s like bringing a piece of artisan craftsmanship into your home.
Choose different knot styles, fiber types, or sizes to match your aesthetic—be it minimalist, bohemian, or eclectic. Hang multiple smaller pieces for a gallery wall effect or a single large piece for a statement. Use natural fibers for a relaxed look, or incorporate dyed yarns for vibrant pops of color. Seasonal decor can be swapped easily by changing fringes or adding seasonal accents.
Gather cotton or jute cords, a sturdy dowel or ring for hanging, and scissors. Find a tutorial or pattern to follow, or experiment with knots like square, half hitch, or spiral. Measure and cut cords to desired lengths, then knot and layer as needed. Secure the top with a loop or metal ring for hanging. Mount on the wall using a nail or hook, ensuring it’s centered and straight. It’s a craft that’s both simple and satisfying.
Customize your wall hanging with beads, shells, or feathers woven into the knots. Play with color by dyeing sections of the fibers or using multicolored yarns. Add small decorative charms or pendants for a personalized touch. You can also incorporate different textures or layering techniques for a more complex look.
Making your own macramé gives you a sense of achievement and a unique decor piece. It proves that you don’t need to buy expensive art to style your home beautifully. Feel empowered to experiment with knots and fibers—your wall deserves a handcrafted masterpiece!
3. Upcycled Vintage Crates as Unique Storage and Decor
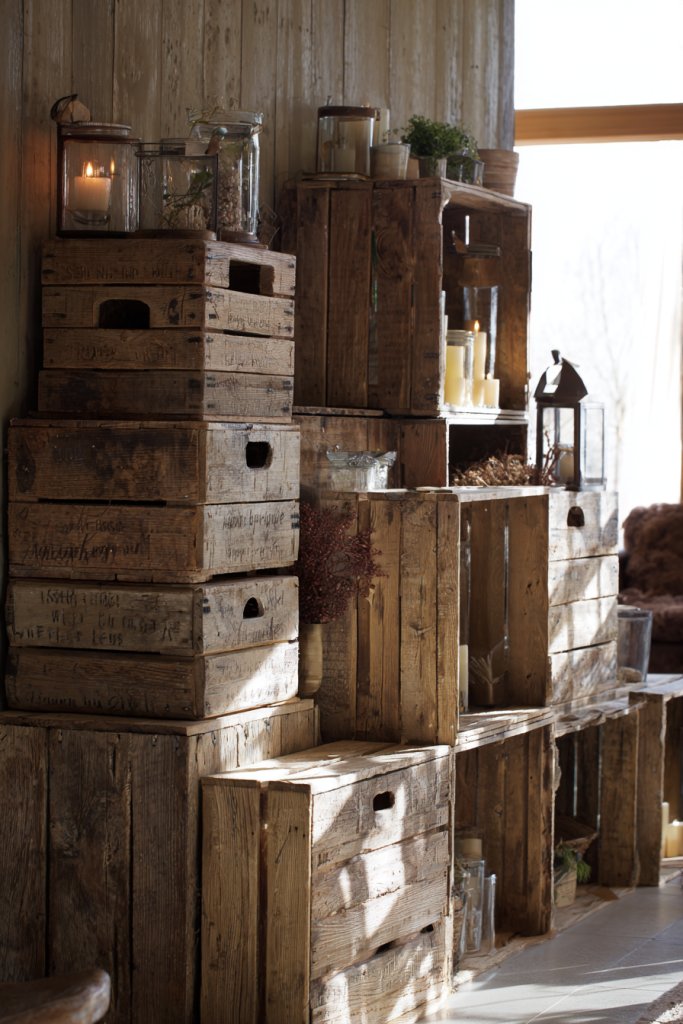
Looking for stylish storage that doesn’t scream plastic or generic furniture? Vintage crates are a charming, eco-friendly alternative. They add rustic character and function simultaneously, making your space both practical and visually appealing.
Visualize stacked wooden crates with weathered paint or natural finish, arranged as side tables or open shelving. They can hold everything from books and magazines to cozy throws or decorative accents. The imperfect textures and aged patina tell a story, adding authenticity and warmth. The varied sizes and shapes create a layered, eclectic aesthetic that looks effortless.
Paint or stain the crates to match your color scheme, or leave them raw for a more organic look. Use them as coffee tables, storage units, or even plant holders (if you’re okay with avoiding restricted content). Stack or arrange them in asymmetrical formations for a casual, boho vibe. You can also add wheels for mobility or line them with fabric for a softer touch.
Source vintage crates at flea markets, thrift stores, or online marketplaces. Clean and sand the surfaces to remove splinters or loose paint. Apply a protective finish or paint in your preferred color. Securely stack or arrange the crates on your floor or wall using brackets or hooks. For a more polished look, line the interior with fabric or wallpaper. Use them to organize clutter or display decorative objects.
Add personal touches by stenciling patterns or quotes onto the crates. Incorporate layered textiles or cushions on top for seating. Mix and match different finishes—some painted, some natural—for visual interest. They’re perfect for creating a vintage-inspired storage nook that’s both functional and full of character.
Upcycled crates are proof that you can transform old materials into statement decor. They encourage sustainable choices and creative problem-solving. Your space becomes more inviting and stylish with just a bit of DIY effort—ready to give your room a rustic, personalized upgrade?
4. Geometric Patterned Area Rugs for Visual Interest
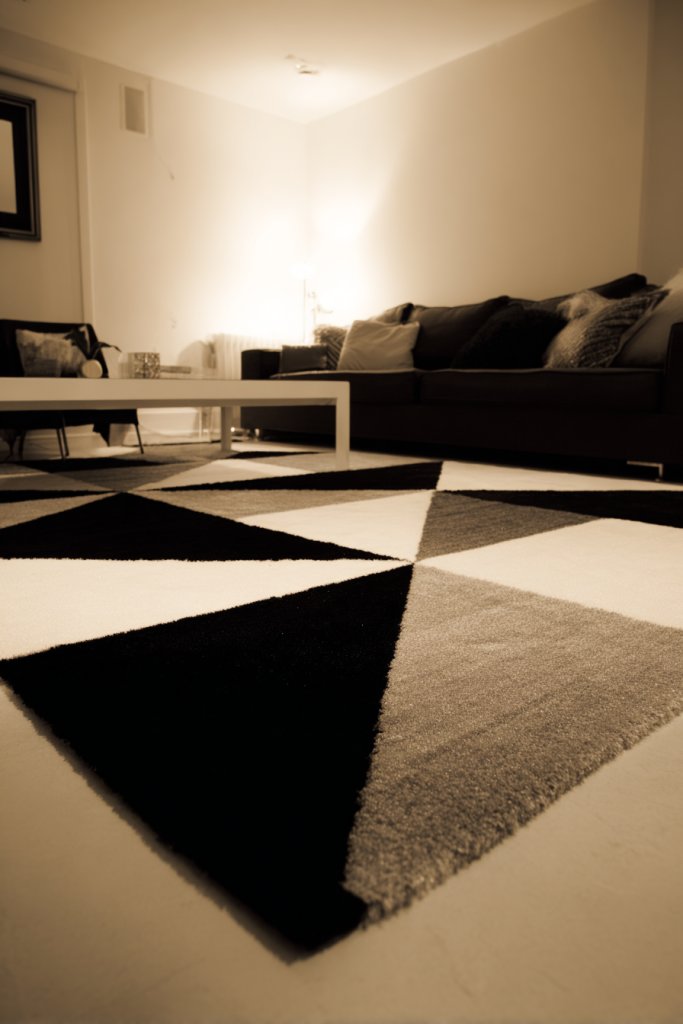
Ever felt like your room needs a focal point or a way to tie everything together? Geometric area rugs are perfect for adding instant style and anchoring your space. They introduce bold patterns that energize the room and define zones without overwhelming the decor.
Visualize a rug with sharp triangles or hexagonal shapes in contrasting colors spread across a hardwood floor. The pattern draws your eye and creates a sense of movement, making the room feel more dynamic. The textured fibers add softness underfoot, while the bold design adds a contemporary edge. It’s like artwork under your feet, making the space feel curated and cohesive.
Select rugs with subtle or vibrant patterns depending on your style—minimalist monochromes or bright, multi-color options. Use smaller runners for hallways or large statement pieces for living rooms. Layer rugs for a more eclectic look or keep it simple for modern minimalism. Seasonal swaps can be achieved with different patterns or colors to match your decor updates.
Measure your space carefully to choose the right size. Look for rugs with durable, easy-care fibers suitable for high traffic areas. Lay the rug flat, and use a non-slip pad underneath for safety. Keep it clean with regular vacuuming, and rotate periodically to prevent uneven wear. Position furniture to frame the rug, highlighting its pattern without hiding it.
Add layered textiles like throws or cushions to complement the rug’s design. Incorporate color accents from the rug into other decor elements for a cohesive look. You can also customize rugs with DIY paint or dye for a one-of-a-kind piece. Use the pattern to inspire other decor choices, like curtains or wall accents.
Bold geometric rugs inject personality and modernity into your home. They show that choosing the right pattern can transform a plain room into a vibrant, inviting space. Ready to make your floors a canvas of style? Your room’s new centerpiece awaits!
5. DIY Photo Garland with Mini Clothespins
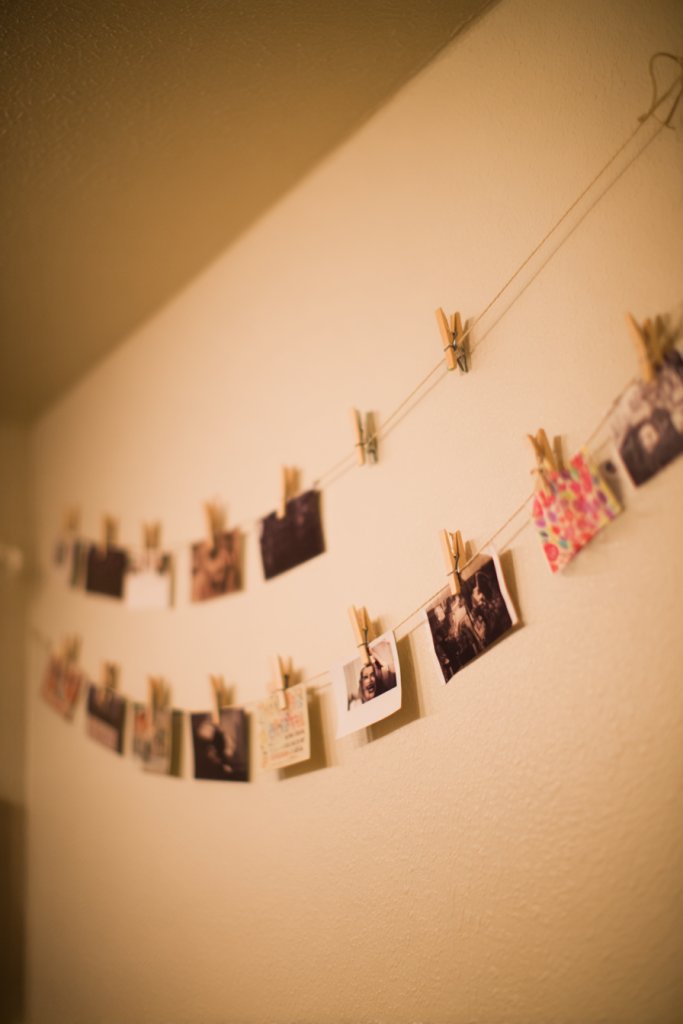
Looking for a personal, budget-friendly way to decorate your space? A photo garland adds charm and nostalgia, turning ordinary walls into a gallery of memories. It’s simple, customizable, and perfect for celebrating special moments.
Picture a string of fairy lights or twine stretched across a wall, dotted with photos, postcards, or fabric swatches clipped with mini clothespins. The display is lively and personal, showcasing your favorite images in a casual, playful way. Layered with soft lighting, it creates a warm, inviting ambiance. Each photo adds a story, making your space feel truly yours.
Mix in different sizes and shapes of photos or add small decorations like tags or charms. Use colorful clips or themed strings to match your decor. Change the display seasonally or for special occasions—birthdays, holidays, or trips. For a more polished look, you can add small frames or mount the garland on a decorative board.
Gather a length of twine, fairy lights, or thin wire. Use mini clothespins or clips to attach your photos or keepsakes. Secure the ends with hooks, nails, or adhesive strips, ensuring the line is taut. Arrange your photos in an order that feels balanced and visually appealing. For added stability, reinforce attachment points with small hooks or clips. Refresh the display whenever you want to update your memories.
Add small decorative elements like ribbons, washi tape accents, or handwritten notes. Incorporate themed collections—travel photos, childhood memories, or art prints. Use colored or patterned clips to add flair. You can also incorporate small LED string lights for a cozy glow at night.
Creating a photo garland is a fun, easy way to celebrate your life and style. It encourages you to personalize your home with meaningful touches. Plus, it’s a conversation starter and a constant reminder of happy moments—what’s not to love?
6. Accent Walls with Removable Wallpaper or Decals
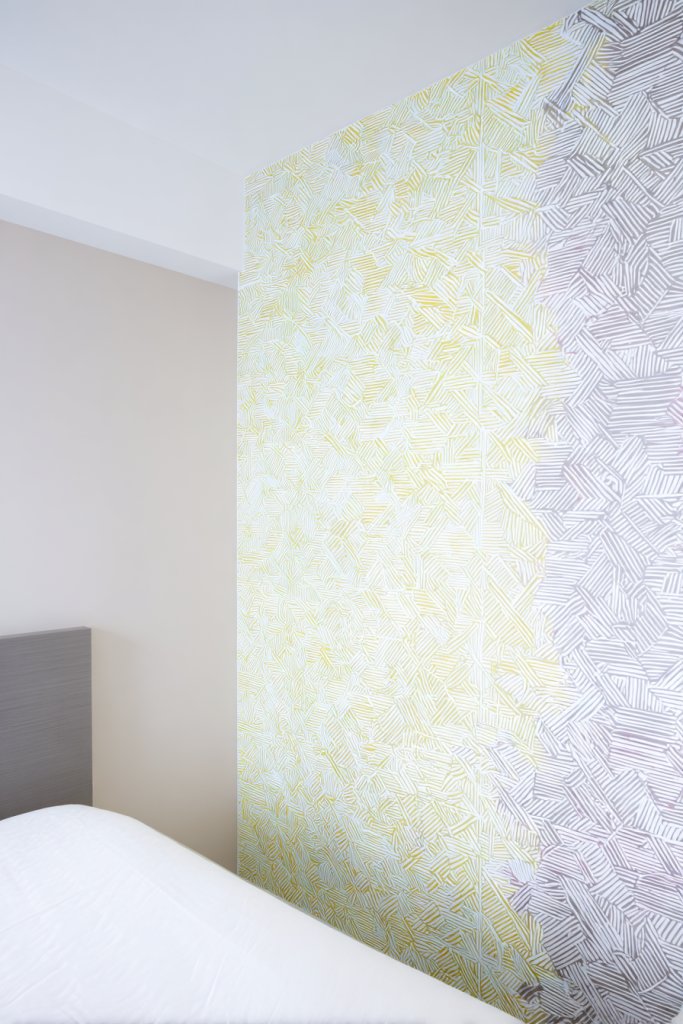
Tired of boring, paint-only walls? Want a quick transformation that’s both stylish and temporary? Removable wallpaper or decals let you create focal points without the commitment of permanent paint or wallpaper. They’re perfect for renters or anyone who loves changing styles.
Imagine a feature wall covered in bold, geometric decals or vibrant floral patterns. The design instantly draws attention, adding depth and personality. The textured or matte finish of removable wallpaper creates a rich backdrop that feels high-end yet easy to update. The designs can be playful or sophisticated, depending on your vibe.
Choose from various patterns—stripes, abstract, botanical, or murals—to suit your style. Apply decals in a corner or across an entire wall for maximum impact. Mix and match different decals for a custom look. Change the design seasonally or whenever you want a fresh feel—no mess, no fuss.
Start by measuring your wall and selecting a pattern or decal set that complements your decor. Clean the surface thoroughly before application. Follow the manufacturer’s instructions for smooth, bubble-free installation. Use a squeegee or credit card to remove air bubbles. To remove, simply peel off without damaging the wall surface.
Add personal touches by combining decals with painted accents or borders. Create custom designs using stencil or DIY painting techniques. Layer decals over textured or patterned paint for a unique layered effect. Incorporate metallic or glitter decals for a touch of glam.
Accent walls with removable decor help you experiment without regret, making styling fun and flexible. They prove that you don’t need permanence to create impact. Your space can evolve with your tastes—no stress, just creativity!
7. Customized Statement Lampshades
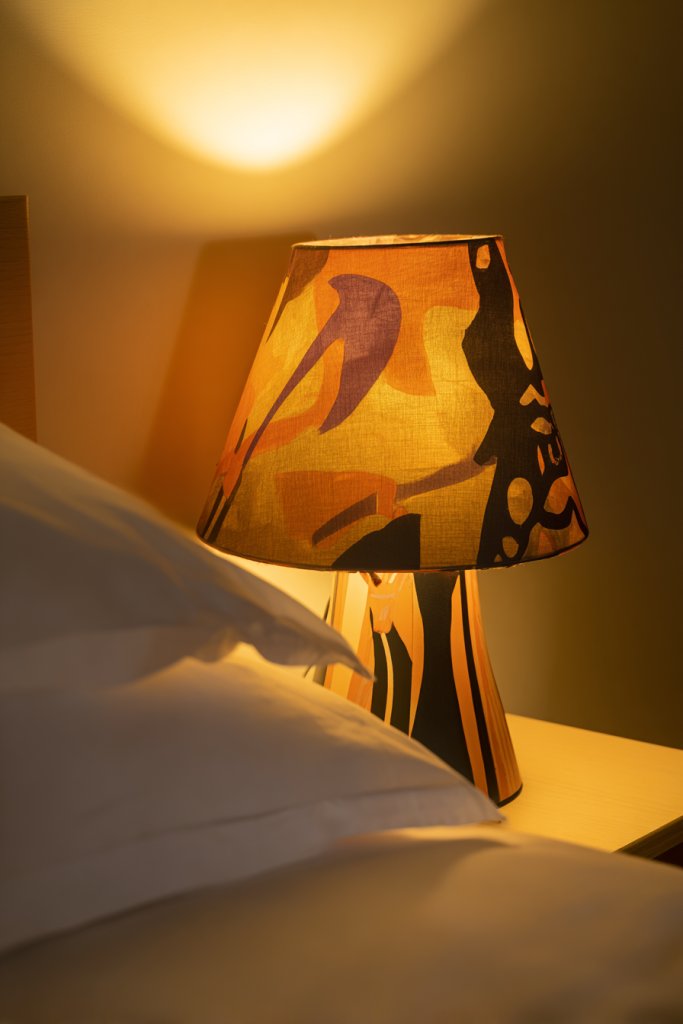
Are your lamps feeling a bit dull or generic? Want to add a personal touch to your lighting? Customizing lampshades is a simple way to create a unique focal point and elevate your room’s style. It’s an affordable DIY project that makes your space truly yours.
Imagine a plain fabric lampshade transformed into a work of art with painted designs, fabric trims, or decorative embellishments. The new shade diffuses light softly, casting warm, inviting glows. Patterns or textures on the shade add visual interest and complement your decor. The personalized touch elevates even the simplest lamps into statement pieces.
Choose fabrics that match your style—bold prints, metallic accents, or textured textiles. Embellish with fringe, beads, or embroidered details for extra flair. Change shades seasonally or for special occasions—think floral for spring, velvet for fall. Use stencils or freehand painting for a custom design that reflects your personality.
Remove the existing shade and measure its dimensions. Select a fabric or decorative material that fits those measurements. Use spray adhesive or fabric glue to attach the fabric smoothly, avoiding wrinkles. Trim excess fabric neatly at the top and bottom. For a professional look, add a decorative trim or piping. Reassemble the shade and place it back on your lamp.
Add custom details like painted patterns, fabric appliqués, or metallic accents. Mix different textures—silk, velvet, burlap—for a layered effect. Personalize with monograms or motifs that hold meaning. Keep the design simple or elaborate, depending on your decor vibe.
Custom lampshades show that small details make a big difference. They demonstrate your creativity and ability to personalize your space affordably. Brighten your room with a touch of your personality—your new lampshade is a reflection of your style!
8. Layered Throw Blankets and Cushions for Cozy Nooks
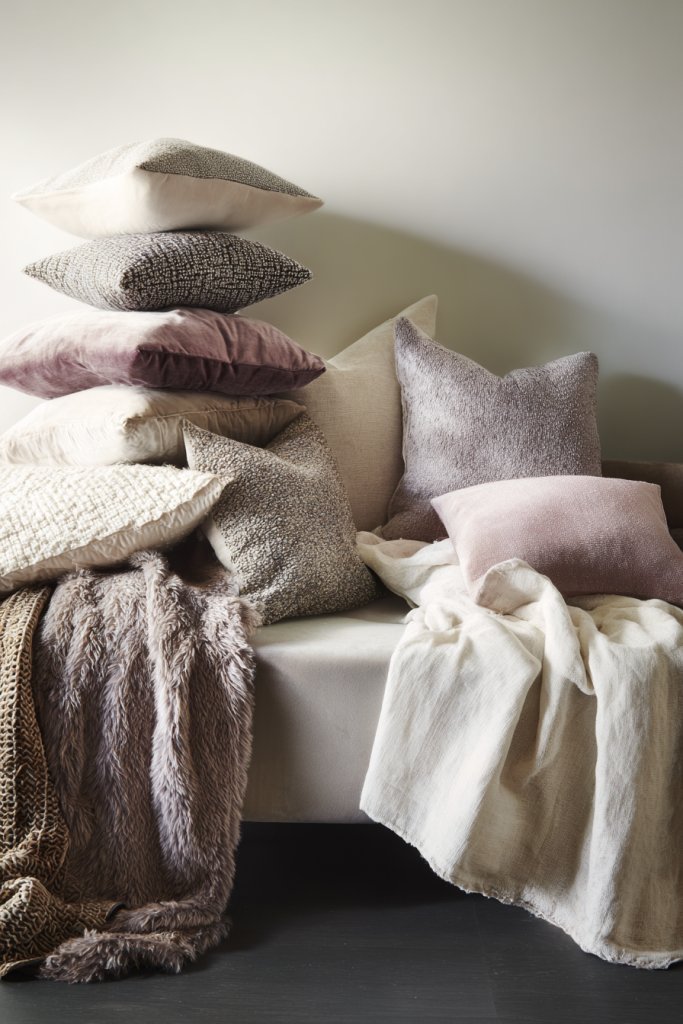
Ever wish your reading corner or bed looked more inviting? Layering throws and cushions instantly adds warmth and personality. It’s the easiest way to create a cozy nook that beckons you to unwind and relax. Plus, it makes your space more colorful and textured.
Picture a soft cream throw blanket with chunky knit texture draped over a sofa, paired with an assortment of cushions in varying fabrics and patterns. The layers create visual depth, making the space feel plush and welcoming. Mix textures like velvet, linen, and faux fur for tactile richness. The vibrant cushions pop against neutral backgrounds, adding energy and charm.
Use a neutral palette for understated elegance or mix bold colors for a lively vibe. Switch out cushions seasonally or when you update your decor. Incorporate different shapes and sizes—bolsters, square, or round—to add interest. Layer throws in different textures and lengths for a curated, hotel-like feel.
Start with a neutral or coordinating base cushion, then add patterned or textured pillows for contrast. Fold or drape throws over furniture for easy access and aesthetic appeal. Mix and match colors and fabrics to reflect your style. Keep a few extra cushions on hand for quick swaps or guest comfort. Regularly fluff and rotate cushions to maintain their shape.
Create custom covers for your cushions with fabrics that match seasonal themes or personal interests. Add decorative trims or embroidery for extra detail. Use cushions to highlight a color scheme or theme in your room. Incorporate sentimental or handmade pillows for a personal touch. Layering is all about mixing and matching to achieve a balanced, inviting look.
A well-layered nook transforms your space into a sanctuary. It shows that comfort and style go hand-in-hand. Your cozy corner can become your favorite retreat—ready for reading, relaxing, or just daydreaming!
9. Vertical Gardens with Faux or Real Plants in Stylish Containers
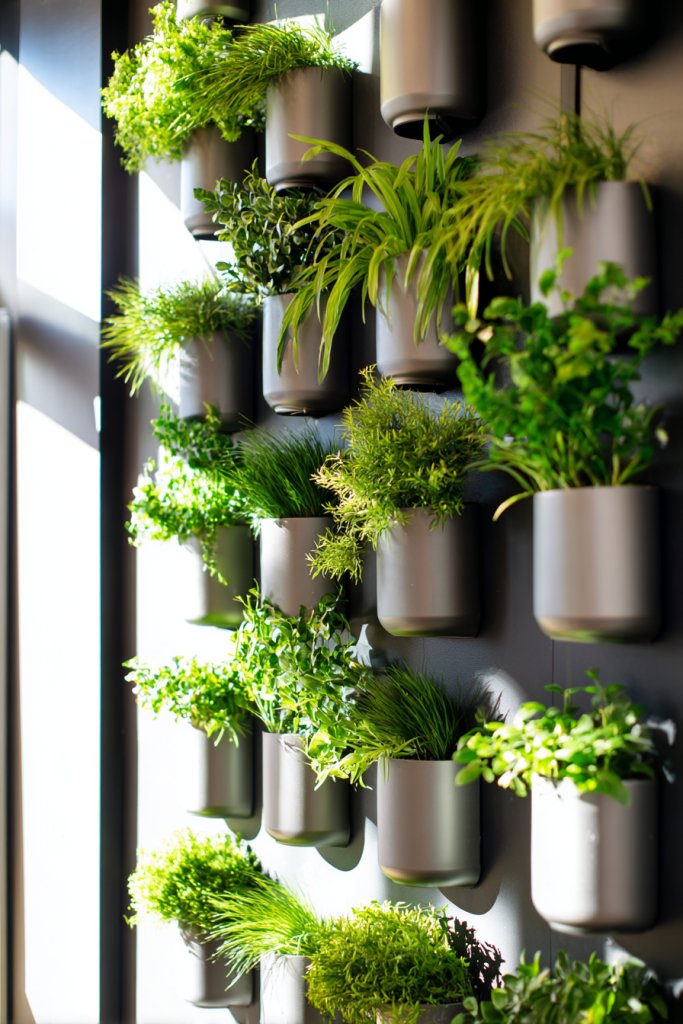
Want to bring a touch of nature indoors but lack a green thumb? Vertical gardens—whether with faux or real plants—offer a lush, vibrant look without taking up precious floor space. They add life and freshness, making your room feel more energetic and inviting.
Visualize a wall-mounted panel filled with small pots or pockets holding greenery, or a sleek metal grid with trailing vines. Faux plants with realistic textures provide the same visual impact as real ones, without maintenance. The arrangement creates a layered, textured backdrop that softens the room’s edges and adds a calming vibe. The mix of different plant types and containers creates visual interest and depth.
Choose between lush real plants for purifying air or high-quality faux options for low-maintenance appeal. Use various containers—ceramic, metal, or woven baskets—to match your decor style. Incorporate herbs, succulents, or trailing plants depending on the space and light. Change the arrangement seasonally or as your taste evolves. For small spaces, vertical planters maximize greenery without clutter.
Mount a sturdy panel or frame on your wall, then add your containers or pockets. Select containers that are lightweight and easy to clean. Fill with soil or faux filler, and plant or arrange your greenery accordingly. Ensure proper watering and lighting—real plants need sunlight, while faux plants just need occasional dusting. Regularly check for water drainage and clean to keep the display looking fresh.
Personalize your vertical garden with decorative pots, painted containers, or personalized labels. Create themed arrangements—herb garden, tropical paradise, or minimalist green wall. Mix trailing and upright plants for variety. Incorporate small decorative stones or LED lighting to highlight your greenery at night. It’s your mini oasis, so make it reflect your style.
Vertical gardens add a lively, natural element that boosts your mood and decor. They show that you don’t need a yard to enjoy greenery—just a wall and some creativity. Ready to turn your blank wall into a mini botanical paradise? Your indoor garden awaits!
10. Minimalist Wall Clocks as Functional Art
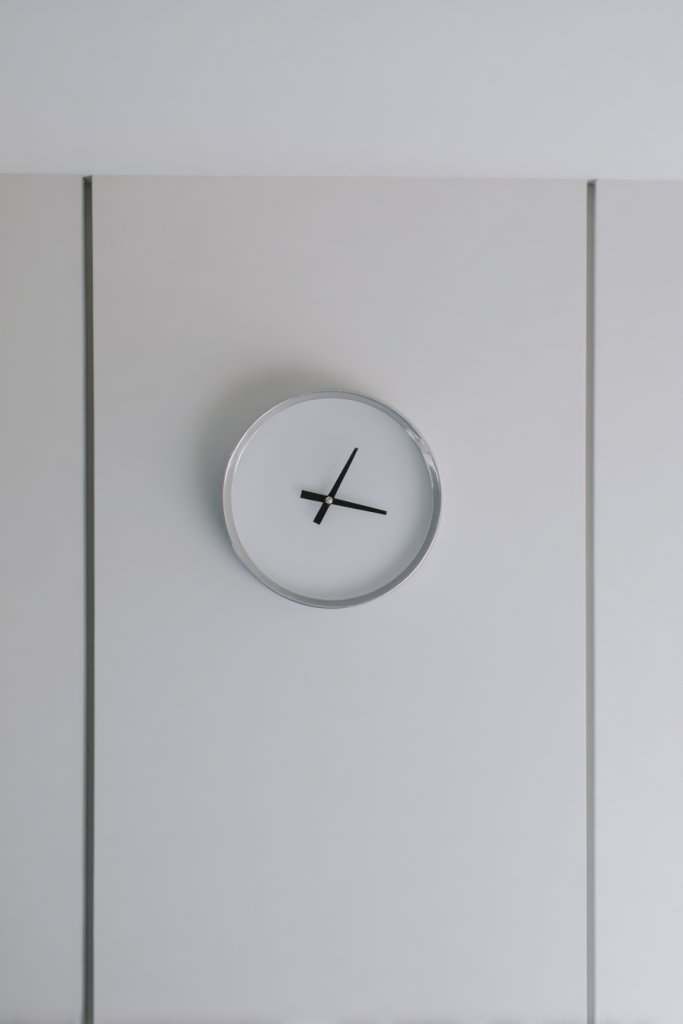
Clocks are practical, but often clutter your walls with busy designs. Want a sleek, stylish way to keep time without sacrificing decor? Minimalist wall clocks serve as both functional tools and aesthetic statements. They add a modern touch while blending seamlessly into your decor.
Picture a clean, round clock with a simple face, no numbers, and slim hands, mounted on a monochrome wall. The design emphasizes form and function, creating a subtle focal point. The absence of clutter keeps your space feeling open and airy. When the clock strikes, it’s a quiet reminder of your modern, minimalist aesthetic.
Choose clocks with different shapes—square, oval, or abstract forms—to match your style. Match clock colors with wall tones or contrasting for a statement piece. Place them in kitchens, offices, or bedrooms to add utility without visual noise. Keep the design simple for a timeless look or select bold, geometric shapes for a more artistic vibe.
Select a clock with a silent sweep mechanism for noise-free operation. Mount it at eye level, ensuring it’s centered and straight. Use a level to align the clock perfectly. Minimalist clocks often require minimal tools—just a nail or wall hook. Ensure the battery compartment is accessible for easy maintenance.
Customize your clock with personalized colors or subtle patterns, if compatible. Pair with other modern decor elements like sleek shelving or abstract art. Use it as an anchor piece on a blank wall, balancing your room’s layout. It’s a versatile, functional piece that can adapt to changing styles.
A minimalist wall clock proves that good design is about simplicity and purpose. It adds convenience while enhancing your decor’s elegance. Ready to keep time in style? Your space will feel more organized and modern in an instant.
11. Artistic Canvas Prints with Bold Colors
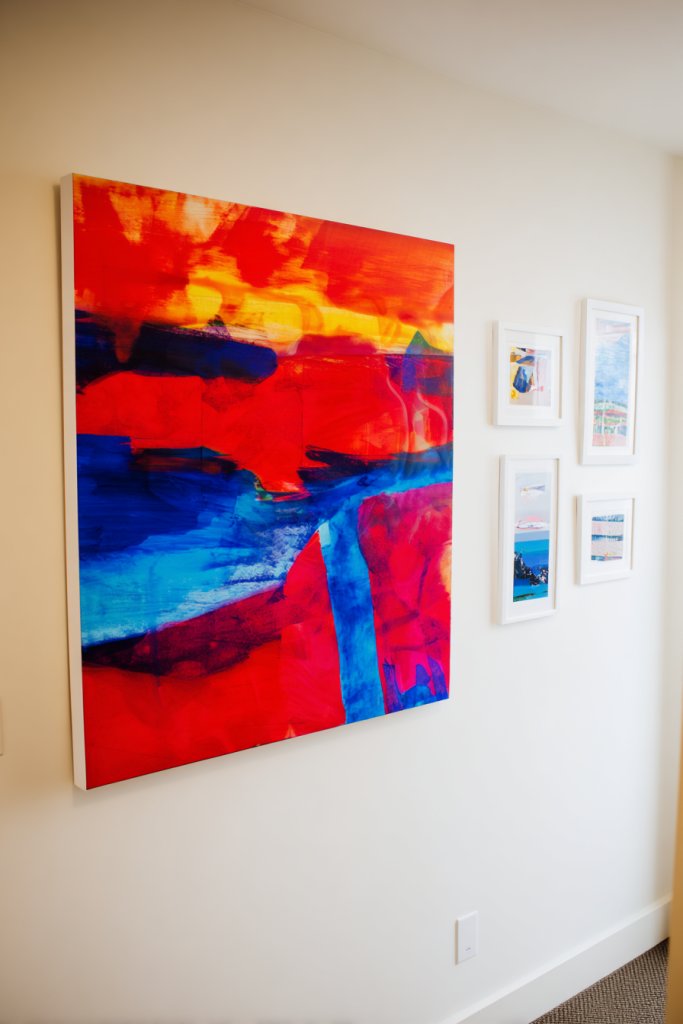
Feeling your walls lack personality or energy? Canvas prints with bold colors can instantly transform a dull space into a lively gallery. They serve as statement pieces that reflect your taste and add visual impact. The best part? You can switch them out whenever you crave a new vibe.
Imagine a large canvas with vibrant, abstract strokes or a striking photographic image in rich hues hung over your sofa. The texture of the canvas adds depth, while the colors energize the room. They create focal points that draw the eye and set the mood—be it calm, energetic, or dramatic. It’s like hanging a piece of modern art that speaks directly to your style.
Choose artwork that matches your decor theme—geometric, nature-inspired, or pop art. Mix multiple canvases in different sizes for a dynamic gallery wall, or keep it simple with one large piece. Change the prints seasonally or when updating your decor. Frame or stretch the canvas for a polished, gallery-ready look.
Select high-quality prints on durable canvas material. Use wall hooks or nails to hang the artwork securely. Center the piece at eye level for optimal viewing. Ensure the wall surface is clean and dry before installation. For added sophistication, incorporate lighting or framing accents. Rotate or swap out prints periodically to refresh your space.
Create custom prints of your favorite photos or artwork. Use bold, contrasting colors that complement your room’s palette. Add a personal touch with handwritten notes or quotes on the margins. Incorporate different textures—gloss, matte, or textured finishes—for variety. Your art collection becomes a reflection of your personality.
Bold canvas prints boost your confidence in curating your decor. They show that art doesn’t have to be expensive or complicated. Your space becomes more dynamic and inviting. Ready to turn your walls into a vibrant showcase of your style? Let your personality shine through art!
12. DIY Painted Mason Jars as Decorative Vases
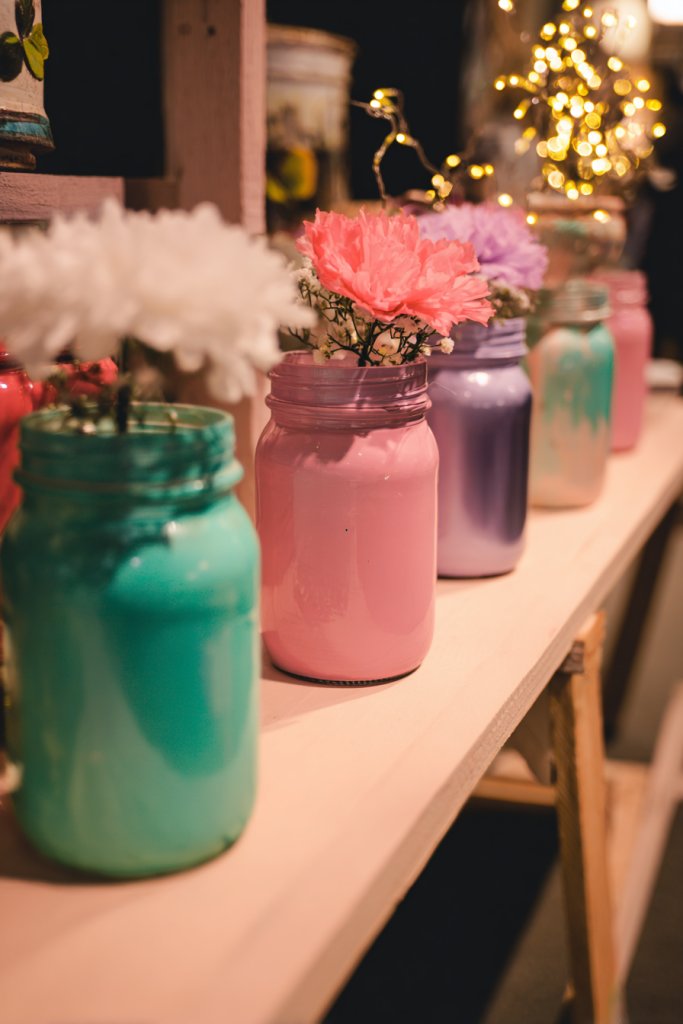
Looking for a simple project to add a touch of rustic charm? Painted mason jars are versatile decor pieces that can hold flowers, pens, or fairy lights. They’re budget-friendly and easy to customize, giving your space a personalized, handcrafted feel.
Visualize a collection of mason jars painted in pastel or metallic hues, arranged on a shelf or clustered on a table. Some are plain, others decorated with patterns or embellishments. They hold fresh blooms or LED fairy lights, casting a warm, inviting glow. The painted surface adds color and texture, making ordinary jars into eye-catching decor.
Experiment with different painting techniques—ombre, stenciling, or freehand designs. Use metallic or chalk paint for varied finishes. Change the colors to match seasons or themes—soft pastels for spring, bold hues for summer. Incorporate embellishments like ribbons, twine, or stickers for extra flair. Use them as centerpieces, storage containers, or accent pieces.
Clean and dry the jars thoroughly. Apply painter’s tape to create patterns if desired. Use spray paint or brush-on paints for even coverage. Let them dry completely before removing tape and adding contents. Fill with fresh or faux flowers, or repurpose as pencil holders or candle holders. Seal with a clear topcoat for durability if needed.
Add monograms, quotes, or custom designs with stencils or freehand painting. Incorporate decorative elements like beads or charms glued onto the surface. Personalize with initials or special symbols. Mix painted jars with unpainted or differently styled ones for visual interest. They’re perfect for gifting or creating a cohesive decorative theme.
DIY painted mason jars highlight your creative side and make every space feel more personal. They’re a fun, inexpensive way to refresh your decor regularly. Plus, they’re a talking point and a reminder that simple projects can have a big impact. Ready to craft your own charming jars?
13. Creative Use of Mirrors to Expand Space and Light
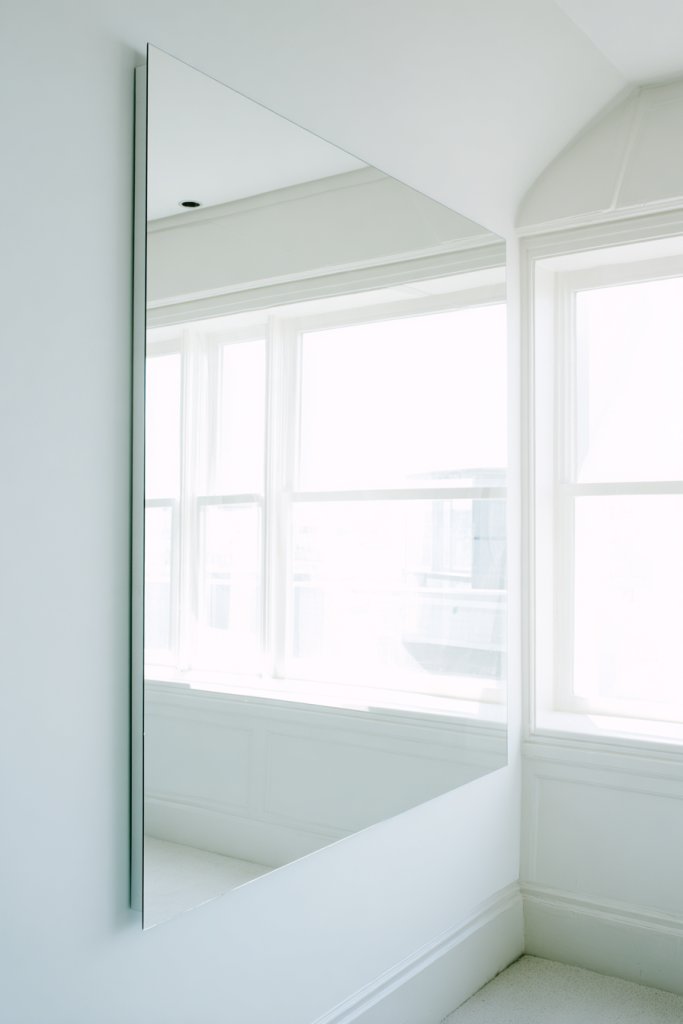
Want to make your room feel larger and brighter without knocking down walls? Mirrors are your best friends, reflecting light and creating the illusion of space. The trick is using them creatively to amplify your decor and mood.
Imagine a large, ornate mirror hung strategically opposite a window, bouncing sunlight across the room. Or a cluster of smaller mirrors with decorative frames forming a modern mosaic. The reflective surfaces add depth, making the space appear bigger and more open. The play of light and reflection energizes your environment, making it feel fresh and airy.
Use different shapes—round, oval, geometric—for visual interest. Position mirrors to reflect beautiful architectural features or other decor elements, avoiding restricted content like artwork or plants. Mix frameless and framed styles for eclectic charm. Incorporate lighting behind or beside mirrors to enhance their brightness. Adjust placement to suit your room’s layout and maximize the effect.
Choose a sturdy wall and measure carefully before hanging. Use appropriate wall anchors and level tools for perfect alignment. Position larger mirrors in focal points, such as above a console or opposite a window. For smaller mirrors, create a gallery wall for a dynamic look. Clean mirrors regularly to maintain clarity and reflectivity. Play with angles to optimize light reflection.
Frame mirrors with decorative trims, LED strips, or paint for a custom look. Mix mirror styles and sizes for a curated, layered effect. Use them to highlight architectural details or create visual balance in the room. Incorporate lighting accents to make the mirrors glow at night. Your mirror arrangement becomes a statement of style and function.
Mirrors are a simple yet powerful decor element that can redefine your space. They show that clever placement can dramatically influence your room’s feel. Ready to reflect your style and brighten your home? It’s easier than you think!
14. Layered Wall-mounted Storage with Baskets and Hooks
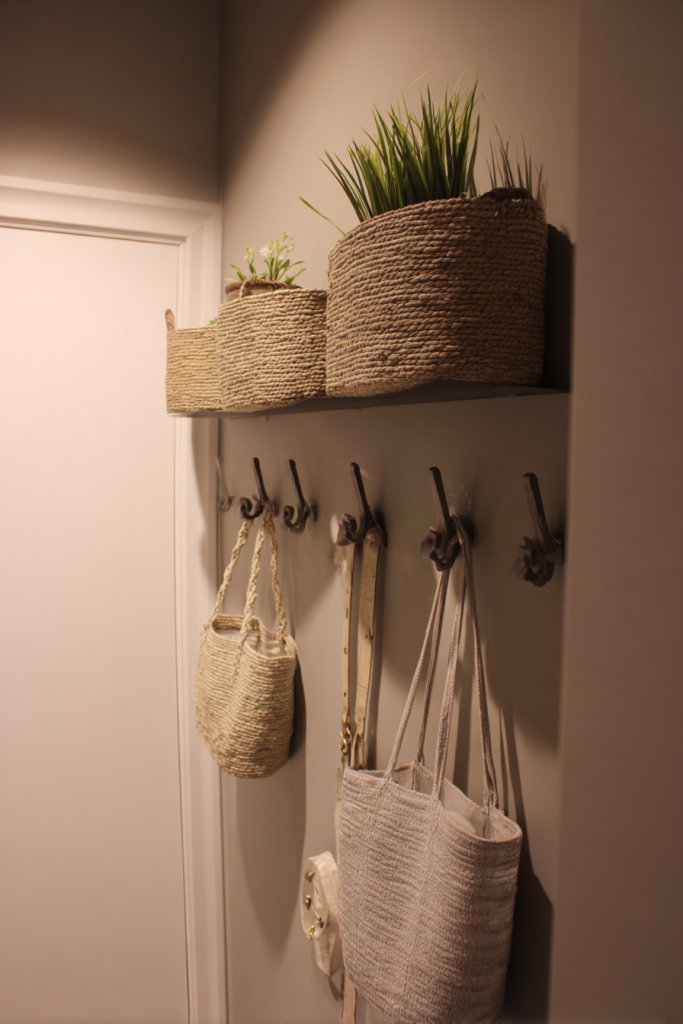
Struggling with clutter but want a stylish solution? Layered wall-mounted storage combines function and design, helping you organize without sacrificing aesthetics. Baskets, hooks, and shelves can turn chaos into curated charm with minimal effort.
Visualize a wall featuring open shelves holding decorative baskets filled with essentials, with hooks underneath for keys, hats, or jewelry. The varied textures and materials—woven baskets, metal hooks, wooden shelves—add visual richness. The arrangement creates a functional art display that keeps your space tidy and inviting. It’s like a gallery of everyday life.
Mix open shelves with closed baskets for a balanced look. Use different shapes and sizes to fit your space and needs—small baskets for jewelry, larger ones for blankets. Incorporate decorative elements like fabric liners or labels. Adapt the color palette to match your decor—neutral tones, metallic accents, or bold hues. Seasonal changes can be achieved by swapping out baskets or reconfiguring the layout.
Install sturdy wall anchors and brackets for shelves, ensuring they can handle weight. Arrange baskets on shelves or hang them from hooks, placing frequently used items lower for easy access. Use decorative hooks to hang coats, bags, or tools. Keep the layout balanced and avoid overcrowding. Regularly clean and reorganize to maintain a fresh, functional look.
Label baskets with handwritten tags or decorative labels for quick identification. Incorporate colorful or patterned baskets for a playful touch. Add small decorative objects on shelves to complement the baskets. Use hooks to hang personalized keychains or jewelry holders. This layered storage system becomes an organized art piece reflecting your personality.
Layered wall storage proves that organization can be stylish and personalized. It demonstrates that smart use of space enhances both function and decor. Your home becomes more livable and visually appealing—ready to organize and impress!
15. Hanging String Lights for Soft Ambiance
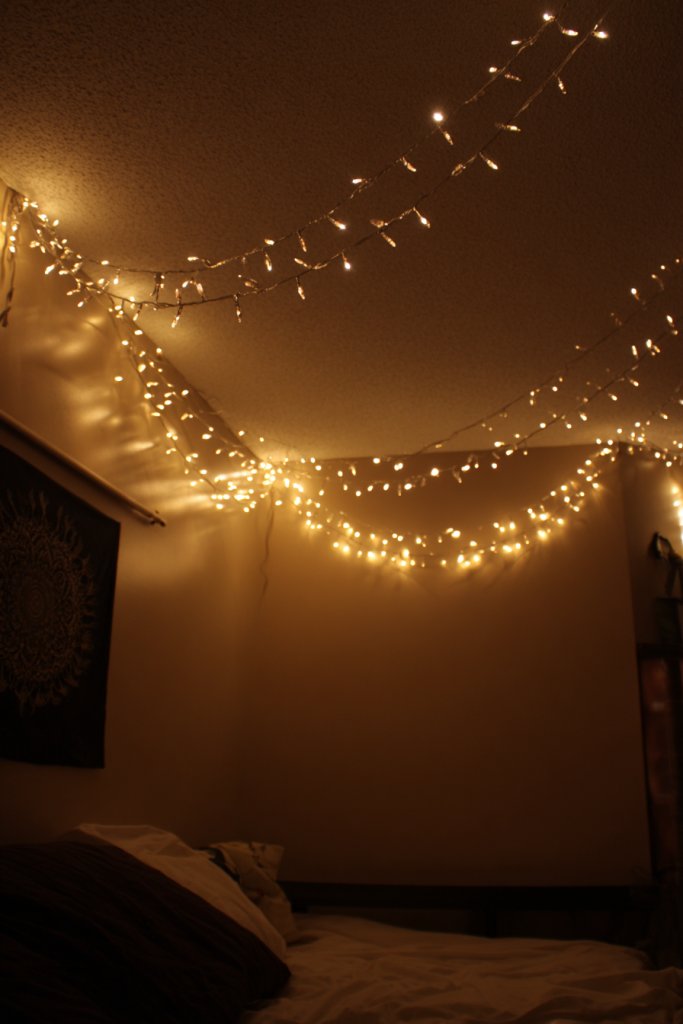
Want to create a warm, inviting atmosphere in your space without expensive lighting? String lights are affordable and versatile, instantly adding a dreamy, cozy glow. They’re perfect for bedrooms, living rooms, or outdoor patios, transforming the mood with minimal effort.
Imagine warm, soft lights draped across a ceiling or along a wall, casting gentle shadows and a relaxing ambiance. The small bulbs or fairy lights add a whimsical touch, making your space feel magical. When dimmed, they create a calming environment perfect for unwinding or entertaining. The subtle glow makes every corner inviting and intimate.
Arrange lights in a straight line, zigzag, or in shapes like stars or hearts for personalized decor. Use clips or hooks to attach them securely, avoiding restricted content. Mix different bulb sizes and colors for a playful or elegant look. For outdoor settings, weatherproof options ensure durability. Seasonal decor updates can include colored bulbs or decorative covers.
Determine the best placement—above beds, along headboards, or across ceilings. Use hooks, adhesive strips, or clips to hang the lights, ensuring they are evenly spaced. Plug into nearby outlets and hide cords for a clean look. For a more sophisticated setup, incorporate dimmer switches or remote controls. Replace bulbs as needed to maintain consistent warmth and brightness.
Add decorative elements like paper lanterns, tassels, or themed covers. Incorporate battery-operated options for flexibility in placement. Combine with other soft textures—velvet curtains or plush cushions—to amplify the cozy effect. Use colored or vintage-style bulbs for a retro or festive vibe.
String lights show that simple touches can dramatically change your home’s atmosphere. They inspire creativity in decorating and mood-setting. Ready to add a layer of warmth and magic? Your space will feel instantly more inviting!
16. DIY Art Frames Using Washi Tape or Tape Art
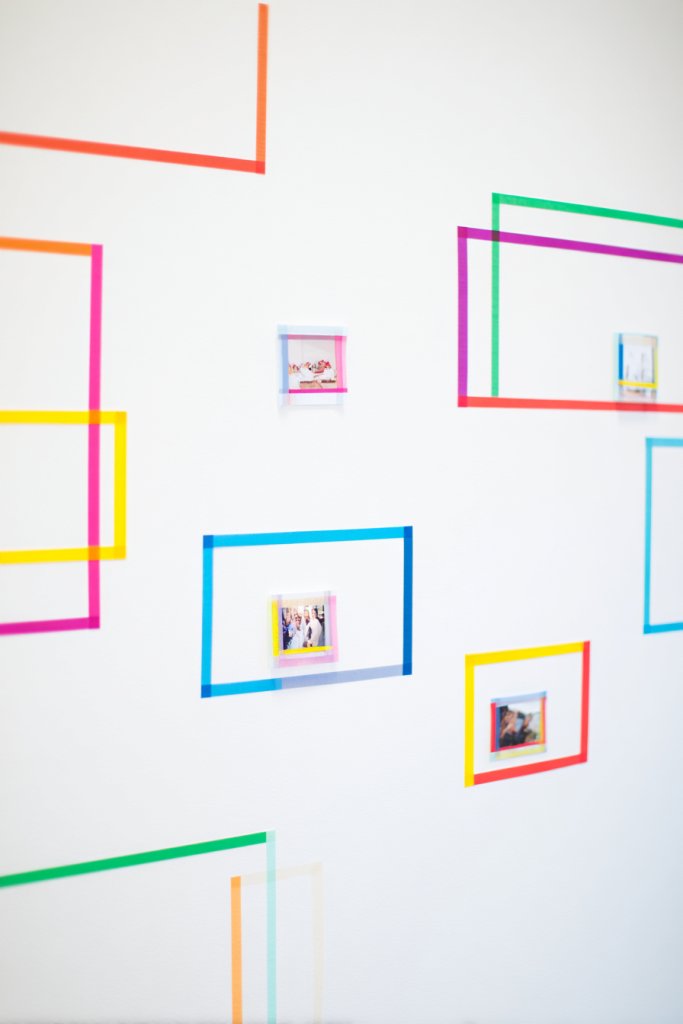
Want a quick, cost-effective way to display art or photos without committing to permanent frames? Washi tape or decorative tape can turn plain walls into a customizable gallery. It’s fun, versatile, and perfect for renters or anyone wanting frequent updates.
Imagine colorful or patterned tape creating borders around photos, quotes, or fabric swatches directly on your wall. The tape’s clean lines and vibrant colors add a playful or sophisticated touch, depending on your choice. It creates a soft, textured frame that can be easily changed or removed. The effect is like a DIY gallery that’s constantly evolving.
Use different tape widths and patterns to create layered frames or geometric shapes. Mix tapes for a more eclectic look, or keep it monochrome for a sleek, modern feel. Change the layout seasonally or as your style evolves—no tools required. Frame small sections of fabric or wallpaper for a textured effect.
Select high-quality washi tape or decorative tapes compatible with your wall surface. Measure and mark lightly with a pencil where you want your frames. Apply the tape carefully, keeping straight lines and avoiding bubbles. Overlap or layer tapes for more complex designs. For removal, gently peel the tape to avoid wall damage.
Add small embellishments like washi tape bows or glitter accents. Use the tape to highlight sections of a larger art piece or create borders around a mirror. Incorporate your favorite colors or patterns to match your decor. Change the tape or layout to keep the display fresh.
Tape art proves that art can be playful and adaptable. It encourages experimentation and quick updates without damage or expense. Your walls become a canvas for your personality—ready to showcase your creative spirit?
17. Vintage Suitcases as Stylish Side Tables or Storage
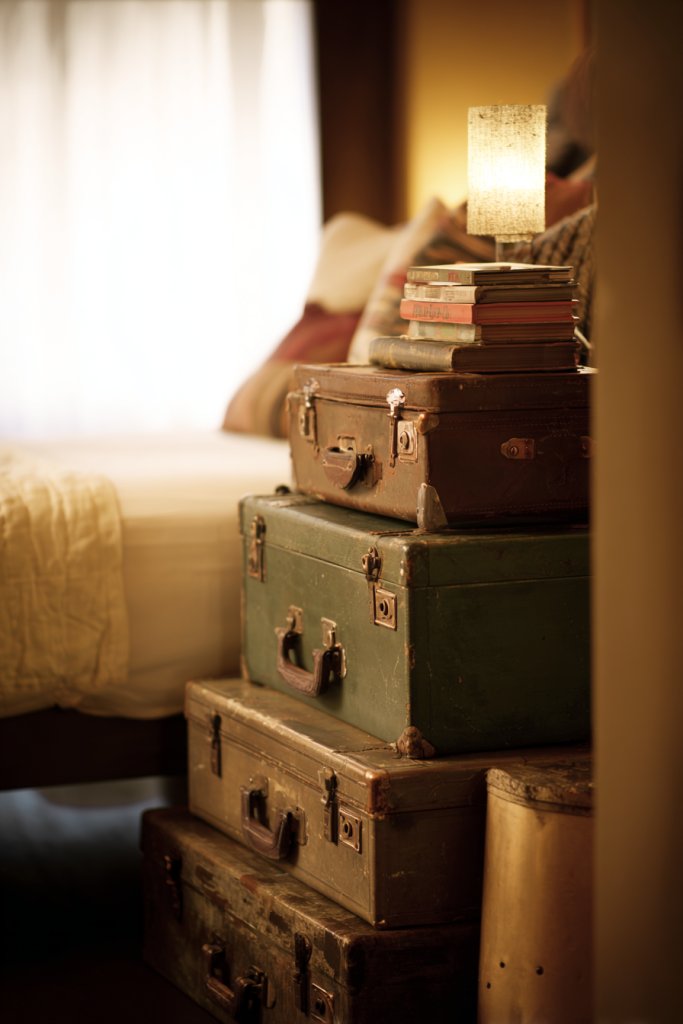
Looking for a unique, vintage-inspired piece that adds charm and function? Stacking vintage suitcases creates a stylish side table or storage unit with character. They’re perfect for adding nostalgic appeal while hiding clutter or holding essentials.
Picture a stack of weathered suitcases topped with a tray or decorative item, placed beside a sofa or bed. The worn leather or fabric exteriors add texture and history, giving your space a curated, eclectic vibe. The varied sizes and styles create visual interest and serve as conversation starters. It’s like bringing a piece of travel history into your home.
Use suitcases in different finishes—antique leather, floral fabrics, or painted surfaces—to match your decor. Secure the stack with brackets or a non-slip pad for safety. Open the top suitcase for quick access to stored items or leave it closed for a clean look. Incorporate decorative trays or cushions for additional style and comfort.
Source vintage suitcases from thrift stores, flea markets, or online. Clean and restore surfaces as needed, applying conditioners or paint for a fresh look. Stack them securely, balancing weight and style. Use the top as a side table or additional storage space. For stability, attach the stack to the wall or floor if needed. Decorate with small accessories or textiles.
Add personal touches like painted patterns, decals, or fabric liners inside the suitcases. Use them to display favorite books, magazines, or keepsakes. Incorporate decorative pillows or throws to turn the top into a cozy seat or footrest. Mix with modern furniture for an eclectic, boho look.
Vintage suitcases are a nostalgic, stylish solution that shows your love for history and design. They demonstrate how repurposing can create functional, beautiful decor. Ready to add character and storage with a touch of adventure? Your space will tell a story.
18. Bold Accent Pillows in Mix-and-Match Fabrics
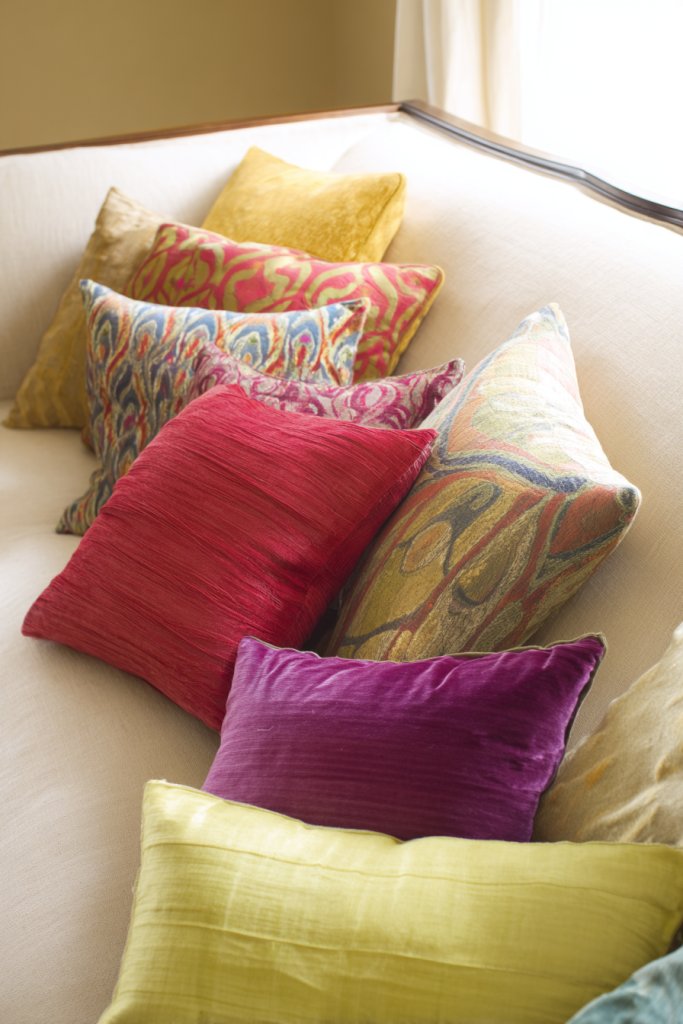
Want to liven up your sofa or bed without overhauling your entire decor? Bold accent pillows are a simple, impactful way to add color, pattern, and personality. They’re easy to swap out and can instantly refresh your space.
Imagine a collection of pillows in different sizes, shapes, and fabrics—velvet, linen, embroidered—arranged on a neutral-colored sofa. The vibrant patterns and textures create visual depth and invite touch. They act as accents that pull your color scheme together, making the space feel curated and cozy. The playful mix adds energy and personality.
Mix patterns—florals, geometrics, stripes—with solids for a balanced look. Use different shapes like squares, rounds, or bolsters for variety. Swap pillow covers seasonally or when your decor updates. Incorporate metallic or embroidered accents for a luxe touch. Coordinate colors with other decor elements for harmony.
Choose pillow covers in fabrics and patterns that fit your style. Add inserts for plumpness and comfort. Layer pillows on sofas, beds, or window seats, mixing sizes for visual interest. Regularly fluff and rotate to maintain their shape. For a cohesive look, select a palette and stick to it but don’t be afraid to experiment.
Create DIY covers with fabric scraps, embroidery, or painted designs. Personalize with monograms or quotes for a special touch. Use decorative trims or piping for a finished look. Incorporate sentimental fabrics or heirlooms for added meaning. These pillows become a reflection of your style and memories.
Bold pillows demonstrate that small decor elements can make a big impact. They show your willingness to experiment and express personality. Your space becomes more inviting and dynamic—ready to impress and relax!
19. Artistic Wall Hooks Made from Reclaimed Materials
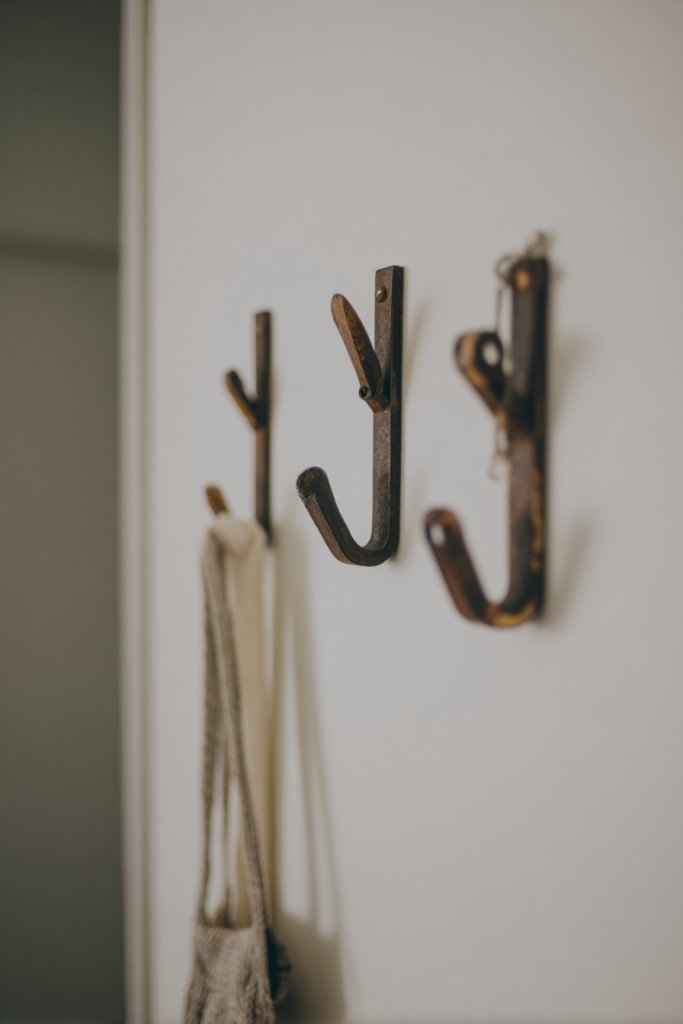
Tired of boring hooks that blend into the background? Want functional decor with an eco-friendly twist? Artistic wall hooks crafted from reclaimed materials add industrial charm and practicality. They’re perfect for hanging coats, bags, or accessories while making a style statement.
Picture hooks made from reclaimed wood planks, metal pipes, or vintage tools mounted on the wall. The raw textures and imperfect finishes add character and a sense of history. They serve as both functional hangers and art pieces, creating a layered, textured wall display. The mix of materials adds an eclectic, industrial vibe that elevates your decor.
Use different reclaimed materials—wood, metal, pipes—for variety. Install hooks at varying heights for visual interest and practicality. Combine with other industrial accessories like wire baskets or pendant lights. Keep the hardware exposed to showcase craftsmanship. Adapt the style to match your decor—rustic, modern, or vintage.
Source reclaimed or scrap materials from salvage yards or hardware stores. Cut, sand, and finish surfaces as needed. Attach hooks securely using screws or brackets. Mount on your wall with anchors or wall plugs, ensuring stability. Arrange in a pattern—linear, clustered, or asymmetrical—to suit your space. Regularly check for loose fittings and clean surfaces.
Add painted or stamped designs to reclaimed wood pieces for a personal touch. Incorporate initials, quotes, or motifs to make them unique. Combine with decorative accessories like vintage signs or art prints. Use different finishes—distressed, polished, or painted—to match your style. They’re a conversation starter and a sustainable decor choice.
Reclaimed material hooks demonstrate that eco-friendly choices can be stylish and functional. They show creativity and respect for sustainability. Your home reflects your values and aesthetic—ready to hang up your style with these unique pieces?
20. DIY String Art on Wooden Boards
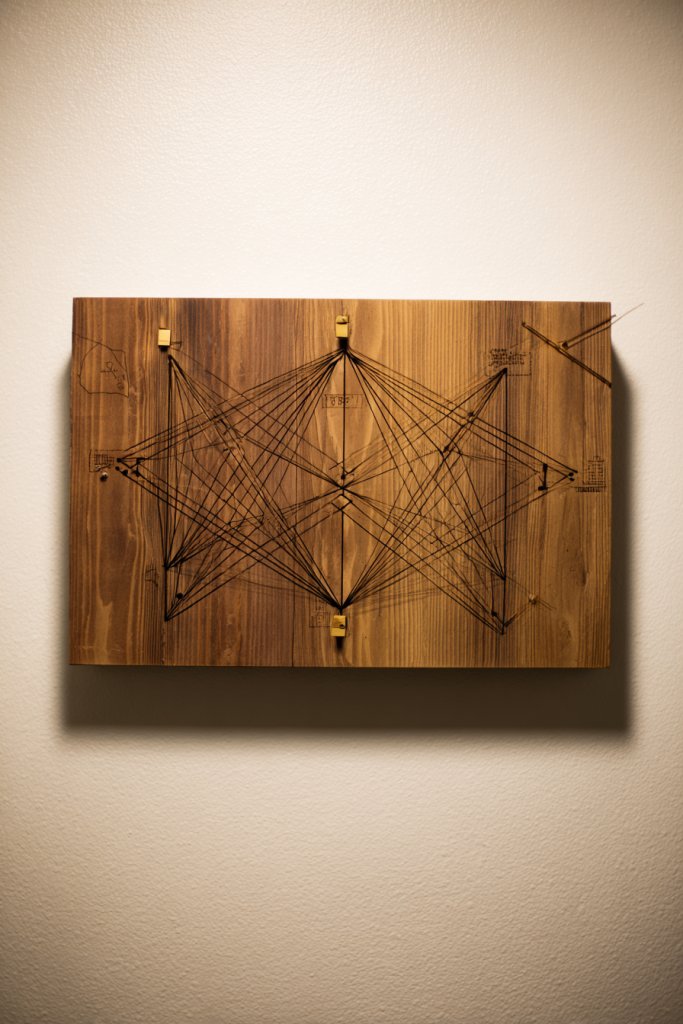
Looking for a personalized, handmade decor piece that’s eye-catching and meaningful? String art on wooden boards is a fun project that results in wall art with a geometric or inspirational design. It’s a creative way to add a focal point and showcase your artistic side.
Imagine a wooden plaque with nails outlining a heart, initial, or abstract shape, filled in with colorful thread or string. The textured lines and geometric shapes create a modern, tactile artwork. The contrast between wood grain and vibrant string adds depth and personality. It’s a custom piece that sparks conversation and admiration.
Choose different shapes—quotes, initials, symbols—to reflect your personality. Use metallic, neon, or pastel threads for various moods. Incorporate layered or intersecting designs for complexity. Hang individually or create a series for a gallery wall. Adapt the size and complexity based on your skill and available space.
Start with a sturdy wooden board, marking your design lightly with a pencil. Hammer nails along the outline at equal intervals. Tie the string to a nail and weave it around the nails following your pattern. Use different colors or thicknesses for added visual interest. Finish by securing loose ends. Mount on your wall with appropriate hardware.
Add embellishments like beads, charms, or paint accents for extra detail. Incorporate your favorite colors or themes to make it personal. Combine with other art forms—photos or quotes—to create a meaningful display. Change the string or pattern seasonally to keep it fresh.
String art proves that DIY can be both beautiful and meaningful. It encourages creativity and patience, resulting in a one-of-a-kind piece. Your home’s decor becomes a reflection of your efforts and personality—ready to inspire!
21. Color-blocked Wall Paint for Modern Minimalism
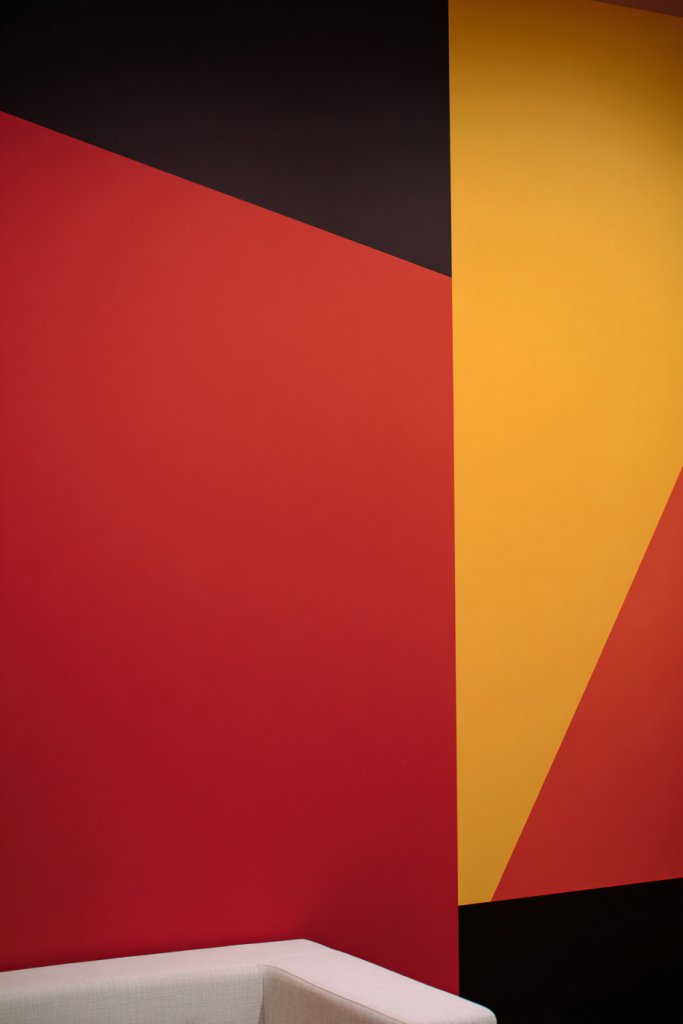
Want to add a bold, contemporary touch to your walls without clutter or busy patterns? Color-blocking is a sleek, modern technique that creates striking visual interest. It’s an easy way to define spaces and add personality with just paint.
Picture a wall divided into large geometric sections in contrasting shades—black and white, or pastel pink and mint green. The sharp lines and vibrant colors create a graphic statement, instantly modernizing the room. The clean separation adds structure and rhythm to the space, making it feel fresh and organized. It’s like artwork created directly on your wall.
Experiment with different shapes—rectangles, triangles, or irregular forms—for a unique look. Use painter’s tape for crisp lines and precise edges. Combine matte and gloss finishes for added texture. Change colors seasonally or with decor updates—flexible and fun. Keep the palette simple for minimalist appeal or go bold for maximum impact.
Start by sketching your design and taping off sections carefully. Use high-quality paint and brushes or rollers for smooth application. Apply in thin, even coats, and remove tape immediately after painting to preserve sharp edges. Allow drying time between coats. Incorporate accent walls or paint entire rooms for a dramatic effect. Use painter’s tape to create clean, straight lines.
Add metallic or textured paint to certain sections for a luxe feel. Incorporate your favorite colors or themes to reflect your personality. Combine with minimalist furniture and decor for a cohesive look. Use the color-blocked wall as a backdrop for art, shelving, or lighting accents.
Color blocking is a bold, stylish choice that proves paint can be art. It encourages creative expression and can be easily updated. Your walls become a statement of modern elegance—ready to impress and inspire!
22. Framed Fabric or Textile Art for Texture and Pattern
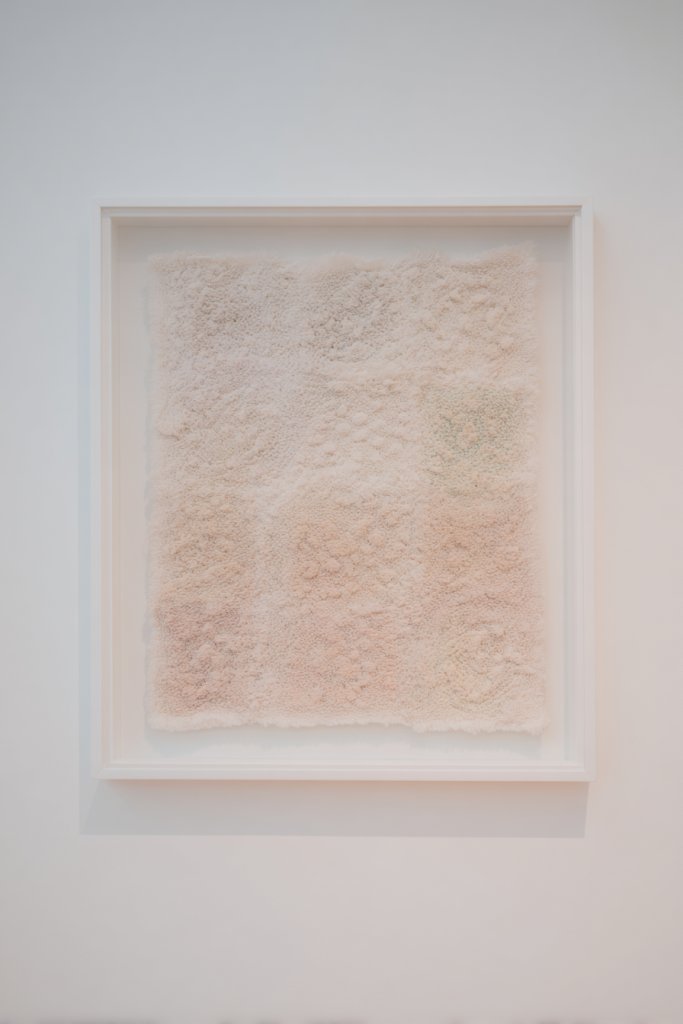
Looking to add softness and visual interest to your walls? Framed fabric or textile art offers a tactile, cozy alternative to traditional art pieces. It’s a simple way to introduce pattern and texture that enhances your decor’s warmth and personality.
Imagine a framed piece of patterned batik, embroidered textile, or woven fabric hung above a sofa or bed. The rich textures and intricate designs add depth, inviting touch and admiration. The frame elevates the textile, giving it a polished, gallery-like appearance. The combination of fabric and frame creates a layered, tactile art piece that complements various styles.
Use different textiles—lace, silk, linen, or wool—to match your decor theme. Mix patterns and colors for an eclectic look, or keep it monochrome for understated elegance. Change textiles seasonally or for special occasions. Frame larger pieces for focal points or smaller swatches as part of a gallery wall. Consider adding decorative trims or embellishments for extra flair.
Select a sturdy frame that suits your textile’s size and style. Mount the fabric using sewing, adhesive spray, or tension within the frame. Keep the fabric taut and smooth, avoiding wrinkles. Hang the framed textile securely on your wall, using appropriate hooks or wires. Clean the glass or surface periodically to maintain clarity and display quality. Rotate or swap textiles for variety.
Create custom textiles using DIY embroidery, dyeing, or fabric painting. Incorporate personal motifs, initials, or meaningful patterns. Use layered or textured fabrics for a more dynamic look. Add decorative trims or borders for a finished, tailored appearance. Your textile art becomes a personal expression and a conversation piece.
Framed fabric art demonstrates that decor can be tactile and artistic without expensive art purchases. It fosters creativity and personalization, making your space uniquely yours. Your walls will tell stories woven with texture and pattern—ready to inspire!
23. Creative Use of Floating Candle Holders or Lanterns
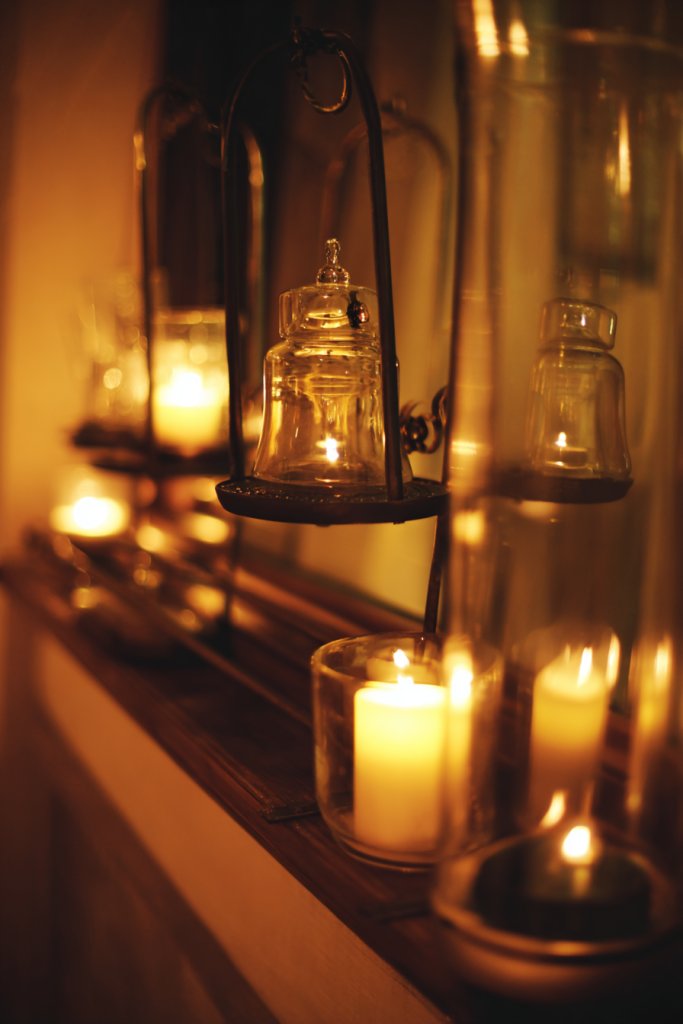
Want to create a cozy, romantic ambiance without overwhelming lighting? Floating candle holders and lanterns add warmth and elegance to any space. They’re perfect for intimate dinners, relaxing baths, or just setting a calming mood in your home.
Imagine a cluster of lanterns with flickering candles on a coffee table or hanging from ceiling hooks. The soft glow reflects off nearby surfaces, creating a warm, inviting atmosphere. Lanterns with intricate cutouts cast patterned shadows that dance across the walls. The gentle flicker of candles instantly relaxes and elevates your environment, transforming your space into a sanctuary.
Use different styles—metal, glass, or paper lanterns—to match your decor. Incorporate scented candles for additional sensory pleasure. Hang lanterns at varying heights or group several for visual impact. Combine with fairy lights or LED candles for safety and convenience. Change candle colors or scents seasonally to refresh the mood.
Select durable lanterns or floating holders suited for your space. Place candles securely inside, ensuring proper ventilation and safety. Hang or position on surfaces, making sure they are stable and away from flammable materials. Use timers or remote controls to automate lighting effects. Regularly check and replace candles as needed for safety and ambiance.
Decorate lanterns with ribbons, paint, or decals to match your theme. Incorporate decorative stones, shells, or faux flowers inside lanterns for added flair. Use colored or scented candles for mood-setting. Group different styles for an eclectic look or coordinate for a minimalist aesthetic.
Candle lanterns are a simple way to add elegance and tranquility, proving that small details can create big atmospheres. They inspire you to experiment with lighting and decor, transforming ordinary nights into special moments. Ready to glow your home with warmth and style?
24. DIY Painted Door or Window Frames for a Pop of Color
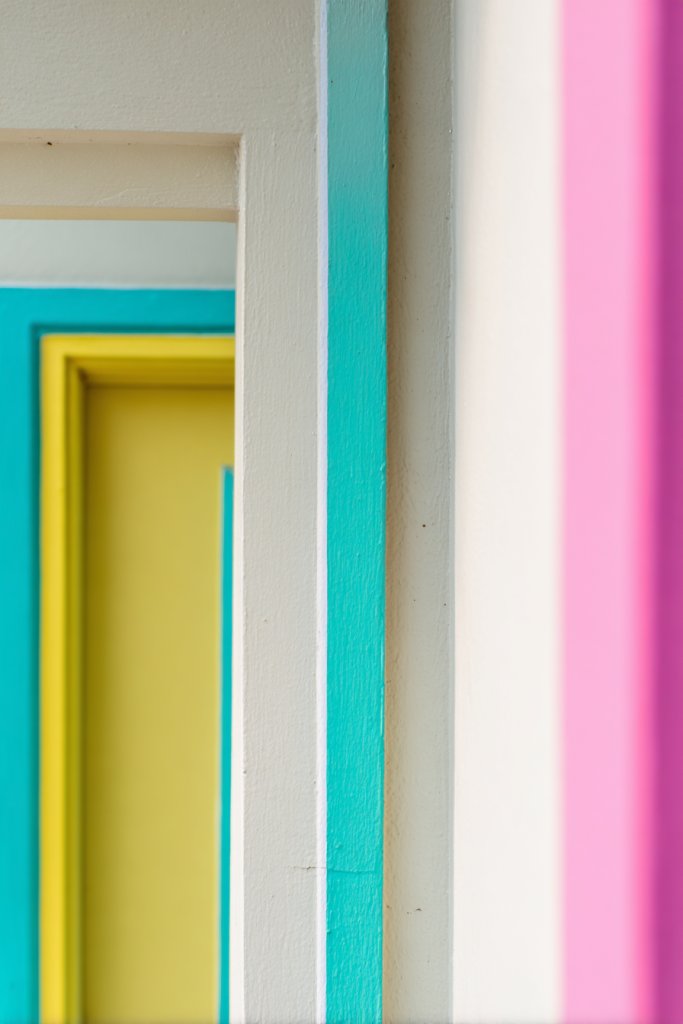
Looking to add a splash of personality to your entryway or windows? Painting your door or window frames in bright or pastel shades instantly refreshes your space. It’s a simple project that makes your home feel vibrant, cheerful, and welcoming.
Imagine a white facade with a bold turquoise door frame or pastel pink window trim. The contrasting colors highlight architectural details and create a focal point. The painted edges catch the eye and add a playful or sophisticated touch, depending on your color choice. This small update can dramatically change your home’s curb appeal or indoor charm.
Choose colors that complement or contrast with your exterior or interior palette. Use matte, gloss, or satin finishes for different effects. For a more eclectic look, alternate colors on different doors or windows. Seasonal color swaps allow you to keep your decor fresh and engaging. Consider stenciling or patterns for extra personalization.
Clean and sand the frames thoroughly before painting. Use painter’s tape to create clean lines and protect adjacent surfaces. Apply multiple thin coats for an even finish, allowing proper drying time. Remove tape carefully to avoid smudges. For durability, add a protective clear coat if needed. Repaint or touch-up as the paint wears.
Add decorative decals, stencils, or motifs for a customized look. Incorporate metallic or glitter accents for a touch of glam. Use contrasting colors or patterns to create visual interest. Coordinate with other exterior or interior accents—shutters, furniture, or trim—to unify your style.
Colorful frames show that simple DIY updates can make a big impact. They demonstrate your creativity and willingness to personalize your home. Your space becomes more lively and inviting—ready to impress visitors and make you smile every day. Go ahead, paint your way to a brighter home!
Conclusion
With such a wide array of Pinterest room decor ideas, there’s no limit to the creativity you can bring into your home. Whether you try a bold accent wall, incorporate vintage finds, or add lush greenery, each idea has the potential to make a big impact. Don’t hesitate to experiment and personalize these concepts—your dream room is within reach. Start today and turn your living space into a beautiful reflection of your unique style!